

Kitchen Remodel: Episode 34 Where there was once a window, there is now a door! No I am trimming it, inside and out with the craftsman style that’s slowly spreading around the house.
Read MoreRipping Out a Window and Installing a Door
Kitchen Remodel: Episode 33 I’m tearing out an inefficient garden window in the kitchen and installing a new door in its place. We’ll have that secret coffee patio yet!
Read MorePatio Door Repair: The Threshold
A chain of failure lead from an anticipated quick fix to a complete replacement of the threshold for our patio French doors. Here’s how I fixed an old Jeld-Wen unit.
Read MoreMoving through another door
Despite the kids going back to school, some crazy weeks at work, the still oppressive summer heat, I managed to regain forward momentum on the interior door replacement project. It's getting to be routine now: purchase, plane to size, paint, rout hinge mortises, hang the door, drill and chisel for the door hardware and install the handle / latch assembly. Not a pro, but I'm getting better at it. (Here's where I started)
This time it was Jack's bedroom that got completed. His door had sat, half-painted for four months or so, while I tackled other pressing projects (see the index, April through July). I do get off-track.
I pulled his (young) man-cave door, complete with HAZ-MAT warning and an electrician's lockout tag-out tag out off it's hinges.

I've also started monkeying with the new DSLR camera and tripod, so "action shots" of yours truly are possible. Although, seeing my mug isn't much of an improvement, I can finally show some better photos than the ol' camera phone, and share some updates to my methods.


This time it was Jack's bedroom that got completed. His door had sat, half-painted for four months or so, while I tackled other pressing projects (see the index, April through July). I do get off-track.
I pulled his (young) man-cave door, complete with HAZ-MAT warning and an electrician's lockout tag-out tag out off it's hinges.
I've also started monkeying with the new DSLR camera and tripod, so "action shots" of yours truly are possible. Although, seeing my mug isn't much of an improvement, I can finally show some better photos than the ol' camera phone, and share some updates to my methods.
I've started using Bench Dog - Bench Cookie Work Grippers to keep from scratching a fresh door with the old one, when I'm transferring hinge measurements. mmmmm coooooookies!

 |
| Cooooooooookies!!! |
I like to transfer marks directly by using a little pocket combination square rather than a tape measure or ruler. It's fast and accurate, less chance for me to screw up when there's no tolerance for error on door hinges. A slight miscalculation from my melon-head and the door won't fit in the original location.
You'll also notice I like to wear free t-shirts. It's an important step to keep Sweetie from killing me for wrecking, yet another, nice work shirt in the garage. I just thought I'd lob that out there for Jeff over at Home Repair Tutor, who has been known to DIY in a shirt and tie.
 |
| Yes,.... that's the mighty, still not finished, organizer project under there. I'm not proud. |
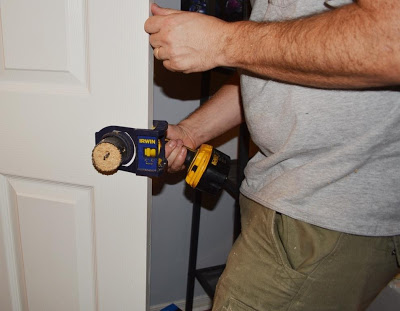
I zapped the hinge mortises out. The Ryobi template is still doing awesome, several doors in.
I'm still using the Irwin door lock installation kit that I've had since door #1. I'll do a review at some point, but honestly the jury is still out. It's not blown me away like the two cool Ryobi products I've tried, but it's done the trick,... mostly. Yeah,..mostly good.
I recently shared I tried and reviewed a new tool to cut the mortise for the latch plate. Read my post about the Ryobi Door Latch Installation Kit if you want all the juicy details. It sped up the process and gave me better results than my previous method.
Then a quick bit of door latch installation action (with an insulated screw-driver for some reason).
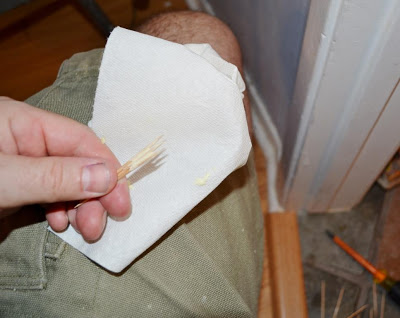
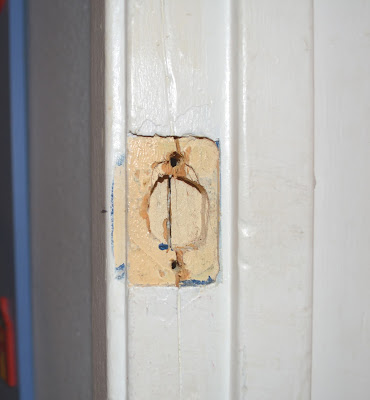
Then, a hiccup. The latch plate mortise in the doorjamb was simply too worn out to hold screws. It's obvious this particular doorway had experienced some violence, sometime in its existence, before our loving family took possession. At some point, the wood had been blown out, obviously kicked in by Genghis Khan's marauding Mongolian hordes. There had been feeble repairs.
I employed the old 1-2-3 wood glue and toothpicks approach to fill the void. Here's how it's done. Warning, it's isn't pretty, but if you want to know how the soup is made, read on.
Step 1: Slop some glue on toothpicks. Make sure to open the box in such a way that you spill them all over the floor as I have, otherwise the technique won't work. If you're wearing nice clothes to work in (ahem, Jeff), a damp paper towel is nice to have on hand.
Step 2: Jam a three or so gluey 'picks in the hole and savagely snap them off. There's no need for ceremony here. We're cleaning up after barbarians. Note: The spattered glue on my hands is a controlled exercise, just an educational illustration of one possible outcome, if you get overzealous in the glue application. It would never happen to me in real life. I'm sacrificing for you, dear reader.
Step 3: Run the screws in. Pro tip: I like to turn my screws in clockwise, otherwise known in the scientific circles as "righty-tighty". Do it your own direction, I'm just sharing what works for me. Again, I used the insulated #2 Phillips tip screwdriverbecause, well.... I don't know.
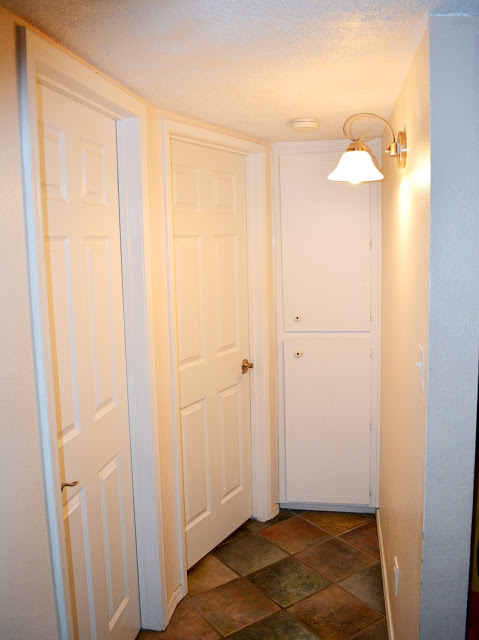
I'm going to come back and touch up all the door frames at the end of the project. I'll fix that damage. For now, we've got this end of the hall way 100% done!! Except the ugly light fixture,... those old hideous linen closet doors and hardware,.... the paint,...the baseboards,... and the chips in the drywall corner. Yep, besides that stuff, 100%!!!

Review: Ryobi Door Latch Installation Kit
Reviewing the Rayobi Door Latch Installation Kit in action.
Read MoreFor the sake of updating,... and stuff
I'm missing a solid post today, for several reasons. For one, I'm back to working on the interior door replacement project. I can only share the same repetitive stuff with you so much before boredom causes you to bounce your head off the keyboard.
I actually do have a post on the back patio misting / cooling system, but the photo's are just plain crummy and I missed a few. I have to re-shoot.

I have fiddled around with the site a bit, adding some favorite story links in the right margin for new visitors.
I've also launched a new side project. I thought I'd chronicle my adventures in learning photography. After a long saving's program, I've finally pulled the trigger and ordered a fancy new DSLR camera. Check out my little side project, AZ DIY Guy's Photography Adventures.
Well it's off to Jury duty, a 15th wedding anniversary with my beautiful bride, and two Meet the Teacher nights this week,... plus, maybe a last coat of paint on this door? Have a great week my friends!
If you stopped by for some hardcore, rock star DIY awesomeness, and found this drivel instead, check out my last post, it's a hot beast: Installing an Oscillating Ceiling Fan (It's hot up here)
 |
| Time to make the donuts... |
I have fiddled around with the site a bit, adding some favorite story links in the right margin for new visitors.
I've also launched a new side project. I thought I'd chronicle my adventures in learning photography. After a long saving's program, I've finally pulled the trigger and ordered a fancy new DSLR camera. Check out my little side project, AZ DIY Guy's Photography Adventures.
 |
| http://azdiyguyphoto.blogspot.com/ |
I'm not only looking forward to a new camera because I'm a gadget hound with an artistic desire to capture images. It will also help improve blog photos, long hampered by exclusive camera phone use. A tripod and remote will improve my action shots and get me in the frame more often. The kids are growing fast; I'll capture more of that while I still can. Finally, Arizona is full of awesome nature, just waiting to be captured.... or maybe I'm just a gadget hound. Yep that's it.
We'll see what happens with the photography blog. I don't know how far I'll go with it and how much I'll let it cross over here or onto the Facebook page (Please stop by and give it a "like". There's a whole lot more content there that doesn't show up here). Surely, it my inner geek, stupid humor, and style will flow there as well. It's not my focus; this Project's blog is where it's at for me.
Well it's off to Jury duty, a 15th wedding anniversary with my beautiful bride, and two Meet the Teacher nights this week,... plus, maybe a last coat of paint on this door? Have a great week my friends!
______________________________________
Review: JELD WEN Interior Doors (hollow core)
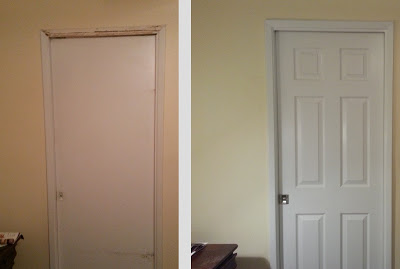
I'm well underway with replacing all the interior doors in our home. We started with flat slab, hollow-core doors that were probably original to the 1979 home. These originals are very plain, beat up, and so thickly coated with poor paintsmanship that there's no saving them. We've started replacing them one-by-one.

Some before and after action!
I've been picking up a hollow core, six panel doors from Home Depot by Jeld Wen. I believe Lowes sells the same brand, but I have my reasons to go to HD.

Concern?:
This sticker did not slow down the planer at all! It got chewed to bits.
I'm using the hollow core doors, because:
The originals were just fine, still structurally stable after 30+ years. It's a family home, not a great wall, fortified to withstand an onslaught of marauding Mongol hordes.
They cost $30.00 each. This is a serious improvement for a great price. I'm spending more on hardware than on the door.
Seriously, they're $30! (Compare to this investment, for more than $30)
I can man-handle these myself. They're light enough to prepare and hang solo, without having to lure a neighbor over with a craft-brew to get help wrestling a solid-oak, back-breaking beast onto the hinges.
They come off-white primed on six sides and have an embossed wood grain pattern. Painted a nice glossy white, even by hand, (...even with a 5 year olds assistance) they really finish up nice.
Of course, I had to plane mine down to size. I got a look at the construction, beneath the primer. The sides are a finger jointed, natural wood. It looks like pine. It's clean and free of knots and imperfections. The top and bottom are particle board. I'd prefer better, but it seems to work. Our old doors were the same. I just make sure I seal them up with primer and a couple coats of paint.

Clamping a sacrificial edge to prevent snipe and blow-out with the planer.
Because the standard sizes were too big for my framing, I bought them as slabs, no hinge mortises or holes for latches and knobs. They did have pre-bored in stock for a few bucks more, for those with houses not built by guys with short tape measures. I cut into mine for two different latch applications, there was plenty of meat left.
Surgery, to install a pocket door latch
The instructions limit how much you can plane down, 1/8" max per side. That was just fine for my application. I did it with a handheld power planer (Bosch).
Overall the quality was really good (see #'s 2&3 above!!!). So far, I only had one with a front that was coming off. It may have caught and popped up when they loaded it onto the shelf at the store. I glued and clamped it overnight before planing it down to size. Fixed!

I'm happy with this good-looking, easy-to-install Jeld Wen product. I have no problem recommending it to mid-skilled DIY'ers, with the proper tools, providing they don't require interior doors capable of stopping bullets.
If you'd like to follow my bumbling, door replacement adventures from the start:
Planning and decisions - Looking at doors, tools, and hardware (while sick as a dog)
Prepping a replacement pocket door - The inaugural first door
Installing a replacement pocket door - Saved the hardest for first
Prepping a replacement hinged door - Improving prep and shopping for hardware.
Installing a replacement hinged door - Here's my first hinged door install, including the first attempt at hinge mortising.
Review: Ryobi Door Hinge Template - Now I have it figured out!
Father & son DIY skills training - including the pitfalls of door shopping with your guard down.
I’m keeping this old, small version of the top pic on my site for a while. There is a carpentry business that stole my image and is passing it off as their own on their corporate website. Weird, right? - John
Father to Son DIY skills training
Since Jack's rapidly approaching teenagerdom, it's time the lad starts picking up some mad handyman skills. My dad started letting me help with projects when I was about his age and I still remember those times fondly.
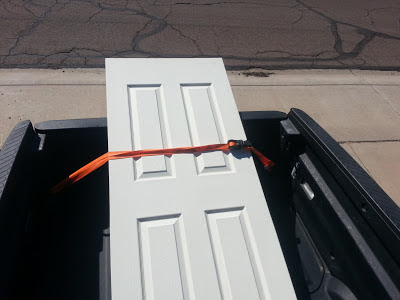
The two of us left the ladies behind and took a Friday night, before-bed trip down to grab door #4 for our interior door replacement project, this one for Jack's own room. He examined a couple from the top of the stack for dents and scratches before choosing a nice specimen from the middle of the stack.
..and slipped away, like ninjas into the night.

The two of us left the ladies behind and took a Friday night, before-bed trip down to grab door #4 for our interior door replacement project, this one for Jack's own room. He examined a couple from the top of the stack for dents and scratches before choosing a nice specimen from the middle of the stack.
 |
| Get that doggie rollin' |
He took charge of the six-wheeled beast-cart and headed out with the unmistakable din of rattling sheet metal and chattering caster wheels. He paused to treat me to some humor about what great stuff, Great Stuff is when we passed the display. Where does he get his goofball sense of humor anyway? We were having fun. Too much fun...
Folks, I'm just going to admit it; I let my guard down and paused like a slack-jawed yokel at the clearance rack. I should have known better to stop in such dangerous proximity to the kitchen section. Of course, I was immediately waylaid, out-of-the-blue by Mr.Smiling Clipboard Dude,
"Has anyone told you about what we're doing for customers tonight?"
CRAP! Amateur move, Mr. Smarty Pants DIY Guy. NO! No one had told me what they were doing for us customers tonight. I was snared like a gazelle drinking from the crocodile pond. Somehow, he sensed I'm a nice guy (chump) and I'd pleasantly engage in his conversation. I dutifully answered the questions about our kitchen and, ever so nicely, gave point-by-point details on our state of unhappiness with our cabinets and layout. I shared the plan for a total kitchen gut and re-model next year,... yes, including plumbing,... and electrical, ... aaaand new cabinets with taller uppers,...
 |
| You're going to have to sit this one out boy. Watch the master at work. |
We all know where this leads don't we? The pitch. It doesn't matter that I clearly, obviously have no reason to entertain his product; I just have to let him toss it out. But I know can still kick away from the crocodile. He's worked so hard, and I can't be rude in front of my son (or all those shiny new tools) can I? A slight pause, a friendly smile, and he lobs it:
"... consider cabinet re-facing" Yaaaaaaaay! We're almost done...
"Free in home estimate" Woooo-hooo! Now there's only my initial polite decline <kick> and his second, face-saving counter attack ...
"...just in case you want to consider it, as an option, anyway", offered with a kindly smile and an attempt to immediately schedule the estimator. I give my trusty standby, a pleasant second decline <kick> followed without pause by a quick, simultaneous thank-you / smile /cart acceleration, and finally the inevitable third decline mumbled over my shoulder as I depart <kick-kick-kick>. Checkmate. We're gone <run>. That's how it's done folks, it's a skill acquired by years of home center visits. I'm just glad my son was there to see it. (You may want to start easy, like a quick run of the dueling Cable TV vs. Satellite TV polo-shirted gauntlet in the back of Wal-Mart. This will sharpen your skills for the pro leagues)
We did a quick checkout, strapped down...
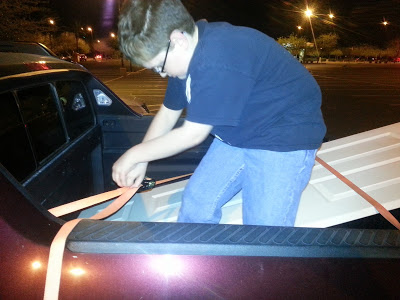 |
Sure, I could have hired a pro to extricate me from the salesman, but I did it myself and saved. You can do it too! Teach your children well.
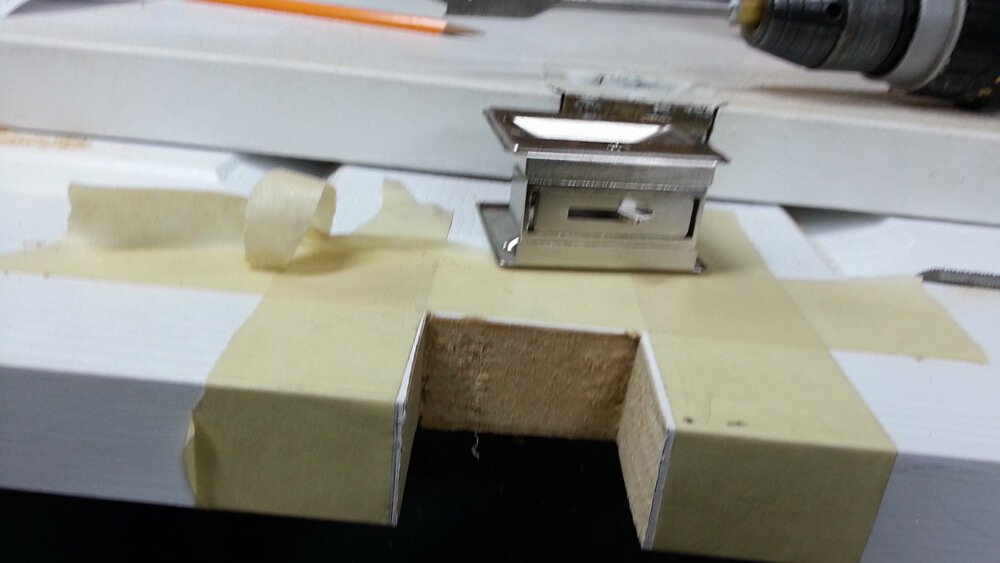
Review: Ryobi Door Hinge Template
 |
To those who haven't heard the term, a mortise is a recessed area on a door where the thickness of a hinge leaf is set, in order to lie flush with the surface of the door.
We've been slowly replacing all our ugly interior slab doors with nice looking six-panel beauties. After the initial pocket door experience and the guest bath door install, I'm getting the hang of it.
Without prior research, (very, very unlike me) I picked up the Ryobi Door Hinge Template

First off it's plastic. But it's that pretty tough stuff, not brittle. I also liked that all the parts (except drill bit and double end driver bit) fit neatly for on board storage. The kit includes instructions, corner inserts (reversible for 5/8" or 1/4" radius hinges), a guide rail for smaller / laminate routers, a router bit with top pilot-bearing, a 1/8" drill bit, a double-ended driver bit and the hinge mortiser unit itself.
 |
| Yep, I'm wearing shorts and sandals. It's 85º today! (Sorry Detroit @ 27º) |
 |
| Depth Charge! |
The instructions are pretty no-nonsense, bullet points. After setting the depth, they simply state:
- Turn on power tool and remove wood from template area

 |
| Flat bottomed: It makes the rockin' world go 'round. |

A perfect, neat fit. Just a matter of rubbing a bit of gummed up paint off and erasing some pencil marks. I moved the rig over to the next spot and zapped it out in a matter of seconds. Perfect.
The verdict I - For a DIY / Remodeler this thing is a definite win. To adapt easily to different door sizes and hinge types it's intricate and clever. It's darn near stupid-proof. For less than $30 to get pro quality results at very high speed, I think it's a tremendous value, and I am happy with my purchase.
The verdict II - For a true professional, I don't know. There's the plastic issue. It's got a bit of flex to it. I had a couple slight abrasions to the guiding surface after the first hinge. Nothing that will affect my work, but I wonder how it will hold up when you need to do a couple hundred doors. I'd also want to look at replacement router bits, just to be sure you can get them when you wear this one out. Still,... the whole thing is $26 bucks. I've seen individual router bits for three times that cost.
I'll follow up later, when I've done another 4-5 doors, and let you know how it's holding up.
Full disclosure: The opinion in this post is wholly my own. I have received no compensation for it. I purchased the kit at my local store, along with an Italian Sausage, chips, and a Coke combo from the "Bad Dogs" cart out front. To be 100% honest, to my readers, I ate the whole meal before I cleared the parking lot.
<update> Pick one up at The Home Depot here:
Affiliate links inluded
A New Interior Door Adventure
I'm replacing all the old, flat panel hollow-core doors in the house with beautiful 6-panel doors. Here's how I installed the new door in the guest bathroom.
Read MoreInterior Door Project
Having successfully wrapped up the first of our interior door replacements last weekend with the
, I'm moving forward with the project. The rest of the doors are standard hinged style. The next one to tackle is the guest (
kids
) bathroom. It's one of the most visible in the house, we'll enjoy it being complete.
Pre-Primed, and too big
Rather than the more efficient, prefab / assembly line approach of buying all the doors, trimming all the doors, painting all the doors, etc. all at once, we're going with the slower, easier on the cash-flow approach of doing one door at a time. I suppose a benefit is that I don't have to stage doors all over the place as paint dries. Plus, we get to see some finished work a little sooner. The drawbacks are the repeated shop cleaning between each door's planing and painting as well as the wait time between paint coats.
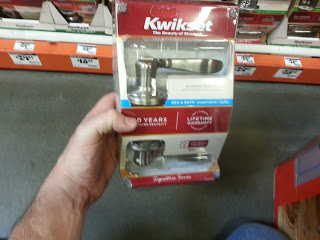
I bought another six-panel door at Home Depot this morning. I also picked up a new brushed nickel, lever-style "door knob" (
What do you call it if it's not a "knob" anyway? The packaging doesn't even say
.) and a bulk pack of matching brushed nickel hinges. By buying the bulk pack of 12 hinges, I saved over ten bucks vs. buying them individually.
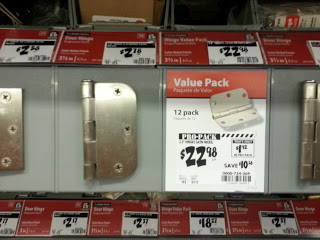
Buying in bulk!
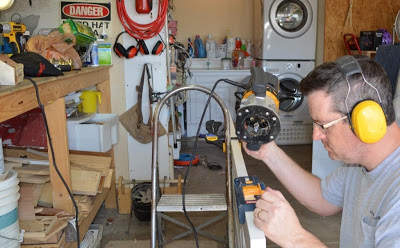
Back at home, prepping this door was exactly the same as prepping the pocket door. Only this time I managed to screw up the edge planing of the first side. I sort-of tapered the door somehow; it was 1/16" off at one end. I must have twisted the depth knob when I was interrupted by a little girl offering to keep me company in the garage,... if I'd fix her a bowl of cookies 'n cream, ice cream. It took a bit of tweaking to get it squared up again.
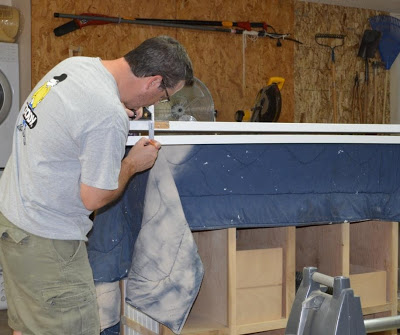
I really like the Bosch planer . It took a bit of practice, but I have the hang of it now. The only struggle I have is the necessity to walk while cutting the long edge. Sometimes I get a little bobble in the cut. I ended up doing a shuffle / shimmy / slide / step-behind maneuver. It would probably be better to set the door on edge. I'll try that next time.
Grab your popcorn folks! Here's the world premier movie of AZ DIY Guy in action. I'm really much better looking in person, this particular role required a dusting of grey hair at the temple and an out of shape appearance. I think I pulled it off. It's certainly Oscar worthy.
There's a dust storm rolling in! Hold your breath and cover your eyes!
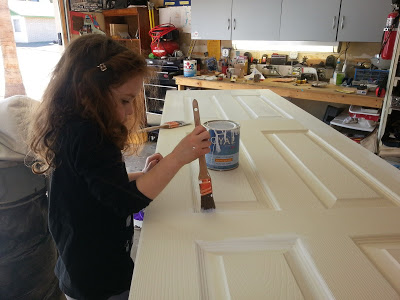
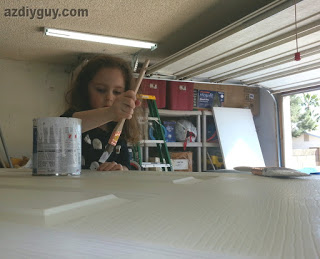
Gracie's been bugging me for a week to help with the painting, so I let her have a go of it. She did pretty good,... mostly. I had to keep reminding her not to scrub (destroy) the brush and tried to keep the splatter to a minimum. I lightly, quickly brushed over her work to keep the strokes with the wood grain. Despite the exuberant assistance, It turned out pretty well.
The paint dried fast in today's 78º, dry weather. I need to put one more coat on in the morning. Hopefully, I can get it done tomorrow.
<UPDATE>
Up before 6am Sunday morning, while the family slept, I put a coat of fresh paint on the reverse side of the door. I ran out of paint right at the finish line, dang-it. I scraped that can as clean as Gracie's bowl on a spaghetti night. I need to go grab some paint first thing and finish if there's any hope of installing it today.

Installing the New Pocket Door
 I'm installing the new pocket door for the master bath today. I'd already prepared our new six-panel door, trimmed it to fit, primed the fresh edges, and painted the whole thing with a couple coats of white, semi-gloss last weekend. If you missed the story, find it here; it's a cliffhanger. The last coat of paint went on 6 days ago, so it's nice and dry, out in the workshop.
The dang thing keeps falling off its rail, plus it rubs on the inner walls of the pocket as it sways loosely from the track. I've already replaced the track mounting screws with larger screws, they seem to be holding. Look how ugly that beat up old slab door looks!
I pulled the top two trim pieces (casing?) off to access the mounting hardware, showering the whole area with bits of drywall from the rough edge behind. It isn't the best looking installation of trim I'd seen, with heavy globs of caulk filling the voids. Maybe when we redo the bathroom, I'll re-trim the whole thing with wide trim.
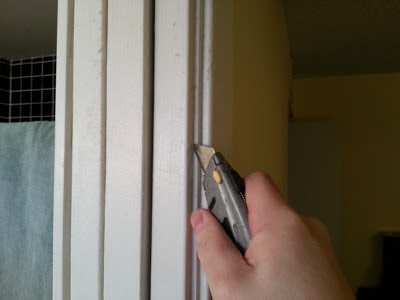
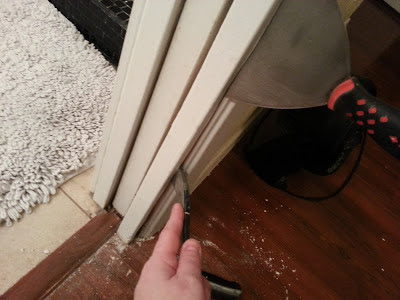
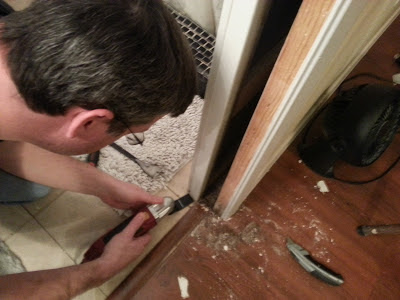
There was a side piece of molding that kept me from swinging the door out from the bottom. First a quick score with the utility knife to break the paint / caulk line:
I used a wide-blade putty knife to slightly pry the molding out enough to stick my mini-prybar/ nail puller behind it. Having learned from several past remodeling disasters, this time I took my time, gently wiggling the tools, then the molding itself as it slowly broke free. I want to reuse it when I reinstall the door. It actually came out in one piece! If you look close, you can see the horrendous tile in the shower. Don't worry, it's on the to do list.
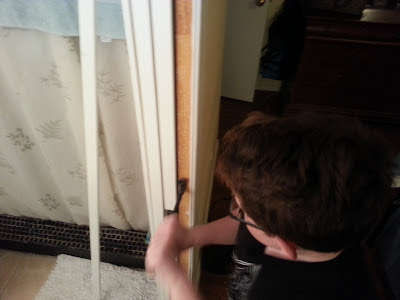
Jack stopped in and pulled all the nails that were left. The narrow head on the mini-prybar/ nail puller made it easy without scuffing up the paint on the remaining trim. He had fun with it and did a great job. There's another glimpse of that horrible black tile in the shower on the left.
 |
| Child Labor Rocks !!! |
I learned why the door was swinging free, dragging on the pocket sides. There were plastic guides originally installed, but they were yellowed and brittle. They had snapped off sometime in the past 30 years. I also saw old water damage from our wonderful house flood a few years ago. (A toilet feed line had ruptured - I'll cover that in future story).
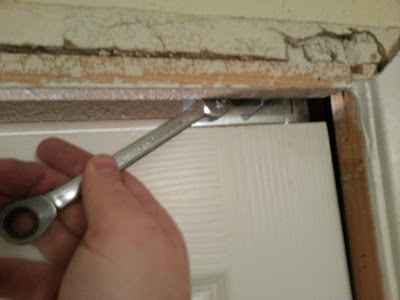
I needed another set of hands for the next step. Jack pushed the bottom of the door from inside the bathroom while I lifted the door up with the top of my foot from outside. The door pivoted from the track, hanging like a garage door. It took my mini pry bar and my favorite, beefy, slotted screwdriver to pry the track and wheels apart. FREEDOM!!! The door popped out. I could see the wheels were well worn, compared to the replacements I have bought.

Looking inside the wall with a flashlight I can see I'm in luck. The track mounting screws inside the wall have not worked themselves loose, like the ones in the doorway had. I could only reach one with my screwdriver; it was tight, thank gods of remodeling. The whole plan to avoid cutting the drywall had hinged on this. Whew!
 |
| Like most men, I have a one-track mind. |
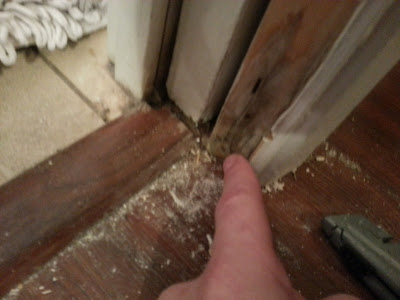
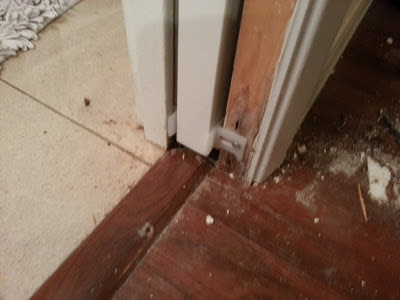
In order to replace the broken plastic guide on the bathroom side of the door, I had to pry the inside molding up a bit. Unfortunately, I couldn't get it free. The floor tile had been installed after the trim piece and was encasing it. I tried out a tool I'd never used before, a "Variable Speed Oscillating Multifunction Power Tool ". It plunge cut, flush with the floor, slicing the wood like butter. 30 seconds = done! Mine is a Harbor Freight cheapie that I picked up a couple months ago on a whim; it was on sale. I'm sure it's not lasting quality, but it's a great concept. I'll definitely buy a nice, quality one whenever this one dies.
I pulled out the molding a bit, removed the old one that was installed with a finishing nail, and screwed the new one in. I'll adjust it later when the door is in.

I lugged the old door out to the workshop and laid it on top of the new one. Perfect match. With luck or possibly the benevolence of magical, midnight workshop elves visiting, I had managed to use the planer for the first time, to trim the new door down to a duplicate size without removing the old door.
It was interesting to note that the top, bottom, and pocket side edges were bare, unpainted wood. That's apparently a big no-no in humid environments. I didn't see any ill effects though.
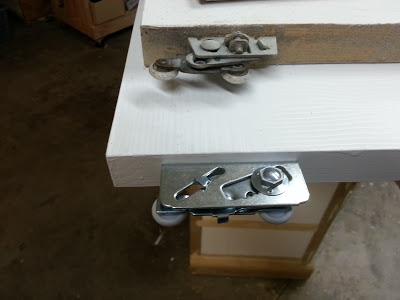
Using the old door for placement, I matched the location of the roller hardware and installed the new ones by measuring, pre-drilling, and running the screws in tight with the impact driver. The new hardware seems a lot heartier. The big hex bolt adjusts the height of the rollers, more on that later.
I also copied the location of the latch from the old door. A very close call, I nearly cut the same size slot, but for some reason I read the instructions and learned that the new latch was 1/8" smaller. I shudder to think what foul words I would have befouled the neighborhood with if I had ruined the door by cutting an oversize hole. The old latch was painted and had a broken mechanism. My wife even cut her finger on it two days ago. I couldn't have used it.
I managed to scuff the new paint by dragging the old door's latch across the new one's face. To avoid more damage, I taped off the face of the new door, drilled a starter hole in the back of the slot and made three slow, steady cuts with the jig-saw. The new brushed-nickel latch fit perfectly.

Go time! I tipped the new door top first into the head of the opening and slipped the rollers easily into the track. Of course that is complete bull, a bald-faced lie.
I grunted and sweated that bastard into place crawling on my hands and knees back and forth, in and out of the bathroom trying to get those rollers to get into the track. For as many times as I had popped the old door back on track, I should have been able to do it with my eyes closed. AAAAAAAGHHHHH!!!

Finally, I turned my brain on for a second and adjusted the rollers so that the wheels were completely extended. It just took a few turns with a 1/2" wrench to extend them. Having only turned on my brain, "for a second" I was quick to realize that by cranking the wheels all the way up, it drove the door down, wedging it into the floor. I couldn't budge it. Idiot.
Turn the brain back on,.. climb back up the step stool,... crank the wheels back up,... climb down the step stool,... swing the door out,... climb back up the step stool,... extend the rollers again,...
This time, a quick prying motion with the mini-crowbar on the roller and the same with the screwdriver against the rail. Click-click, POW! Locked and loaded. I adjusted the rollers back up with the wrench making the leading edge square with the wall so there is no gap. The door slid closed smooth and easy. I installed the second guide at the bottom and tightened both. This door will not rub.
The original trim goes on with a quick "skadoosh!" from the finish nailer. It was easy to place since the original razor cut-line fit back together like a tight puzzle.
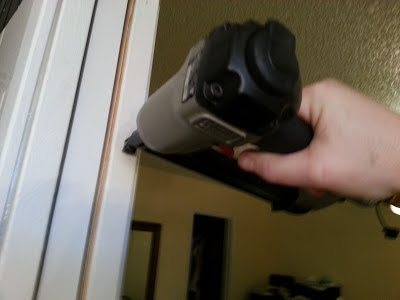
I've got it on the run now! Quickly swapping the nail gun for a caulking gun, I keep on shooting.
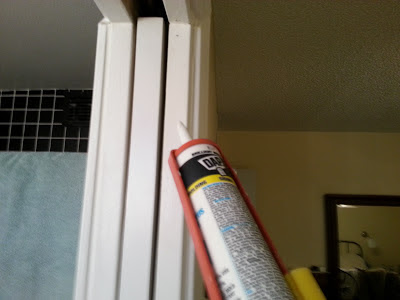
With wet caulk, I have to pause to address the more important task of enjoying a grilled cheese sandwich, a bag of Fritos, and a Diet Dr. Pepper that Sweetie whipped up for me. There's enough time to eat, clean up, and type up the story while it dries.
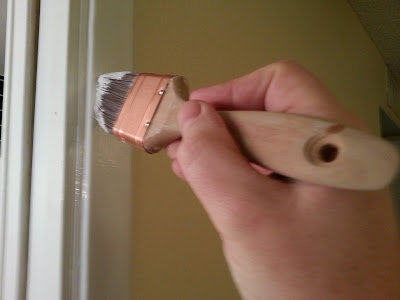
After a couple hours, I hit the trim and the door scuffs with a quick touchup of white paint. It's nice that I didn't have to remove trim from anywhere against wall color paint. It was all trim on trim / white on white, therefore no masking, just a quick layout of old newspaper on the floor to avoid drips.
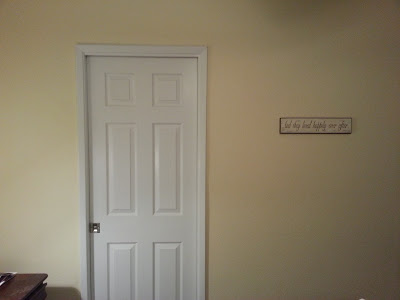
Finished! I think it looks 100% better than before. It really dresses up the room a lot. The ladies will be pleased that the door finally, actually locks and won't fall off the track, trapping them in there.
Overall, it wasn't a super difficult project. It did take time to prep the door, but today's portion only took a couple hours to do.
 |
| What do you think? Better? |
That's the only pocket door in the house. Next, I have six standard doors, the door to the garage, and a louvered closet door to replace.
Prepping a replacement pocket door
I'm going to kill two birds with one stone, start the interior door upgrade project my wife asked for and cross one item off the to do list. The master bath door is constantly falling off the track. Several times, my poor wife or daughter has been trapped, hollering for rescue when the door has gotten wedged. I'll find the unfortunate lady, peering furiously through a five inch gap.
I initially wanted to replace the track with a two rail type, where the wheels cannot easily disengage. However, based on my research, removing and replacing the track requires highly customized tools to get at screws deep in the pocket where you cannot reach, or opening the wall up. I'd rather not open the wall and get into a bunch of drywall repair and painting. I'm going to see if I can simply replace all the hardware and tighten up what I can get to. I'm replacing the beat-up, scratched, over-painted, bleeeechh slab door.
I picked up a 28" W x 80" H hollow core, six panel door at The Home Depot for $30 along with new hardware. Like all of our interior doors, the standard size was too big. I had bought a new tool, a handheld planer. I'd never used one, but I'd used a jointer, the same principle, just move the tool, not the work piece. I chose a Bosch 6 amp, 3 1/4 planer. (Maybe I'll review it after I've done all the doors in the house - so far, so good). It took a few passes to get the hang of it, but slowly felt comfortable taking deeper cutting passes.
 I took the door down to 27 5/8' W x 79 3/4" H, in multiple passes, learning the feel of the planer. It threw a fair amount of sawdust, but not a ton. The collection bag filled up twice. If it was green, it would have looked like Easter Basket grass.

I initially wanted to replace the track with a two rail type, where the wheels cannot easily disengage. However, based on my research, removing and replacing the track requires highly customized tools to get at screws deep in the pocket where you cannot reach, or opening the wall up. I'd rather not open the wall and get into a bunch of drywall repair and painting. I'm going to see if I can simply replace all the hardware and tighten up what I can get to. I'm replacing the beat-up, scratched, over-painted, bleeeechh slab door.
I picked up a 28" W x 80" H hollow core, six panel door at The Home Depot for $30 along with new hardware. Like all of our interior doors, the standard size was too big. I had bought a new tool, a handheld planer. I'd never used one, but I'd used a jointer, the same principle, just move the tool, not the work piece. I chose a Bosch 6 amp, 3 1/4 planer. (Maybe I'll review it after I've done all the doors in the house - so far, so good). It took a few passes to get the hang of it, but slowly felt comfortable taking deeper cutting passes.
 |
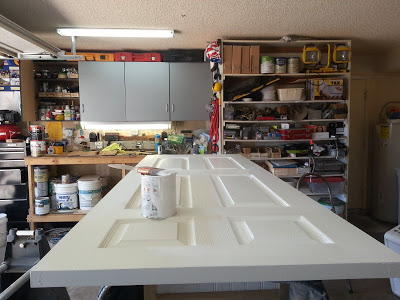
| Notice my work bench? Yep, that's the (still) unfinished hall organizer project. |
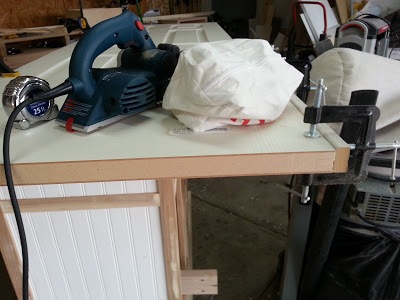
On my first couple passes, I got some splinter-out as the cutter leaves the surface, following the cut. I used a little trick I saw Tom Silva do on This Old House, although I think he was working on window casings at the time. I clamped a sacrificial strip of MDF to the exiting edge of my cut with three way clamps. The MDF took the blow-out and the snipe, keeping my edge straight. (shown to the right above)
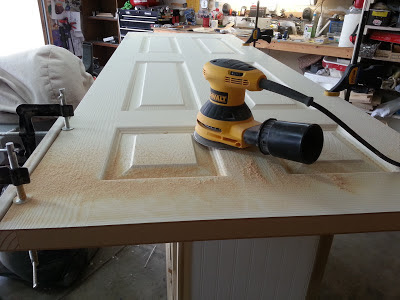
I hit the freshly planed faces with the Random Orbital Sander and slightly eased the edges by a quick 45 degree pass, to keep the veneer from chipping out later.
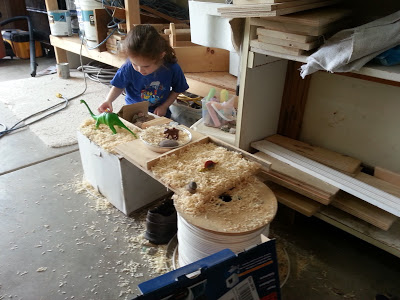
Grace always loves playing with my sawdust. These shavings took it to the next level. She made some sort of dinosaur / Angry Birds amusement park. It was a constant, "Watch this Daddy,...Daddy watch!,.. Look at this guy!,... Hey, watch this!,... Daddy look!...Daddy,..." She had an absolute ball,... then she tracked it into the house.
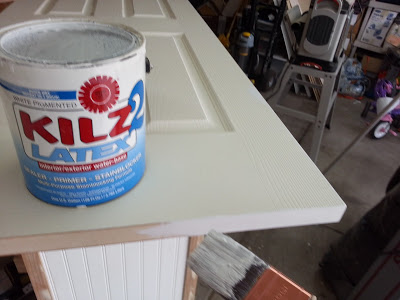
Since I had taken all the factory priming off the edges, I hit the bare wood edges with two coats of a good primer. Since this is a bathroom door, subject to moisture, I want too make sure it's sealed up really good.
I applied a couple coats of semi-gloss, white latex on the whole door and left it to dry. Well, at least I painted five sides out of six. Even though today was a beautiful 70 degree day, the paint was still a little tacky when I decided to clean up and head in for the Super Bowl.
I headed out to the shop and checked it at halftime. The paint took beautifully. I'll probably paint the reverse side tomorrow after work.
So far, this is a pretty easy, enjoyable project. Follow the exciting install next!