

My garage / workshop’s were a hideous mess of lumpy drywall compound, holes, and mystery stains. I’m fixing it up with an awesome patterned wall covering from Decorative Ceiling Tiles.
Read More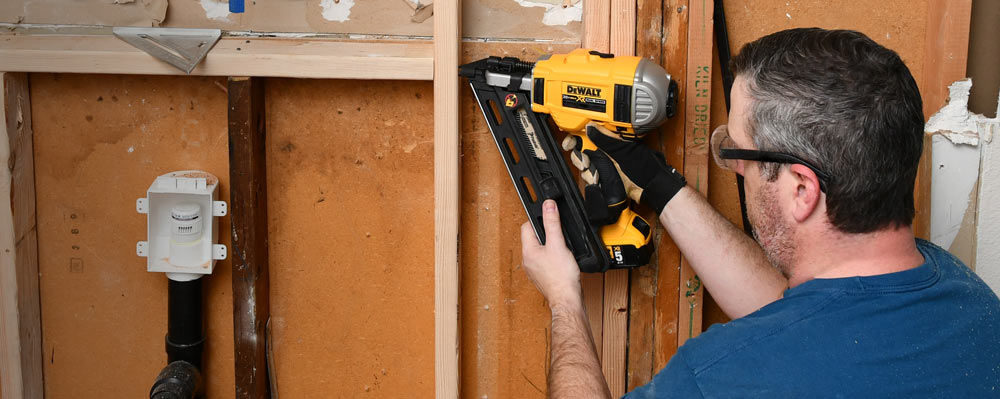
Review: The Dewalt 20V Cordless Framing Nailer in Action
I’ve been using the DeWalt DCN692 20V Max XR Brushless Dual Speed Nailer to do some framing in the kitchen. No cords, no hoses, and no fuel canister. Oh yeahhhhhh…
Read More
Installing Knobs and Pulls with the Kreg Cabinet Hardware Jig
A tool review and how to install cabinet pulls and knobs with the Kreg Cabinet Hardware Jig. The kitchen remodel is half done!
Read More
DeWalt 2017 Press Event - Tough in The South
I had an awesome experience at the DeWalt 2017 press event in Nashville, TN. Check out my highlights of their new and upcoming tools. Hint: Cordless, cordless, cordless!!! #toughinthesouth
Read MoreReview: DeWalt Battery Adapter for 18 Volt tools to 20V MAX Batteries
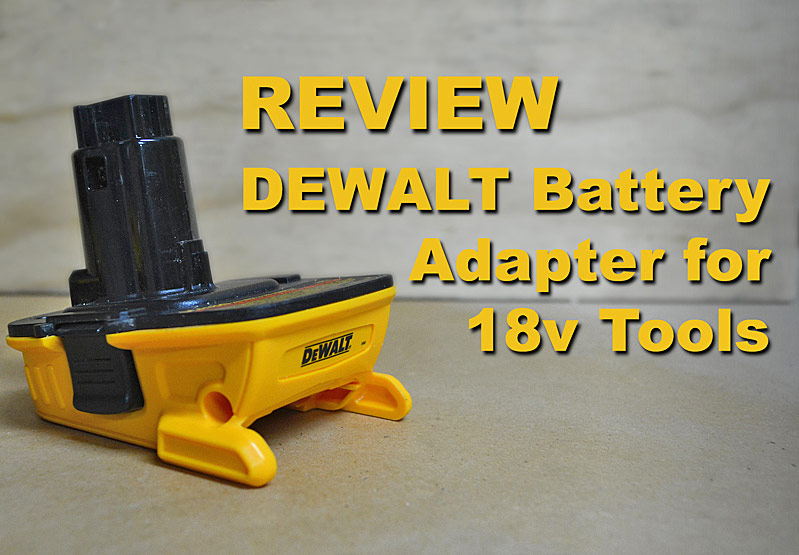
Regular readers of this blog know that I've been personally wielding DeWalt 18 volt cordless tools on my projects for years. I love 'em; absolutely no complaints.
When DeWalt gave me an early-bird chance to try out their new battery adapter and bring modern battery technology to my older tools, I couldn't wait to put it in action. I've run it through its paces for a month on a variety of my tools.
I believe DeWalt's 18 volt line of cordless tools has been in the market for about 20 years. It's been one of the most popular lines of professional-quality cordless tools, for a very long time. They're certainly the most common brand on the construction sites I've visited.
I've had my own set for about 8 years, and all the tools are still going strong. They've outlasted and out performed any other brand of cordless tools I've owned by several years, leaving me a bit of a fan-boy.
This battery adapter is a huge deal. Years ago, I worked a second job, at a department store selling their popular exclusive brand of tools. It was common that I'd bear the brunt of a shopper's frustration when they learned that each year's version of the store-brand tools had an battery configuration incompatible with the prior model. It was odd, even though each generation was a same voltage, NiCd battery, there would be a slight change to a a bump or ridge on its case, preventing interchange between versions. People would end up purchasing new tools, rather than ordering older batteries from the factory. Was it an "engineered obsolescence" sales scheme? Although many people bought new cordless tool sets, lots left to shop elsewhere, swearing off the brand as they went out the door.
DeWalt on the other hand, has supported tools that last for a seriously long time. You can go to hardware store, home center, or Amazon.com today and get an 18 volt NiCd battery, or even a brand-new 18 volt tool. That's simply incredible, considering the modern system of 20V MAX tools has been out for 4-5 years. The introduction of this battery adapter is awesome; now we can start transitioning towards newer technology, bit by bit, piece by piece.
I own three 18 volt XRP batteries. I've worked them hard over the years. One recently decided it was time to retire and refused to take another charge. The other two are showing signs of age with their full-charge run time declining slightly. I'm still running them hard.
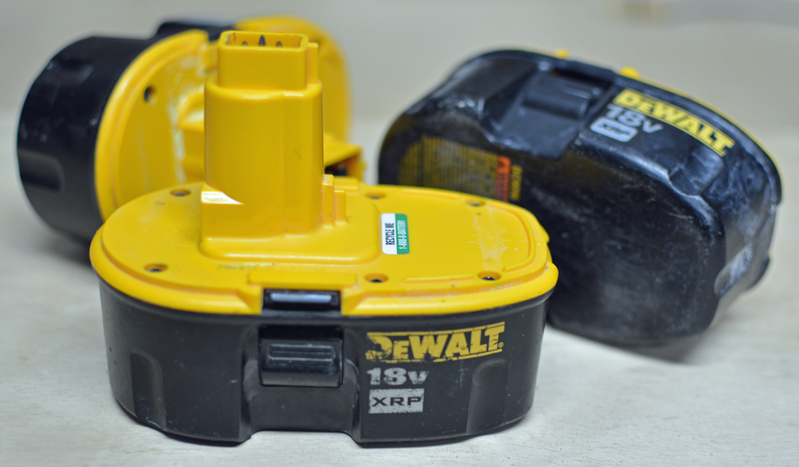
The grizzled veterans
These 18v batteries are beasts. They pack a lot of punch and run for a long time, even at their advanced age. I've never have trouble working two to three tools on a project, cycling between my three batteries. Now with one retired, I don't want to spend the dollars on replacements, when the modern stuff is so much better. The new Lithium Ion batteries pack much stronger punch with a better power to weight ratio, almost no self-discharge, and a cool led "fuel gauge".
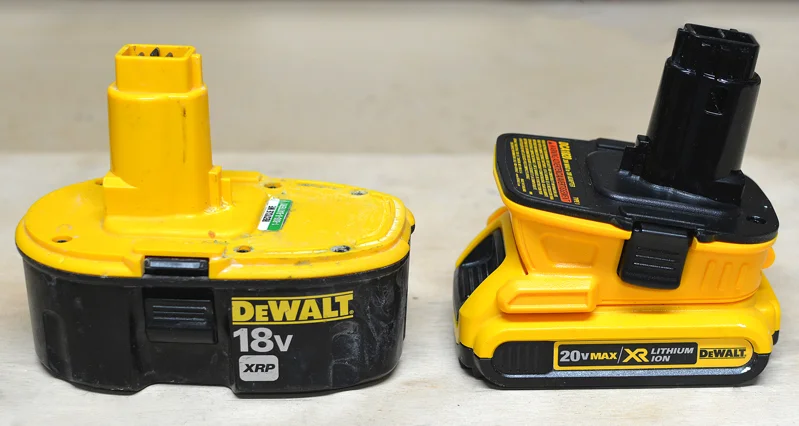
Check out the size difference between the 2 amp hour Lithium Ion 20V MAX battery pack that came with my DeWalt Cordless Oscillating Multi Tool and one of my my beefy 18v XRP nickle-cadmium packs. There's a significant weight difference too.

NiCad vs, Lithium Ion
Obviously, there's more than a little physical difference between the old plunge-in style NiCd and the slide-on Lithium Ion. That difference is what the Dewalt Battery Adapter overcomes. It also holds the pack at a slight angle, presumably to mimic the tool balance we are accustom to with the old packs.
I slipped the adapter into my 18 volt Reciprocating Saw, just as I would the standard battery pack. It felt like it was of the same beefy plastic the tools are constructed from. There was a slight color variance, but I'm fairly sure that's due to 8 years of Arizona sun beating down on my tools as I work. Of course, I'm not going to complain about color variation, these are workin' tools after all.

The base of the adapter has the same electrical connections as the modern DeWalt MAX tools. The battery pack slides on from the front and locks onto the adapter.

Since February in Arizona isn't about shoveling snow, I let the DeWalt 18v Cordless Reciprocating Saw chew on some yard work for a bit. I cut palm tree fronds, trimmed the mesquite, and chopped up a dead cactus. I wasn't sad to see that stinker go either. It was the son-of-a-gun that seemed to shoot spines at me whenever I was in its vicinity. It still managed to get one last parting shot when I accidentally flipped a chunk up into the front of my shirt, leaving some painful little holes in my chest.

The saw ripped along, fast and powerful. It balanced good in the hand with the new batter set-up. I finished with plenty of juice in the battery.

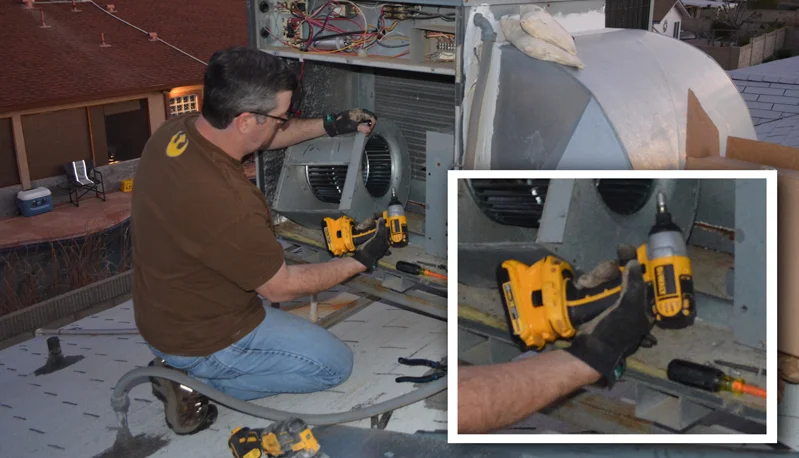
Another adventure where I brought the battery adapter into play was the repair of our rooftop heat pump (Post: Cold at Night! A DIY Heating Repair Adventure ). I removed and replaced a bazillion screws with my DeWalt 18v 1/4" Impact Driver fueled by the 20V MAX Lithium Ion battery through the adapter. I ran the impact driver until the sun went down,...literally.
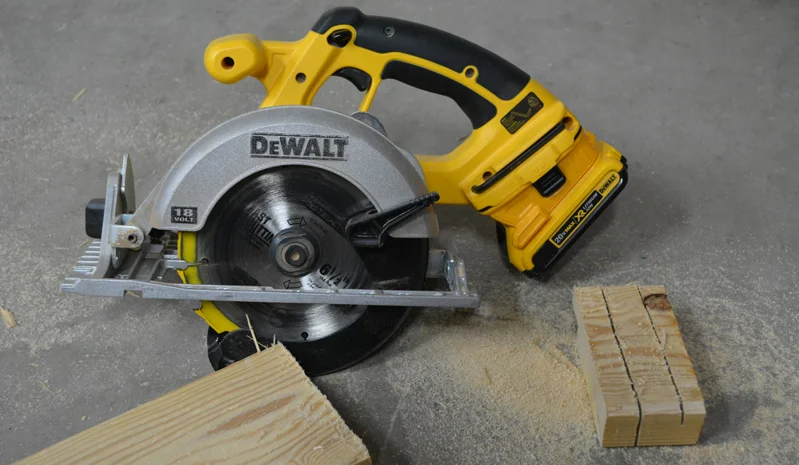
The battery adapter with the 20V MAX battery pack with worked just fine in my circular saw as well. Power and speed, making sawdust in the garage.
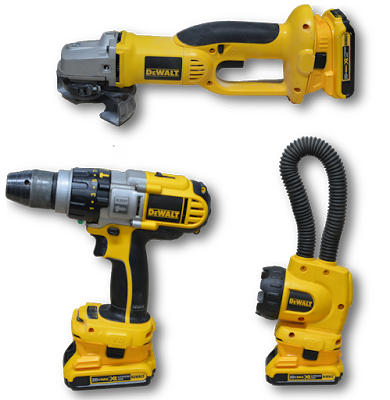
I understand the adapter works with most, but not all of the legacy DeWalt 18 volt tools loose in the wild, but it worked with my whole arsenal. I tested the rest of my collection with success. The adapter worked well with my cordless cut-off tool , my XRP Hammerdrill / drill / driver , and my flexible floodlight. The only complaint I have is that it takes a bit of extra muscle to remove the adapter; it seems to latch in tighter than the 18v battery packs themselves. Not a problem if you are just changing the batteries, but if you want to slip the whole deal on another tool, it takes just a little extra grunt.
I'm really happy with this cool widget. Frankly, I'm surprised DeWalt even produced it. Who could complain if they slowly phased out the 18 Volt line after such a long operational lifespan? Not only do they continue to support the older line, they chose to offer this adapter as a bridge to their current line. That's loyalty to your customers my friends.
I used a single 2 amp hour 20V MAX battery on my tools. I believe it outperformed the 18v XRP packs on their best day. DeWalt also makes larger-capacity 20V MAX packs, ranging up to a 5 amp hour beast.
The DeWalt Battery Adapter for 18V Tools is available now, in two configurations:
DCA1820 - DeWalt Battery Adapter for 18V Tools (inc. adapter)
DCA2203C - DeWalt Battery Adapter Kit for 18V Tools (inc. adapter, (2) 2 amp hour 20V MAX batteries, and a charger)
Keep an eye out, I'm going to be running this little champ on some upcoming projects.

This is not a sponsored post, but my friends at DeWalt did send me
a demo unit to try. All opinions and experiences are 100% my own.

Review: DeWalt 20V XR Lithium-Ion Oscillating Multi-Tool

I picked up a DeWalt 20V XR Lithium-Ion Oscillating Multi-Tool recently and ran it through its paces on a recent, closet remodel project. Spoiler: I'm really pleased with it.
An oscillating multi-tool is a handy class of tool that features an interchangeable blade or attachment that rapidly rotates back and forth, on the horizontal axis. The blade travel is slight, nothing like the inch or so of travel of a big, bad reciprocating saw. These tools can make fine cuts in difficult to reach areas, even straight, plunging cuts. Many brands of Oscillating Multi Tools have appeared over the last several years, along with accessories beyond cutting blades.
My first OMT experience
I became more familiar with the somewhat new class of Oscillating Multi-Tools, having started with a cheapo import model that sold me on the concept. I bought the thing on a whim, on a weekend coupon sale. I found loved the things a multi-tool could do. I've used it to slice door molding, cut drywall and siding, trim bamboo flooring, and even hack shingles.

It was a perfect type of tool to have in the cabinet, and got more use than I thought it would. I loved the concept, but I did have issues with the tool itself. I tore up the cheap wood cutting blades like crazy. Blade changes were a pain and I had to periodically re-tighten them the with an allen wrench. The tool was loud and sent a lot of vibration up my arm. I decided to replace it because it got really hot under extended use, feel the heat through work gloves hot. Still, I got a decent life span from the tool, considering the price.
The Upgraded Experience
I wanted to a cordless model, so I decided to buy the DeWalt, the #1 Best Seller seller on Amazon.com, with a 90% five-star rating. The version I bought is the DEWALT DCS355D1 20V XR Lithium-Ion Oscillating Multi-Tool Kit which came with a bag and a bunch of accessories. This kit costs a little under $200, less for the bare, cordless tool less if you already have enough 20V MAX batteries and prefer to buy the attachments a la carte. A similarly outfitted kit can be picked up for about $50 less for the corded model. I've also seen it included with some of the larger, cordless combo kits, if you are financially blessed enough to bag a sweet pile of new lithium-ion power tools in one swoop, and make me horribly jealous.
blade mounted 90 degrees to the tool
I figured these things were suited for nail encrusted wood, so they'd be good for cutting bare framing nails. I think there was too much wobble in the way I was holding the tool. I managed to dull the blade up more than I'd hoped, but it worked.
Using Off Brand Blades
The next task I tried was to cut a large drywall opening for my in wall closet shelving project. For this cut, I used a blade I already had in inventory. It was a Harbor Freight, 4" crescent shaped, steel blade. with the wide, curved tooth edge, I could cut a long line, changing the angle of the tool, so my grip and arm position could be adjusted for comfort. DeWalt makes higher-quality, similarly-shaped blade, but I wanted to test the included universal accessory adapter included with the kit I'd purchased.
This piece utilizes a the bolt and washer type connection similar to my old tool, but it snugged up much tighter. It allowed me to use the off-brand blade without any issue.
An off brand blade mounted via the Universal Accessory Adapter
Oscillating Tool Guide System
Cutting those long, straight lines freehand was a concern before I started, but it was a piece of cake. First of all, this tool is smoooooth.
I don't know if it's better build quality, or the brushless motor, but the DeWalt didn't vibrate and rattle as much as my old tool. It positively purred in my grip. Fitted with the removable DeWalt Oscillating Tool Guide System
(included in the kit), I was able to roll along, pressing the guide against the wall as I went, for added stability.
Oscillating Tool Guide System
It's stable enough to comfortably cut one handed, almost like a pair of scissors.
One-handed, overhead cutting, using the Oscillating Tool Guide System
Accessory Changes
The DeWalt uses a tool-free, accessory clamp system, with a big spring-loaded lever and those gripping teeth I mentioned earlier. The tapered teeth slip into holes in the blade and grip tight. This is one of those features I didn't know I missed when using my original tool. I had simply dealt with hunting around for the special Allen wrench to make changes and periodic re-tightening.
Quick, tool-free blade change
Battery life

I challenged the multi-tool during my project, by performing plunge cuts inside the wall cavity through 2x4's. I completely cut through the boards in four places; two locations were actually doubled 2x4's. I sliced a couple nails in the process too. All of this, including the drywall cutting, was done on a single battery charge, with juice to spare. DeWalt claims a 57% increased run-time due to the brush-less motor. I was really pleased, because I only have the one 20 V MAX battery on hand. My aging fleet of cordless tools are running on last generation, monstrous Ni-Cad batteries that I couldn't swap into the tool.
The tool was powerful, yet lightweight and easy to handle. I could fit the thing inside the wall cavity, with enough room for my fingers to grip it. Of course, my entire hand wouldn't fit in there to pull the trigger comfortably, but there is a trigger lock feature to keep it running, something else my original tool didn't enjoy.
Tight Spaces
It plowed through the cuts fairly quickly. Of course, it was slower than a reciprocating saw would have done, chewing full-speed. I probably wouldn't reach for this tool in an open stud-wall situation with both tools on hand, but that's not what it's made for. This little soldier is a commando, trained for precision strikes, in difficult-to-reach territory and, with a variety of accessories, it's prepared to take whatever weapon it needs to complete that mission.
Plunge cutting a 2x4
Light it up
Seriously? A headlight? It's another feature I would not have actively added to my shopping list, thinking it a silly inclusion, like dealer added pin-striping and mud-flaps on a car. However, at the end of the day, I absolutely loved it; I was lining up my cuts on pencil lines, hiding in the shadowy recesses of a wall cavity. It was awesome.
In fact, at one point, because I can be an idiot, I dropped my remote camera trigger down inside the wall and simply shined the tool's LED headlight down the wall to locate it.
(Note: The Oscillating tool does not include any feature whatsoever to reach three feet down inside a tight wall cavity and fish a feeble-fingered Blogger's critical, photography item out. Disappointing, you'd think they'd have thought of that and added some kind of Bat-Grapple thing. I gotta deduct points for this omission.)
Bright idea
I found the tool versatile and enough to use throughout the entire project, I even used it like a pair of power shears to cut the beadboard backer. I rough cut it to size, then trimmed it flush, once it was tacked in place.
Detail Sanding
I popped on the sander accessory and gave my project a good once over. The kit I purchased includes this fitting, plus a decent supply of sandpaper, in three grits.
How do you like my dust extraction system in the background? Wintertime in Phoenix baby!
Detail Sanding attachment with 120 grit
No complaints on the sanding, I slipped a piece of 120 grit on the hook-and-loop pa and went to town. I rounded the edges slightly, cleaned up my puttied nail holes, and gave the whole piece a once over, including the inner corners. The tool was easy to handle. I loved not having to fiddle around with a clumsy power cord while I sanded the piece.
Bottom line, I really like this tool. I'm sold on the concept of a multi-tool in general, but this DeWalt came through with everything I wanted, and more. It's well balanced, powerful, and gets great battery life. You will not be disappointed if you add this gem to your DIY tool arsenal.
This is a non-sponsored post, but I have included Amazon.com affiliate links for your convenience. If you make a purchase through one of my links, I'll earn a modest commission to help run the site, at no additional cost to you. Thank you for all your support.
Review: Keen Braddock Utility Work Boots - All Terrain / All the Time
Taking a pair of Keen Utility Work Boots into weekend DIY battle.
Read MoreGarage Organization with Monkey Bars
Installing a yard tool organization rack by Monkey Bar Storage.
Read MoreWear N Write - Clever Dry-Erase Notepads, Perfect for DIY'ers
Reviewing the Wear-N-Write. a wearable, portable whiteboard.
Read More
Review: Ryobi Door Latch Installation Kit
Reviewing the Rayobi Door Latch Installation Kit in action.
Read More
The very essence of destruction itself, leashed in your hand.
Review: Stanley Functional Utility Bar (FUBAR!) - a destruction love story
After a polite invitation from our HOA to promptly remove (demolish) our front door overhang, I decided that I needed to get something a little better than a 12" wonderbar and a too-heavy, sawed off sledge hammer to take into the fight. I considered the Dead On 18-Inch Annihilator Utility and Wrecking Bar versus the Stanley 55-099 FatMax Xtreme Fubar Functional Utility Bar
Choosing the FUBAR VS. The Dead-On Annihilator

A bit of research revealed that the users have reported quality issues with the Dead-On Annihilator. The design seems pretty good and it certainly looks wicked, but reports of slipping handles, claws snapping off, welds breaking and general failure of the cast-metal frightened me (and my wallet) off.
Photo: Courtesy of rockstar4960 - used with permission
"A 98 pound guy did this with a brand new tool, by banging it on a piece of wood. Yes, that is a weld. I guess they are 2-piece hammers. I expected it to be a 1-piece design. We'll see what their lifetime warranty is all about."
- rockstar4960
Most of the positive reviews I saw reflected on how mean it looks and an intent to use it as a defense weapon in the upcoming zombie apocalypse. Zombies, in a tool review. That's just stupid.
Just because it looks bad-ass and has a skull-head sticker, doesn't mean I'm going to take it within the 18" it would take to hit a zombie. You'll find yours truly wielding a trusty 3/4" conduit bender with a nice 36" long handle when it comes to repelling those brain-munching ghouls.
I went with the Stanley Functional Utility Bar. It's four pounds of forged-steel brutality. I liked the feel of it better in the store too; it just looked and felt more solid. I'm going to stop comparing the two, because I didn't take the Annihilator home and I can't review it in action. Just don't get hung up on the names; if you want some bad-ass street cred, the term "FUBAR" has some pretty tough roots itself, look it up.
From the manufacturer: Professional grade utility bar is a 4-in-1 tool for prying, splitting, board bending, and striking 1-piece forged steel for increased durability Textured grip for excellent comfort and control, even when wet beveled nail slot for pulling and prying nails. Limited lifetime warranty.
This isn't simply a review where set up ways to try the tool, just to share it with you. I purchased and took the FUBAR into actual battle in the demolition of our front porch overhang , a treacherous tunnel of ill-constructed lumber, nails, and hardware to lay waste upon. I brought along my sawed-off sledge, (Mjölnir) but it never got a chance to play. The FUBAR hogged all the carnage.

Destructive fury, pictured from (left to right):
THUNDER! and LIGHTNING!

I thought if I threw it, it was supposed to fly back into my hand.
As a demo hammer, it made short work of slaughtering latticework. I used the big gripping claw to rip and pull at it, the pry bar to pop it off the frame and break it down into strips. It also worked really well in twisting and ripping 2x boards off. It grabs ahold and bites in, hard.
The hammer was beefy and balanced to strike mighty blows to the hardware, loosening it up, even blasting it clean off at times. It was initially annoying that the claw is too thick to pry narrow gaps like a hammer, and that there is not a nail puller on the head. It's an old ingrained habit to quickly reverse a normal hammer to pull nails or pry with a claw.
Instead, the FUBAR has a forked pry bar, at the handle end instead of the head. After a little use, I got used to it being down there and was no longer annoyed. It probably makes the tool a lot stronger to keep the claw end so beefy. I found myself prying holding the top of the claw, in a T-grip fashion. It was comfortable and allowed good leverage. Now, I like it this way.

Nail pulling is easy. The hammer, with it's meaty heft, pops them hard from the reverse side. The combination of the forks and the pulling slot zaps them the rest of the way out quickly. Due to the hammer balance being a little weird, it takes a little more attention to hit the nails without bending them, versus a normal claw hammer, but if you connect squarely, the nails are going backwards in a hurry! I've seen others lament the curved pry bar being a wrist hazard for right-handed bashers, but it gave me no trouble whatsoever.

The good old pry and whack maneuver

I pounded, twisted, pried, and ripped the heck out of the structure. The FUBAR stayed with me as the primary tool of devastation. I bet the neighbors enjoyed me leaping up to pound the decking off the rafters like I was the Norse God of Thunder. With my hand at the base, just above the bent pry bar and on the rubber grip, I could deliver some serious leverage to my swings without worrying about the thing flying out of my gloved hand and hurtling through the front window.
I did use the claw to pry a new board in to place a bit before shooting with the nail gun. It did it very well, but it's probably not best for finished surfaces (like facia) because it leaves some tooth marks. It would be great for framing though.

I discovered "makeshift vice mode", you can now call it a 5-in-1 tool Stanley!
This thing is a beast. Honestly, I abused it and only scratched the paint.

I probably shouldn't be doing this,... but it worked.
The verdict -
- This is a well-crafted tool of demolition madness. I heartily recommend it, for what it is supposed to be. It's not a framing hammer.
- I'd never try to install nails with it; it's too clumsy for precision work when my fingers are on the line. It's not a full size crow bar, not enough leverage.
- It's not a sledge hammer, heavy, but not that heavy. It is a tough, multi-function demo tool that does what it's supposed to. The only thing I didn't try was the drywall wrecking blade below the hammer head. Maybe I'll wait until Sweetie is at the hair salon and I'll take out a wall to report back to you fine readers.
- I do suppose it would do some serious damage to the zombies too,... if you want to get that close. I'll pack it as a back up when it gets that serious.
What are you waiting for? Get a Stanley 55-099 FatMax Xtreme Fubar Functional Utility Bar and wreck some stuff!
Note: This is not a sponsored post. I selected and purchased the tool myself.
UPDATE!!
I'm honored to have this story chosen to be featured an Bob Vila's website as part of the "Bob Vila Nation" of contributors from the blogging community. Please check it out and give me a vote by the hammer image.

Review: ProjectCalc Calculator
In my Support Tools post, I mentioned I am enamored with my ProjectCalc. It does a bunch of stuff beyond a normal calculator, but for me, the winning feature boils down to one key ability, quickly doing calculations with fractions.
Sure, I took basic 5th grade math (a million years ago), and still remember some that cross-multiply and divide crap, but why do it when I can rely on economical technology to do it for me?

I like to save time, instead of scribbling my error filled, unintelligible calculations on scrap cardboard or 2x4s. Plus, it's more accurate than taking off my shoes to count past ten.
I keep it stowed in a drawer of measuring, layout, and marking implements, but like to tuck it in my Nail Apron when I'm suiting up for project combat operations. Its hinged cover protects it in a pocket, tool bag, or drawer full of tools. Maybe there are some smartphone apps that can do this stuff, but do you want yours to slip out of your hand from atop a ladder? I have a version older (#8515) than the one they are currently selling
 ; it's probably about 3 years old and going strong on it's original batteries. The rugged construction of this little bulldog has allowed it to survive many projects.
The fraction feature is easy to learn, but takes a few extra keystrokes to accomplish. For example, to divide 7 feet, 3 and 3/8 inches into three equal parts, you tap a few unique buttons (shown here as <BUTTON>):
Therefore: 7ft. 3 3/8 in. ÷ 3 = 2ft. 5 1/8 in. Wham Bam! Done!

Sure, I took basic 5th grade math (a million years ago), and still remember some that cross-multiply and divide crap, but why do it when I can rely on economical technology to do it for me?
I like to save time, instead of scribbling my error filled, unintelligible calculations on scrap cardboard or 2x4s. Plus, it's more accurate than taking off my shoes to count past ten.
"Math is haaard".
-Kevin Malone, Accountant
Dunder Mifflen Paper Company
I keep it stowed in a drawer of measuring, layout, and marking implements, but like to tuck it in my Nail Apron
The fraction feature is easy to learn, but takes a few extra keystrokes to accomplish. For example, to divide 7 feet, 3 and 3/8 inches into three equal parts, you tap a few unique buttons (shown here as <BUTTON>):
7 <FEET> 3 <INCH> 3 < / > 8 < ÷ > 3 < = >
Therefore: 7ft. 3 3/8 in. ÷ 3 = 2ft. 5 1/8 in. Wham Bam! Done!
 |
| Just don't forget to add the width of your saw blade, like yours truly did. |
In addition to standard calculator functions, it easily converts between decimal and fractional numbers in standard or metric measurements (linear, square, or cubic). It also calculates for paint, concrete, tile, wallpaper and carpet.
The new version takes advantage of a quantum leap forward in project mathematical calculating technologies. Calculated Industries has finally able to harness the power of White and Blue. Gone is the ancient, yellow styling of yesteryear. Of course this upgraded modern technical marvel has been renamed as the Home ProjectCalc Do It Yourself Calculator (#8510). I didn't see any other differences other than additional buttons replacing the dual button function I have to use in order to figure materials.
Calculated Industries has a full line of project / construction calculators with even more features, (like memory storage) but for what I normally do, I'm really happy with the DIY / Homeowner grade calculator. At some point, maybe I'll try out one of the more advanced models, but for about $20 - $30, you can't go wrong with this one.
I've personally used mine for renovation projects, woodworking, and electrical conduit bending calculations. I'm happy to recommend it. It's a tool worth having in your collection.
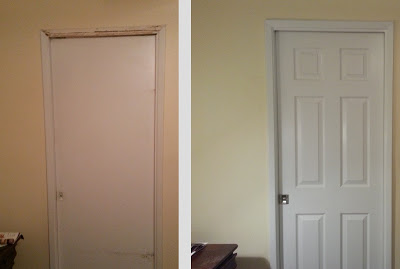
Review: JELD WEN Interior Doors (hollow core)
I'm well underway with replacing all the interior doors in our home. We started with flat slab, hollow-core doors that were probably original to the 1979 home. These originals are very plain, beat up, and so thickly coated with poor paintsmanship that there's no saving them. We've started replacing them one-by-one.

Some before and after action!
I've been picking up a hollow core, six panel doors from Home Depot by Jeld Wen. I believe Lowes sells the same brand, but I have my reasons to go to HD.

Concern?:
This sticker did not slow down the planer at all! It got chewed to bits.
I'm using the hollow core doors, because:
The originals were just fine, still structurally stable after 30+ years. It's a family home, not a great wall, fortified to withstand an onslaught of marauding Mongol hordes.
They cost $30.00 each. This is a serious improvement for a great price. I'm spending more on hardware than on the door.
Seriously, they're $30! (Compare to this investment, for more than $30)
I can man-handle these myself. They're light enough to prepare and hang solo, without having to lure a neighbor over with a craft-brew to get help wrestling a solid-oak, back-breaking beast onto the hinges.
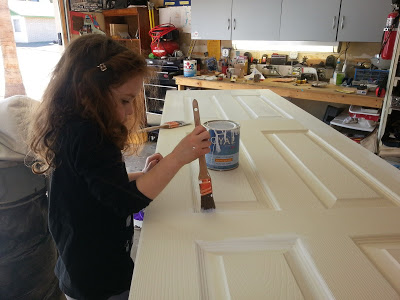
They come off-white primed on six sides and have an embossed wood grain pattern. Painted a nice glossy white, even by hand, (...even with a 5 year olds assistance) they really finish up nice.
Of course, I had to plane mine down to size. I got a look at the construction, beneath the primer. The sides are a finger jointed, natural wood. It looks like pine. It's clean and free of knots and imperfections. The top and bottom are particle board. I'd prefer better, but it seems to work. Our old doors were the same. I just make sure I seal them up with primer and a couple coats of paint.

Clamping a sacrificial edge to prevent snipe and blow-out with the planer.
Because the standard sizes were too big for my framing, I bought them as slabs, no hinge mortises or holes for latches and knobs. They did have pre-bored in stock for a few bucks more, for those with houses not built by guys with short tape measures. I cut into mine for two different latch applications, there was plenty of meat left.
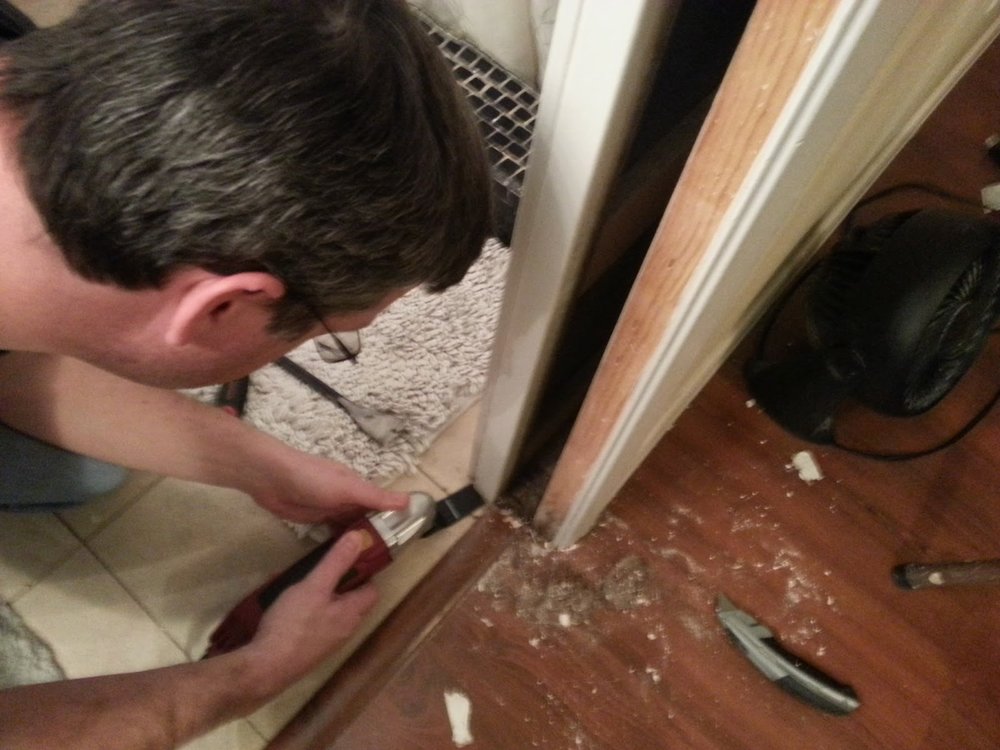
Surgery, to install a pocket door latch
The instructions limit how much you can plane down, 1/8" max per side. That was just fine for my application. I did it with a handheld power planer (Bosch).
Overall the quality was really good (see #'s 2&3 above!!!). So far, I only had one with a front that was coming off. It may have caught and popped up when they loaded it onto the shelf at the store. I glued and clamped it overnight before planing it down to size. Fixed!

I'm happy with this good-looking, easy-to-install Jeld Wen product. I have no problem recommending it to mid-skilled DIY'ers, with the proper tools, providing they don't require interior doors capable of stopping bullets.
If you'd like to follow my bumbling, door replacement adventures from the start:
Planning and decisions - Looking at doors, tools, and hardware (while sick as a dog)
Prepping a replacement pocket door - The inaugural first door
Installing a replacement pocket door - Saved the hardest for first
Prepping a replacement hinged door - Improving prep and shopping for hardware.
Installing a replacement hinged door - Here's my first hinged door install, including the first attempt at hinge mortising.
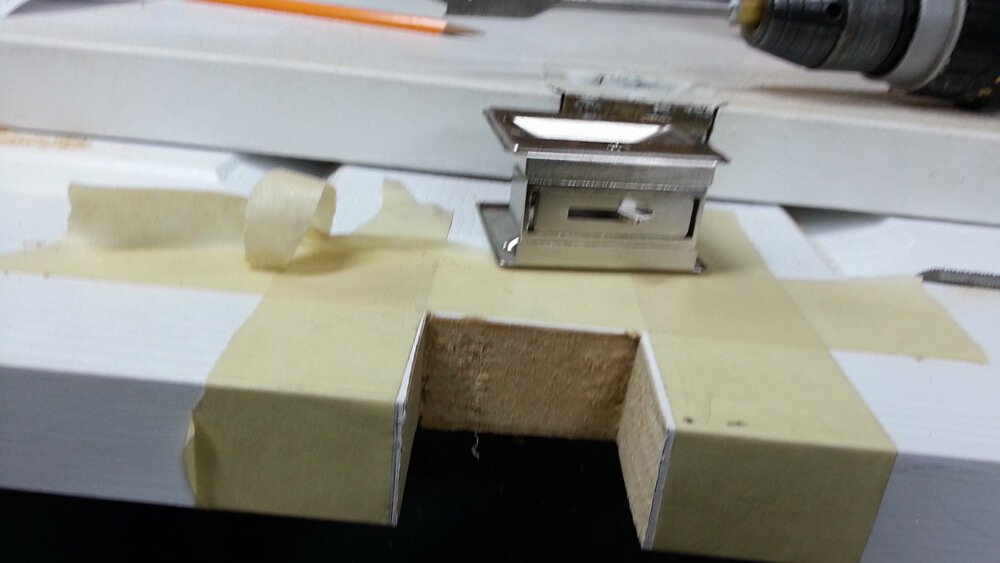
Review: Ryobi Door Hinge Template - Now I have it figured out!
Father & son DIY skills training - including the pitfalls of door shopping with your guard down.
I’m keeping this old, small version of the top pic on my site for a while. There is a carpentry business that stole my image and is passing it off as their own on their corporate website. Weird, right? - John
Review: Ryobi Door Hinge Template
 |
To those who haven't heard the term, a mortise is a recessed area on a door where the thickness of a hinge leaf is set, in order to lie flush with the surface of the door.
We've been slowly replacing all our ugly interior slab doors with nice looking six-panel beauties. After the initial pocket door experience and the guest bath door install, I'm getting the hang of it.
Without prior research, (very, very unlike me) I picked up the Ryobi Door Hinge Template

First off it's plastic. But it's that pretty tough stuff, not brittle. I also liked that all the parts (except drill bit and double end driver bit) fit neatly for on board storage. The kit includes instructions, corner inserts (reversible for 5/8" or 1/4" radius hinges), a guide rail for smaller / laminate routers, a router bit with top pilot-bearing, a 1/8" drill bit, a double-ended driver bit and the hinge mortiser unit itself.
 |
| Yep, I'm wearing shorts and sandals. It's 85º today! (Sorry Detroit @ 27º) |
 |
| Depth Charge! |
The instructions are pretty no-nonsense, bullet points. After setting the depth, they simply state:
- Turn on power tool and remove wood from template area

 |
| Flat bottomed: It makes the rockin' world go 'round. |

A perfect, neat fit. Just a matter of rubbing a bit of gummed up paint off and erasing some pencil marks. I moved the rig over to the next spot and zapped it out in a matter of seconds. Perfect.
The verdict I - For a DIY / Remodeler this thing is a definite win. To adapt easily to different door sizes and hinge types it's intricate and clever. It's darn near stupid-proof. For less than $30 to get pro quality results at very high speed, I think it's a tremendous value, and I am happy with my purchase.
The verdict II - For a true professional, I don't know. There's the plastic issue. It's got a bit of flex to it. I had a couple slight abrasions to the guiding surface after the first hinge. Nothing that will affect my work, but I wonder how it will hold up when you need to do a couple hundred doors. I'd also want to look at replacement router bits, just to be sure you can get them when you wear this one out. Still,... the whole thing is $26 bucks. I've seen individual router bits for three times that cost.
I'll follow up later, when I've done another 4-5 doors, and let you know how it's holding up.
Full disclosure: The opinion in this post is wholly my own. I have received no compensation for it. I purchased the kit at my local store, along with an Italian Sausage, chips, and a Coke combo from the "Bad Dogs" cart out front. To be 100% honest, to my readers, I ate the whole meal before I cleared the parking lot.
<update> Pick one up at The Home Depot here:
Affiliate links inluded
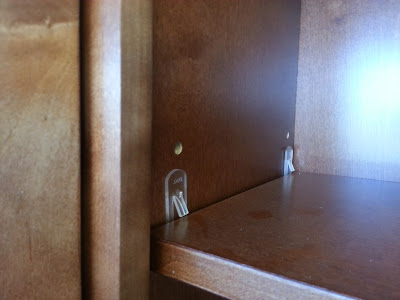
Cabinets to...No
We decided to take a trip over to our closest Cabinets to Go showroom, excited to find an economical solution for our impending kitchen remodel. It's about 45 minutes from our house, so we made it a family outing / lunch out.
We'd already perused the catalog they'd sent in the mail. It looked really good!
When we entered, they had a really nice looking selection of cabinets set up along with wall displays of hardware, vanities and countertop samples. Still good...

.. until I looked up close. Sure, it's wood & plywood, but it did not have a good fit and finish. There were gaps in the trim I could see through. The shelf pins were plastic clips. A big surprise to me was that it was held together with knockdown hardware, plastic from what I could see. The painted door fronts were cracked at the seams (Which I know happens due to wood movement, but it looked rougher than I'd expect.)
Awww nuts. If it seems too good to be true, it probably is,...right? This stuff is IKEA-ish. It's probably slightly better, due to the solid wood,... I'll give it a rousingly solid rank of "decent-ish". Maybe it's even a good value for the dollars. But I can tell it won't last for the long run; I doubt the install would be pleasant.
We didn't stick around long. The lone salesperson was working with another couple, and never acknowledged our presence. Later, I looked at their website more closely. Although it had higher-end manufactures plastered across the homepage, we didn't see any of them. We had just seen the Chinese, assemble-it-yourself stuff. The fact that they are assemble-it-yourself is buried deep within the bowels of their website, under terms and conditions. Just read through those babies and decide if this is the type of outfit you want to work with on your beloved dream home. To me they say, very clearly, "RUN!!!" I couldn't find any reference to them being "ready-to-assemble" anywhere in their gorgeous, full-color 27 page catalog. It just feels intentionally tricky to leave such a detail hidden, or to bury it somewhere less than obvious. Scuzzy. I don't mind economy grade or doing assembly, but this marketing style is the old put lipstick on a pig routine.
I did a little follow-up surfing on the company. There appear to be plenty of happy customers, but just as many, or more, unhappy ones, really-really unhappy ones,.. downright pissed-off, plaster their complaints across the internet, everywhere they can find a text box ones. There are countless horror stories about poor customer service, shipping damage, missed delivery dates and endless replacement times. As I suspected, there are poor ratings from the Better Business Bureau. Enough to scare us off, even if we were still interested in the product.
Although we could save some serious coin, I just don't think it's in the cards for us. It's still a huge effort in time and money to settle for something of this quality. Maybe if we were flipping houses we'd think about it, but even then, I'd just buy in-stock from a big-box to avoid shipping issues and the risk of poor customer support.
I really wanted this to be a win. To good to be true.
We'd already perused the catalog they'd sent in the mail. It looked really good!
When we entered, they had a really nice looking selection of cabinets set up along with wall displays of hardware, vanities and countertop samples. Still good...
.. until I looked up close. Sure, it's wood & plywood, but it did not have a good fit and finish. There were gaps in the trim I could see through. The shelf pins were plastic clips. A big surprise to me was that it was held together with knockdown hardware, plastic from what I could see. The painted door fronts were cracked at the seams (Which I know happens due to wood movement, but it looked rougher than I'd expect.)
Plastered around the showroom were photocopied signs that the cabinets were "ready to assemble". Ok, wait,...what? I don't recall seeing that little detail anywhere in their flashy literature.
Awww nuts. If it seems too good to be true, it probably is,...right? This stuff is IKEA-ish. It's probably slightly better, due to the solid wood,... I'll give it a rousingly solid rank of "decent-ish". Maybe it's even a good value for the dollars. But I can tell it won't last for the long run; I doubt the install would be pleasant.
We didn't stick around long. The lone salesperson was working with another couple, and never acknowledged our presence. Later, I looked at their website more closely. Although it had higher-end manufactures plastered across the homepage, we didn't see any of them. We had just seen the Chinese, assemble-it-yourself stuff. The fact that they are assemble-it-yourself is buried deep within the bowels of their website, under terms and conditions. Just read through those babies and decide if this is the type of outfit you want to work with on your beloved dream home. To me they say, very clearly, "RUN!!!" I couldn't find any reference to them being "ready-to-assemble" anywhere in their gorgeous, full-color 27 page catalog. It just feels intentionally tricky to leave such a detail hidden, or to bury it somewhere less than obvious. Scuzzy. I don't mind economy grade or doing assembly, but this marketing style is the old put lipstick on a pig routine.
I did a little follow-up surfing on the company. There appear to be plenty of happy customers, but just as many, or more, unhappy ones, really-really unhappy ones,.. downright pissed-off, plaster their complaints across the internet, everywhere they can find a text box ones. There are countless horror stories about poor customer service, shipping damage, missed delivery dates and endless replacement times. As I suspected, there are poor ratings from the Better Business Bureau. Enough to scare us off, even if we were still interested in the product.
Although we could save some serious coin, I just don't think it's in the cards for us. It's still a huge effort in time and money to settle for something of this quality. Maybe if we were flipping houses we'd think about it, but even then, I'd just buy in-stock from a big-box to avoid shipping issues and the risk of poor customer support.
I really wanted this to be a win. To good to be true.
(Hijacked) Review: DeWalt Deep Pro Organizer
I have two inexpensive plastic tray style organizers that are pretty trashed. Years of lugging washers, nuts, screws, bolts and the like have taken their toll. I picked up this beefy DeWalt Deep Pro Organizer thinking it would be perfect for carting my common nuts and bolts stuff from the garage to my various projects. Personally, I like the portability of tray organizers rather than a bench or wall bound drawer system, just my style. At $30 it seemed like a fair deal.
I like the features. The construction is really tough as well as smart.The deep yellow bins are removable so you can take just what you need, if it's a small job. The lid has indents that keep the bins in place while carrying suitcase style. The latches, hinges, and handle are heavy-duty. You can even stack & clip multiple organizers together for bulk carrying action.
As far how it works for using it as I intended, for lugging my project hardware, my experienced advise is... I have no idea.
You see, when today's modern, tool-weilding Daddy-about-town shows up at the house lugging a rig as sweet as this one, the entire family responds with the obvious chorus, "LEGOS, LEGOS, LEGOS!!!!!!" Out-voted. Even my beloved wife, my steadfast partner against the world's challenges, sided with our rapscallion offspring.
My yellow & black, bullet-proof, hardware-toting man-satchel was mine no more. It would never taste the pleasure of lightly machine oiled hardware. Not a single 10/32 machine screw would rest in it. No, it now serves a new master and she offers no quarter:
I think I'm going to quietly grab another couple of these and smuggle them into the garage, undetected.
I like the features. The construction is really tough as well as smart.The deep yellow bins are removable so you can take just what you need, if it's a small job. The lid has indents that keep the bins in place while carrying suitcase style. The latches, hinges, and handle are heavy-duty. You can even stack & clip multiple organizers together for bulk carrying action.
As far how it works for using it as I intended, for lugging my project hardware, my experienced advise is... I have no idea.
 |
| I could almost feel the heft of this beast loaded with 7 varieties of washers, before it was torn ruthlessly from my grasp. |
You see, when today's modern, tool-weilding Daddy-about-town shows up at the house lugging a rig as sweet as this one, the entire family responds with the obvious chorus, "LEGOS, LEGOS, LEGOS!!!!!!" Out-voted. Even my beloved wife, my steadfast partner against the world's challenges, sided with our rapscallion offspring.
My yellow & black, bullet-proof, hardware-toting man-satchel was mine no more. It would never taste the pleasure of lightly machine oiled hardware. Not a single 10/32 machine screw would rest in it. No, it now serves a new master and she offers no quarter:
 |
| The Wee-Pirate and her loot. |
Admittedly, ....<Insert overused comedian cliché, but true, story about stepping on Legos in your bare feet in the dark>..., so I guess it's a good idea, to keep those little hellish, foot slaughtering rascals sorted away nicely. The kids absolutely loved sorting various Lego figures, weaponry, "cool-stuff", wheels, windows, etc. into the totes. Maybe now we won't have meltdowns when one of the Ninjago or Star Wars figures is missing one of their trusty side-arms. I think I'm going to quietly grab another couple of these and smuggle them into the garage, undetected.
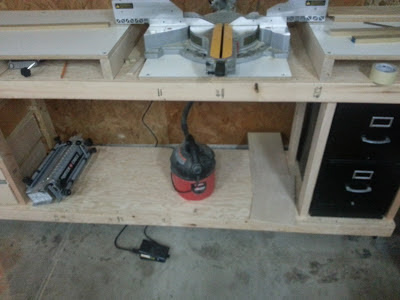
Inexpensive Foot Pedal Switch for Dust Collection
I picked up this foot pedal switch at Harbor Freight last weekend on a whim. It was only nine bucks. I meant to use it with my dust collection system on the table saw, because I have to walk over and switch-off the rear mounted switch to kill it.
Of course I bought the wrong one, not paying attention. I bought the Momentary Power Foot Switch (#96619) rather than the Power Maintained Foot Switch (#96618) that I would have preferred. The difference is that the "momentary" pedal only switches on while your foot is on it, not good for table-saw work, while the "maintained" pedal clicks on and stays on until step on it again.
Of course I bought the wrong one, not paying attention. I bought the Momentary Power Foot Switch (#96619) rather than the Power Maintained Foot Switch (#96618) that I would have preferred. The difference is that the "momentary" pedal only switches on while your foot is on it, not good for table-saw work, while the "maintained" pedal clicks on and stays on until step on it again.
 |
| This sucks! |
I ended up installing my little Craftsman "Clean and Carry" 1.5 HP / 2 gallon vac to my miter saw. I plugged it into the load side of the switch, plugged the switch in, turned on the vac. It worked perfectly when I stepped on the pedal. The miter saw is a walk up and cut type operation. Just step on the switch while you cut. It was pretty good. The dust collection pick-up on the saw on the other hand wasn't the best. But it still was better than nothing.
Watch that first step, It's a doo-oozy!
-Ned Ryerson, Insurance Salesman
I've seen how expensive these types of switches are elsewhere. Shopsmith charges $38.65, plus freight for theirs, of course it's a lot nicer unit. But for this price, the Harbor Freight unit seems pretty decent. I'll grab the maintained switch next time. Let's see how long they last.

Review: Kreg Jig Jr.
Reviewing the Kreg R3 JR. pocket hole jig. Simply awesome!
Read MoreReview: General Tools EZ Pocket Hole Jig
I picked this pocket hole jig up at Home Depot because I had a couple gift cards burning a hole in my pocket.
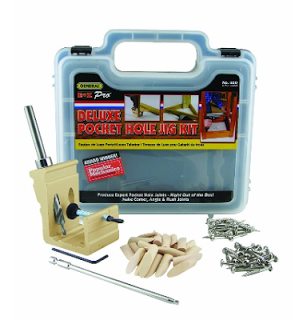
The General Tools 849 EZ Pro Pocket Hole Jig Kit as described on their web-site:
“What have I got in my pocket?"
- Bilbo Baggins*
I have haven't done a lot of pocket-hole joinery, but I have done a bit. I had a really good experience using a dedicated Porter Cable Machine about a year ago, when taking a community college woodworking class. It was pretty sweet; I blasted out at least a couple dozen holes in just a few minutes, each was perfect. I've also done them on my Shopsmith, using the horizontal boring mode with the table at a slight angle. That's fine, but a little laborious. Looking at the General Tools kit, for about $40, I figured it would do the trick.
The General Tools 849 EZ Pro Pocket Hole Jig Kit as described on their web-site:
The E-Z Pocket Hole Jig Kit! Before embarking upon your next project, be sure to grab one of Generals E-Z Pocket Hole Jig Kits. The innovative design allows you to create three popular types of pocket hole joints with accuracy and relative ease. Made of heavy duty aluminum, the Jig can be mounted to a bench for stationary use and also includes a clamping system for when portability is desired. A great choice for building cabinets, furniture or other high precision woodworking endeavors. Includes free DIY project plans!
 |
| It looks nice though. |
| The clamshell plastic box is decent enough but the divider is terribly lightweight. I can see it ripping up in short order. You get some screws and dowel plugs which, along with the box, is what makes the kit I purchased the deeeeeeee-lux version. The jig itself seems to be constructed pretty well, nice and straight without sharp mold marks etc. The stepped bit seems good. The long Robertson tip driver bit seemed a little goopy with its chrome coated finish. Here's the deal. I tried it out. I'm not going to rave about it. It performed for me reasonably as advertised, but I just wasn't pleased with it from a standpoint that I had dropped 40 bucks on it. I also thought it would not be a long lasting tool.
If you want to give it a whirl, Amazon has the kit I bought here and a less expensive version here, without the screws and dowel plugs. I took it back. I almost never take stuff back. I like a quiver of gadgets in my toolbox, even if I barely use them. But, I'd hang on to this for $19.95 tops. I hate being negative, but here I am; it just doesn't do it for me. Search "Pocket Hole Jig" and you are bombarded by Kreg products. The DIY Blog world seems to have a near love affair with their stuff. It looks pretty good. At some point I'll give that a try. Sure it's expensive, but they have one at 40 bucks, so maybe I'll give that a whirl.
*The above quoted text belongs to JRR Tolkien & co. No copyright infringement intended. |
Stubble: The Ultimate Power Tool
I've learned a lot from the DIY type shows on TV. There's one power tool all the guys use that just gets the job the heck done. I've had the pleasure to sample and to master it on my own projects. Of course, it's stubble. The ole' five o'clock shadow isn’t quite enough to pull it off; you need a professional-grade semi-beard to achieve success in today's demanding renovation projects.
I support my claim with first-hand experience. Over many trials, I have broken my weekend projects into meaningful data. Then it's a simple analysis of mathematics and production. I have found that I complete 80% of my weekend projects on Sunday, with a healthy two-day stubble. Normally, by Saturday, I'm only halfway through my planned weekend projects, naturally due to the mere overnight dusting of a single-day's chin whiskery on my mug. Coincidence? I think not. Conversely, if I had to appear somewhere on Saturday as a clean-shaven gentleman about town, my weekend projects tended to suffer, when starting fresh on Sunday. It's almost as if I lost a day's work, just because I am elsewhere half the time, in a semi-smooth faced condition.
Features
Stubble actually enhances the brain's neurological problem-solving center. Men are subconsciously trained from birth that a good scratch of the stubble* sends a blast of mental adrenalin to quickly devise an appropriate solution. This knowledge is reason that generations of cartoons have portrayed countless legions of idiots and feeble-minded morons as fools, scratching the top of their heads. They are so stupid that they are scratching the completely wrong side of their head!
Wouldn't you prefer to see your hired electrician silently rubbing his stubbled chin, as he assesses the complexities of your electrical service panel, using his knowing, steely gaze, rather than a smooth-chinned, slack-jawed yokel, scratching his unkempt hair, poking at the panel, glassy-eyed, with a bent twig, "duuuuuuuhhhh...."?
* A proper stubble scratch should be performed with a loose fist-like gesture, palm downward with a good, slow thumb and index finger stroking motion. Additionally, at no time should a single-sided, multi-finger rapid scratch be used. It just looks like a hound trying to dislodge a chigger, and is clearly beneath the status of any true tool-wielding craftsman.
Confidence.
Do you really think you can handle an 18 volt reciprocating-saw, with a heavy demolition blade, while perched smooth-faced and daintily on your eggshell-white step stool, in your khaki Dockers and a Polo shirt? Or are you going to get your grizzle-jawed self up a 8 foot, class III ladder in your Carhartt's and rip through a nail encrusted wall in a shower of sparks, drywall, and burning sawdust? Damn right you are! Confidence man!
The Research.
You don't have to trust my experience. Again, look to the cable TV renovation expert dudes. Nine times out of ten, they're sporting a good, perfectly-maintained stubble. Would the homeowners even trust them to touch their home otherwise?
There's that Property Brothers show where the twin brothers find and fix up a house for a young couple that can't afford to buy what they want outright. One is smooth-ish faced, the other measurably scruffier. Can you guess which one is the realtor and which one knows how to sledgehammer out a non-load bearing wall and create a high-end commercial kitchen out of a musty coat closet full of dead mice?
Even fictional Hollywood handymen follow the rule. Why do you think clean shaven Tim "The Tool Man" Taylor's projects so rapidly imploded into chaos, while the Al Borland shook his head knowingly, luxuriating in his Bob Vila beard?
The only guys that can pull off a smooth face reno without being laughed off the project seem to have decided to go spear bald. I haven't figured it out yet, but the chrome dome look seems to share some of the same powers as the stubble. I'm not yet willing to do any personal experimentation on this aspect.
I further recognize that the cadre of female cable TV fix-it-up experts don't go the facial stubble route, but they seem to finish their work admirably well regardless. I can only surmise by the evidence I can gather from my observations that this is accomplished through one of two methods.
The stubble, employed properly is one of the most economical additions you can use in your shop or work site. The cost is not too overly bad and compares very favorably against power tools equipped with laser targeting. The cost consist of:
I believe the addition of good quality man stubble to your toolbox will improve your work quality and productivity. Give it a try. If all you can pull off is a peach fuzz, or a mangy cat look , perhaps try the chrome dome or the too tight, V-neck lady T-shirt method.
Then again, there is an exception to every rule.
 <UPDATE> Stop the presses! This manly, manly post won the coveted "Manliest link up so far to Man Up Link Up." award over at So I Married A Craft Blogger. Check his site out, a Man's view of the world of craft blogging.
 |
| AZ DIY Guy with full stubble & kung-fu action grip |
I support my claim with first-hand experience. Over many trials, I have broken my weekend projects into meaningful data. Then it's a simple analysis of mathematics and production. I have found that I complete 80% of my weekend projects on Sunday, with a healthy two-day stubble. Normally, by Saturday, I'm only halfway through my planned weekend projects, naturally due to the mere overnight dusting of a single-day's chin whiskery on my mug. Coincidence? I think not. Conversely, if I had to appear somewhere on Saturday as a clean-shaven gentleman about town, my weekend projects tended to suffer, when starting fresh on Sunday. It's almost as if I lost a day's work, just because I am elsewhere half the time, in a semi-smooth faced condition.
Features
Stubble actually enhances the brain's neurological problem-solving center. Men are subconsciously trained from birth that a good scratch of the stubble* sends a blast of mental adrenalin to quickly devise an appropriate solution. This knowledge is reason that generations of cartoons have portrayed countless legions of idiots and feeble-minded morons as fools, scratching the top of their heads. They are so stupid that they are scratching the completely wrong side of their head!
Wouldn't you prefer to see your hired electrician silently rubbing his stubbled chin, as he assesses the complexities of your electrical service panel, using his knowing, steely gaze, rather than a smooth-chinned, slack-jawed yokel, scratching his unkempt hair, poking at the panel, glassy-eyed, with a bent twig, "duuuuuuuhhhh...."?
* A proper stubble scratch should be performed with a loose fist-like gesture, palm downward with a good, slow thumb and index finger stroking motion. Additionally, at no time should a single-sided, multi-finger rapid scratch be used. It just looks like a hound trying to dislodge a chigger, and is clearly beneath the status of any true tool-wielding craftsman.
Confidence.
Do you really think you can handle an 18 volt reciprocating-saw, with a heavy demolition blade, while perched smooth-faced and daintily on your eggshell-white step stool, in your khaki Dockers and a Polo shirt? Or are you going to get your grizzle-jawed self up a 8 foot, class III ladder in your Carhartt's and rip through a nail encrusted wall in a shower of sparks, drywall, and burning sawdust? Damn right you are! Confidence man!
The Research.
You don't have to trust my experience. Again, look to the cable TV renovation expert dudes. Nine times out of ten, they're sporting a good, perfectly-maintained stubble. Would the homeowners even trust them to touch their home otherwise?
There's that Property Brothers show where the twin brothers find and fix up a house for a young couple that can't afford to buy what they want outright. One is smooth-ish faced, the other measurably scruffier. Can you guess which one is the realtor and which one knows how to sledgehammer out a non-load bearing wall and create a high-end commercial kitchen out of a musty coat closet full of dead mice?
 |
| Pop Quiz: Which one is the Realtor and which one can jackhammer the floor out of a basement? Hint: Compare the area between their ears and their collars. |
The real rock stars of the craft sport old school, full-time facial trophies. I'm talking about Tom Silva, Roger Cook, and Norm Abrams of This Old House. Heck, they don't even comb their hair on the jobsite, they're too busy kicking old house ass with their full beard and / or moustache. But this is about what an everyman can accomplish, not a deity of the construction realms.
Even fictional Hollywood handymen follow the rule. Why do you think clean shaven Tim "The Tool Man" Taylor's projects so rapidly imploded into chaos, while the Al Borland shook his head knowingly, luxuriating in his Bob Vila beard?
The only guys that can pull off a smooth face reno without being laughed off the project seem to have decided to go spear bald. I haven't figured it out yet, but the chrome dome look seems to share some of the same powers as the stubble. I'm not yet willing to do any personal experimentation on this aspect.
I further recognize that the cadre of female cable TV fix-it-up experts don't go the facial stubble route, but they seem to finish their work admirably well regardless. I can only surmise by the evidence I can gather from my observations that this is accomplished through one of two methods.
- The use of tousle-haired meathead sidekick carpenter that seems to change every few episodes. These guys are each outfitted complete with stubble, an empty leather tool belt, nail guns and a sliding-compound miter saw.
- The too-tight, V-neck lady T-shirt. You know, the one with the weirdly too short sleeves. I don't understand the science, but there seems to some commonality to their garb on these shows. I suspect that it is the female version of man-stubble and should be attributed the same way to their success. They can't reasonably pull off a successful chin-scratch power move, but there seems to be a maneuver involving the position of the camera in relation to a quick hint of cleavage whilst circular sawing or shooting a nail gun. I truly think it's the tasteful use of boob-age that does the trick. I haven't put it to the test myself because I simply get good results by letting my facial hair grow out a couple days; I don't see the need to work dressed in a too-tight, V-neck lady T-shirt, plus I look terrible in pastels.
The stubble, employed properly is one of the most economical additions you can use in your shop or work site. The cost is not too overly bad and compares very favorably against power tools equipped with laser targeting. The cost consist of:
- The pain of carving it off your face Monday morning as well as the price of blades.
- The uninitiated simply don't realize the toll stubble takes on your wardrobe. The 60 grit sandpaper on your neck tears the heck out of the collar of an otherwise serviceable flannel work shirt.
- The degraded feeling you get when you see that baby-smooth chin in the mirror, your cheeks flush with razor burn and your fresh shaven whiskers laying in the sink, their power ebbing back to the cosmos.
I believe the addition of good quality man stubble to your toolbox will improve your work quality and productivity. Give it a try. If all you can pull off is a peach fuzz, or a mangy cat look , perhaps try the chrome dome or the too tight, V-neck lady T-shirt method.
Then again, there is an exception to every rule.
<UPDATE> Stop the presses! This manly, manly post won the coveted "Manliest link up so far to Man Up Link Up." award over at So I Married A Craft Blogger. Check his site out, a Man's view of the world of craft blogging.