Interior Door Project

Having successfully wrapped up the first of our interior door replacements last weekend with the

new pocket door

, I'm moving forward with the project. The rest of the doors are standard hinged style. The next one to tackle is the guest (

kids

) bathroom. It's one of the most visible in the house, we'll enjoy it being complete.

Pre-Primed, and too big

Rather than the more efficient, prefab / assembly line approach of buying all the doors, trimming all the doors, painting all the doors, etc. all at once, we're going with the slower, easier on the cash-flow approach of doing one door at a time. I suppose a benefit is that I don't have to stage doors all over the place as paint dries. Plus, we get to see some finished work a little sooner. The drawbacks are the repeated shop cleaning between each door's planing and painting as well as the wait time between paint coats.

I bought another six-panel door at Home Depot this morning. I also picked up a new brushed nickel, lever-style "door knob" (

What do you call it if it's not a "knob" anyway? The packaging doesn't even say

.) and a bulk pack of matching brushed nickel hinges. By buying the bulk pack of 12 hinges, I saved over ten bucks vs. buying them individually.

Buying in bulk!

Back at home, prepping this door was exactly the same as prepping the pocket door. Only this time I managed to screw up the edge planing of the first side. I sort-of tapered the door somehow; it was 1/16" off at one end. I must have twisted the depth knob when I was interrupted by a little girl offering to keep me company in the garage,... if I'd fix her a bowl of cookies 'n cream, ice cream.  It took a bit of tweaking to get it squared up again.

I really like the Bosch planer . It took a bit of practice, but I have the hang of it now. The only struggle I have is the necessity to walk while cutting the long edge. Sometimes I get a little bobble in the cut. I ended up doing a shuffle / shimmy / slide / step-behind maneuver. It would probably be better to set the door on edge. I'll try that next time.

Grab your popcorn folks! Here's the world premier movie of AZ DIY Guy in action. I'm really much better looking in person, this particular role required a dusting of grey hair at the temple and an out of shape appearance. I think I pulled it off. It's certainly Oscar worthy.

There's a dust storm rolling in! Hold your breath and cover your eyes!

Gracie's been bugging me for a week to help with the painting, so I let her have a go of it. She did pretty good,... mostly. I had to keep reminding her not to scrub (destroy) the brush and tried to keep the splatter to a minimum. I lightly, quickly brushed over her work to keep the strokes with the wood grain. Despite the exuberant assistance, It turned out pretty well.

The paint dried fast in today's 78º, dry weather. I need to put one more coat on in the morning. Hopefully, I can get it done tomorrow.

<UPDATE>

Up before 6am Sunday morning, while the family slept, I put a coat of fresh paint on the reverse side of the door. I ran out of paint right at the finish line, dang-it. I scraped that can as clean as Gracie's bowl on a spaghetti night. I need to go grab some paint first thing and finish if there's any hope of installing it today.


Installing the New Pocket Door

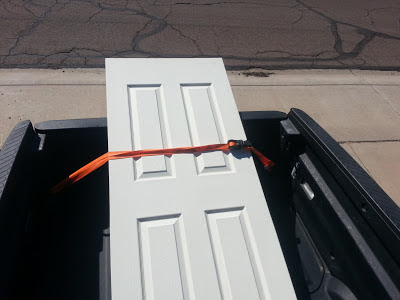
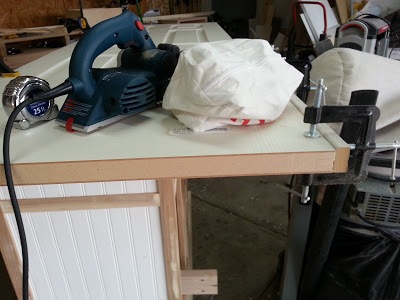
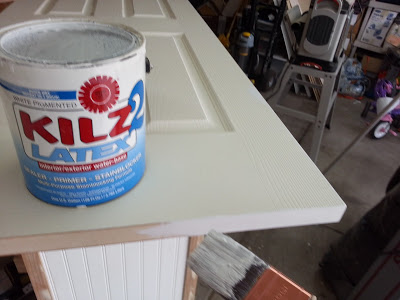
I'm installing the new pocket door for the master bath today. I'd already prepared our new six-panel door, trimmed it to fit, primed the fresh edges, and painted the whole thing with a couple coats of white, semi-gloss last weekend. If you missed the story, find it here; it's a cliffhanger. The last coat of paint went on 6 days ago, so it's nice and dry, out in the workshop.

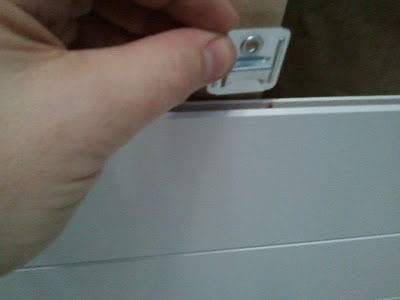
The dang thing keeps falling off its rail, plus it rubs on the inner walls of the pocket as it sways loosely from the track. I've already replaced the track mounting screws with larger screws, they seem to be holding. Look how ugly that beat up old slab door looks!

I pulled the top two trim pieces (casing?) off to access the mounting hardware, showering the whole area with bits of drywall from the rough edge behind. It isn't the best looking installation of trim I'd seen, with heavy globs of caulk filling the voids. Maybe when we redo the bathroom, I'll re-trim the whole thing with wide trim.

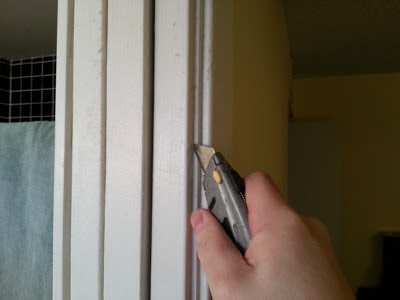
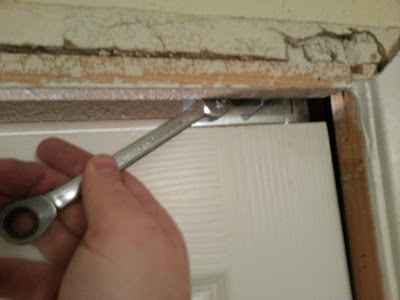
There was a side piece of molding that kept me from swinging the door out from the bottom. First a quick score with the utility knife to break the paint / caulk line: 
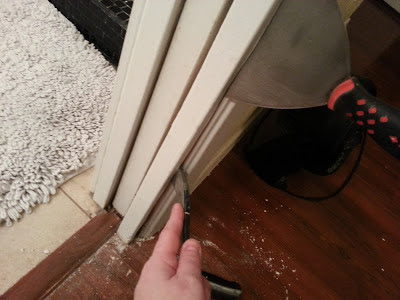
 

I used a wide-blade putty knife to slightly pry the molding out enough to stick my mini-prybar/ nail puller behind it. Having learned from several past remodeling disasters, this time I took my time, gently wiggling the tools, then the molding itself as it slowly broke free. I want to reuse it when I reinstall the door. It actually came out in one piece! 
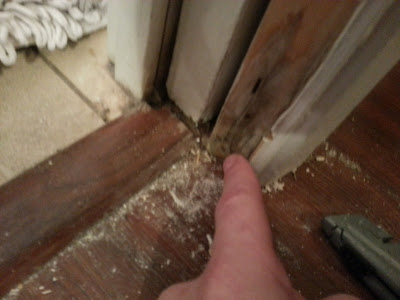
If you look close, you can see the horrendous tile in the shower. Don't worry, it's on the to do list.


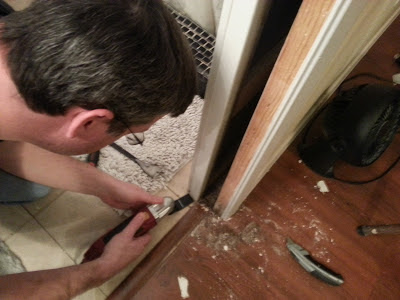
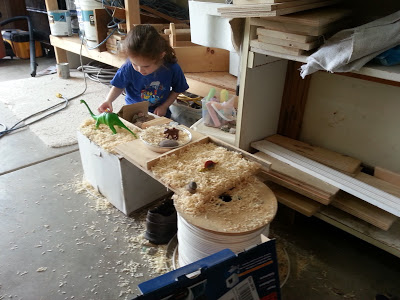
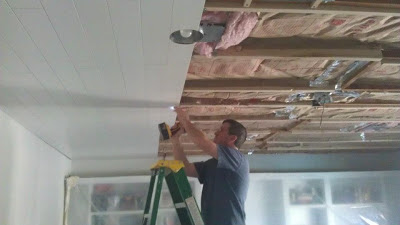
Jack stopped in and pulled all the nails that were left. The narrow head on the mini-prybar/ nail puller made it easy without scuffing up the paint on the remaining trim. He had fun with it and did a great job. There's another glimpse of that horrible black tile in the shower on the left.  

Child Labor Rocks !!!
I learned why the door was swinging free, dragging on the pocket sides. There were plastic guides originally installed, but they were yellowed and brittle. They had snapped off sometime in the past 30 years. I also saw old water damage from our wonderful house flood a few years ago. (A toilet feed line had ruptured - I'll cover that in future story).


I needed another set of hands for the next step. Jack pushed the bottom of the door from inside the bathroom while I lifted the door up with the top of my foot from outside. The door pivoted from the track, hanging like a garage door. It took my mini pry bar and my favorite, beefy, slotted screwdriver to pry the track and wheels apart. FREEDOM!!! The door popped out. I could see the wheels were well worn, compared to the replacements I have bought.

Looking inside the wall with a flashlight I can see I'm in luck. The track mounting screws inside the wall have not worked themselves loose, like the ones in the doorway had. I could only reach one with my screwdriver; it was tight, thank gods of remodeling. The whole plan to avoid cutting the drywall had hinged on this. Whew! 

Like most men, I have a one-track mind.
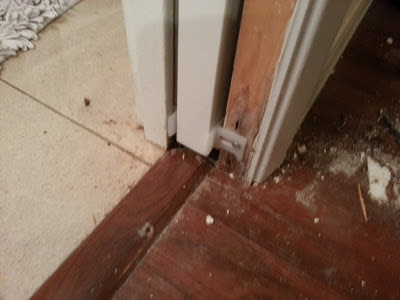
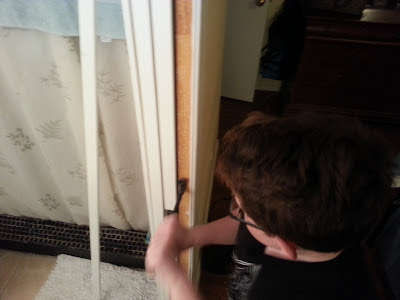
In order to replace the broken plastic guide on the bathroom side of the door, I had to pry the inside molding up a bit. Unfortunately, I couldn't get it free. The floor tile had been installed after the trim piece and was encasing it. I tried out a tool I'd never used before, a "Variable Speed Oscillating Multifunction Power Tool". It plunge cut, flush with the floor, slicing the wood like butter. 30 seconds = done! Mine is a Harbor Freight cheapie that I picked up a couple months ago on a whim; it was on sale. I'm sure it's not lasting quality, but it's a great concept. I'll definitely buy a nice, quality one whenever this one dies.


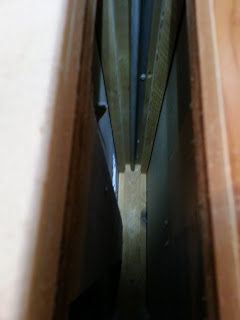
I pulled out the molding a bit, removed the old one that was installed with a finishing nail, and screwed the new one in. I'll adjust it later when the door is in.

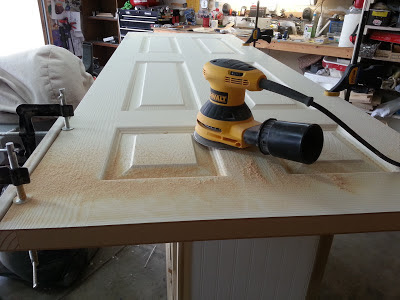
I lugged the old door out to the workshop and laid it on top of the new one. Perfect match. With luck or possibly the benevolence of magical, midnight workshop elves visiting, I had managed to use the planer for the first time, to trim the new door down to a duplicate size without removing the old door.
It was interesting to note that the top, bottom, and pocket side edges were bare, unpainted wood. That's apparently a big no-no in humid environments. I didn't see any ill effects though.
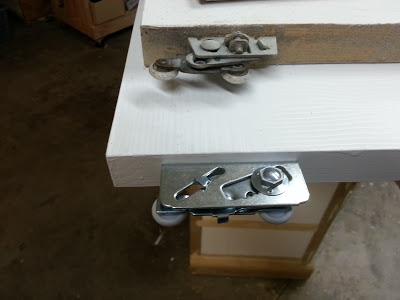
Using the old door for placement, I matched the location of the roller hardware and installed the new ones by measuring, pre-drilling, and running the screws in tight with the impact driver. The new hardware seems a lot heartier. The big hex bolt adjusts the height of the rollers, more on that later.

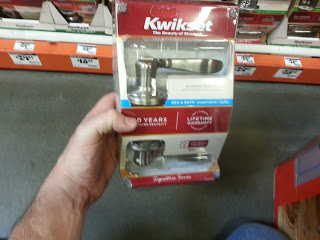
I also copied the location of the latch from the old door. A very close call, I nearly cut the same size slot, but for some reason I read the instructions and learned that the new latch was 1/8" smaller. I shudder to think what foul words I would have befouled the neighborhood with if I had ruined the door by cutting an oversize hole. The old latch was painted and had a broken mechanism. My wife even cut her finger on it two days ago. I couldn't have used it.

I managed to scuff the new paint by dragging the old door's latch across the new one's face. To avoid more damage, I taped off the face of the new door, drilled a starter hole in the back of the slot and made three slow, steady cuts with the jig-saw. The new brushed-nickel latch fit perfectly. 

Go time! I tipped the new door top first into the head of the opening and slipped the rollers easily into the track. Of course that is complete bull, a bald-faced lie.

I grunted and sweated that bastard into place crawling on my hands and knees back and forth, in and out of the bathroom trying to get those rollers to get into the track. For as many times as I had popped the old door back on track, I should have been able to do it with my eyes closed. AAAAAAAGHHHHH!!!
Finally, I turned my brain on for a second and adjusted the rollers so that the wheels were completely extended. It just took a few turns with a 1/2" wrench to extend them. Having only turned on my brain, "for a second" I was quick to realize that by cranking the wheels all the way up, it drove the door down, wedging it into the floor. I couldn't budge it. Idiot.
Turn the brain back on,.. climb back up the step stool,... crank the wheels back up,... climb down the step stool,... swing the door out,... climb back up the step stool,... extend the rollers again,...


This time, a quick prying motion with the mini-crowbar on the roller and the same with the screwdriver against the rail. Click-click, POW! Locked and loaded. I adjusted the rollers back up with the wrench making the leading edge square with the wall so there is no gap. The door slid closed smooth and easy. I installed the second guide at the bottom and tightened both. This door will not rub.

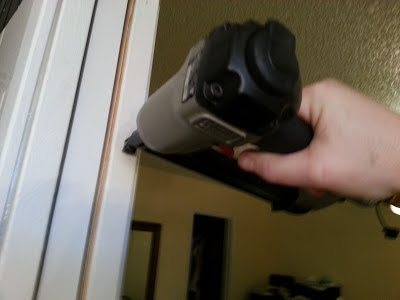
The original trim goes on with a quick "skadoosh!" from the finish nailer. It was easy to place since the original razor cut-line fit back together like a tight puzzle.


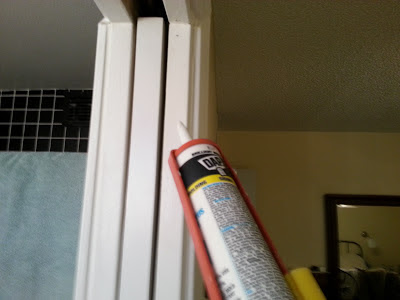
I've got it on the run now! Quickly swapping the nail gun for a caulking gun, I keep on shooting.


With wet caulk, I have to pause to address the more important task of enjoying a grilled cheese sandwich, a bag of Fritos, and a Diet Dr. Pepper that Sweetie whipped up for me. There's enough time to eat, clean up, and type up the story while it dries.

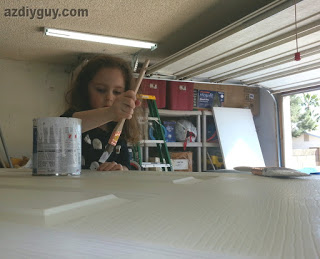
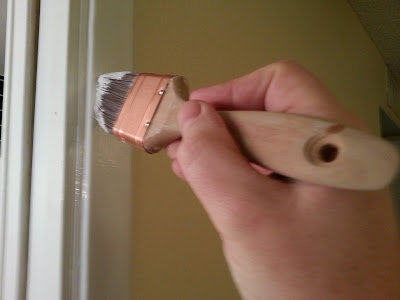
After a couple hours, I hit the trim and the door scuffs with a quick touchup of white paint. It's nice that I didn't have to remove trim from anywhere against wall color paint. It was all trim on trim / white on white, therefore no masking, just a quick layout of old newspaper on the floor to avoid drips.


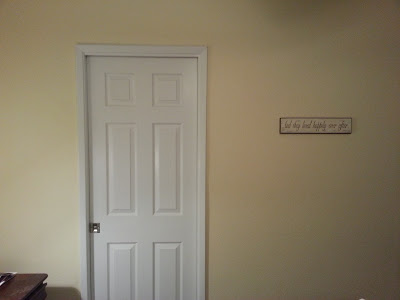
Finished! I think it looks 100% better than before. It really dresses up the room a lot. The ladies will be pleased that the door finally, actually locks and won't fall off the track, trapping them in there.

Overall, it wasn't a super difficult project. It did take time to prep the door, but today's portion only took a couple hours to do.

What do you think? Better?
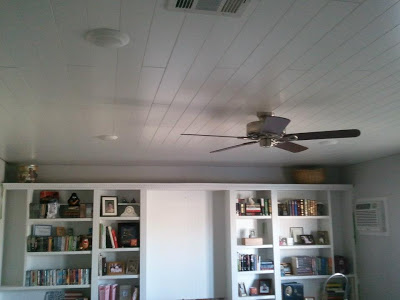
That's the only pocket door in the house. Next, I have six standard doors, the door to the garage, and a louvered closet door to replace. 

Prepping a replacement pocket door

I'm going to kill two birds with one stone, start the interior door upgrade project my wife asked for and cross one item off the to do list. The master bath door is constantly falling off the track. Several times, my poor wife or daughter has been trapped, hollering for rescue when the door has gotten wedged. I'll find the unfortunate lady, peering furiously through a five inch gap.

I initially wanted to replace the track with a two rail type, where the wheels cannot easily disengage. However, based on my research, removing and replacing the track requires highly customized tools to get at screws deep in the pocket where you cannot reach, or opening the wall up. I'd rather not open the wall and get into a bunch of drywall repair and painting. I'm going to see if I can simply replace all the hardware and tighten up what I can get to. I'm replacing the beat-up, scratched, over-painted, bleeeechh slab door.

I picked up a 28" W x 80" H hollow core, six panel door at The Home Depot for $30 along with new hardware. Like all of our interior doors, the standard size was too big. I had bought a new tool, a handheld planer. I'd never used one, but I'd used a jointer, the same principle, just move the tool, not the work piece. I chose a Bosch 6 amp, 3 1/4 planer. (Maybe I'll review it after I've done all the doors in the house - so far, so good). It took a few passes to get the hang of it, but slowly felt comfortable taking deeper cutting passes.
Notice my work bench? Yep, that's the (still) unfinished hall organizer project.
On my first couple passes, I got some splinter-out as the cutter leaves the surface, following the cut. I used a little trick I saw Tom Silva do on This Old House, although I think he was working on window casings at the time. I clamped a sacrificial strip of MDF to the exiting edge of my cut with three way clamps. The MDF took the blow-out and the snipe, keeping my edge straight. (shown to the right above)
I took the door down to 27 5/8' W x 79 3/4" H, in multiple passes, learning the feel of the planer. It threw a fair amount of sawdust, but not a ton. The collection bag filled up twice. If it was green, it would have looked like Easter Basket grass.
I hit the freshly planed faces with the Random Orbital Sander and slightly eased the edges by a quick 45 degree pass, to keep the veneer from chipping out later.  
Grace always loves playing with my sawdust. These shavings took it to the next level. She made some sort of dinosaur / Angry Birds amusement park. It was a constant, "Watch this Daddy,...Daddy watch!,.. Look at this guy!,...  Hey, watch this!,... Daddy look!...Daddy,..." She had an absolute ball,... then she tracked it into the house. 

Since I had taken all the factory priming off the edges, I hit the bare wood edges with two coats of a good primer. Since this is a bathroom door, subject to moisture, I want too make sure it's sealed up really good.  

I applied a couple coats of semi-gloss, white latex on the whole door and left it to dry. Well, at least I painted five sides out of six. Even though today was a beautiful 70 degree day, the paint was still a little tacky when I decided to clean up and head in for the Super Bowl.

I headed out to the shop and checked it at halftime. The paint took beautifully. I'll probably paint the reverse side tomorrow after work.

So far, this is a pretty easy, enjoyable project. Follow the exciting install next!

Replacing our interior doors - planning


The whole family is sick today. We're laying around like limp dish rags. No projects this weekend.

blurry picture / blurry brain
 I had hoped to dig into the next reno project, replacing interior doors. Our current ones are simple, beat up, flat slabs. The doorknobs throughout the house don't match at all and some of the hinges are painted over. My wife asked if I'd do this as a birthday gift for her.

Unfortunately, it takes all the energy I have, just to put dishes in the dishwasher. I'm down to doing research while laying on the couch, between bouts of slipping into feverish sleep.  In the end, I don't even know if this post contains a single, coherent string of thought.

We're going to need a total of 5 interior doors, plus one for the garage. I'm pretty sure that one has to be metal for fire resistance.

Par for the course, our door openings are too small for standard size doors. I'll have to see if I can plane them down enough to fit, rather than tearing out all the trim and framing. I read a few articles about resizing doors, and a planer is apparently, by far the way to go. Of course, I don't have one, so that's going to be picked up specifically for this project. It will probably be something we use again in the future, but I wonder just how much use I'd find for it. I'm not sure which route to go; do I go high quality/price (DeWalt, Bosch, Makita, etc.), mid-grade (Porter Cable, Craftsman, Ryobi, Skil), or über cheap (Harbor Freight)? Would the Harbor freight last 5 doors x 4 sides each? Hmmmm...

As for the doors, I think we'll go with a simple hollow-core, six panel. We haven't visited the home centers to look at their in stock doors, but, I've been couch surfing-them. Here's the showdown:

The blue versus orange smack down.
 
I've never taken a bare door and installed hinges, latches and knobs. I'll probably need one of the hole saw door kits to be sure I'm right, I'm pondering routing out for the hinges by hand.
 
I think we're going to go a with satin nickel lever style
Maybe next weekend... Now, it's time for medicine and some hot tea.

The Great Family Room Remodel: Part VII

This is the final episode of the Great Family Room Remodel, the last five full days of work. The electrical trim, crown molding and baseboards get wrapped up.

Spoiler Alert!  If you've stumbled into the mess without first reading the exciting beginning of the saga, head over to the beginning at The Great Family Room Remodel - Part I

Workday 15:

Electrical Switching is done and the can lights are lit!

I'm really excited about these dimmable L.E.D. fixtures. The light is decently warm at 3000k, much better than the CFLs I've seen. Each puts out the equivalent of a 75 watt incandescent at only 14.5 watts. They dim to 5%. We have more than twice the light of the old twin 60w ceiling fan for less than half the energy. It's spaced more evenly around the room. Plus, they generate less heat, which reduces the A/C load. They supposedly last 32 years. Commercial Electric T91: $39 each at Home Depot. They take about a minute to install in a standard can, including opening the box and climbing the ladder.

t took a bit of fiddling around to get the dimming to work. Dimmer switches specifically for LED fixtures didn't work. I ended up going to their website and figuring out which standard dimmer to use.

The three gang switch box includes a dimmable toggle switch, a speed control switch for a ceiling fan, and a standard toggle switch that controls a receptacle hidden above the bookshelves for Christmas lights or perhaps a string of future LED rope light for ambient lighting.

Workday 16:

I put up the ceiling fan, which is pretty much a must-do for every room in the house when you're in Phoenix. We chose one without the light kit this time since the cans do so well. We gained a lot more vertical space in the room. This will be much more comfortable on the old noggin when I'm jumping around like a fool with the kids, playing with the Xbox Kinect.

 Rather than more white on white, we went with a brushed nickel with dark wood blades. We may change the blades in the future, but we like the way it looks now.

We pulled down the plastic sheeting protecting the bookcases. Aaaaaaghhhh. Everything was coated with drywall dust. Jennifer & I spent the rest of our work time cleaning everything up. I'm still going to do some work on the shelves to make them a bit more usable later.

Workdays 17 & 18:

 80' of crown molding in 16' lengths loaded with less than 5 feet of bed space.

Putting up the crown molding was slow going since I hadn't done it before. We chose a simple, clean profile since there is so much detail on the dentil molding and the bead board in the room. We thought it would look too busy.

This is Trimfinity Crown Molding from Home Depot. It's is made from 90% recycled plastic (50% post-consumer, 40% pre-consumer). Mostly polystyrene. It's economical

too, much cheaper than wood and a bit less than MDF (which chips too easy IMHO).

After fighting the 16' lengths home, I decided to only put it up about 4-5' at a time. It's just too floppy to work with a long stick and make it look good, by myself. It cuts , nails, and takes paint like wood. I can hide the scarf joints pretty good.

<update - I wouldn't do this again in the future. Too many joints across the room, in four months, about half of them have opened up and need to be caulked. I'll have help next time instead of stubbornly doing it alone>

I'm using the method (from Tom Silva of This Old House) where I butt a stick to the wall and back cope one mitered cut rather than a dual-mitered corner that will open up later.

Note the gap at the wall and the face screwing at the edge, hidden by the crown.

Workdays 19 & 20:

Final details. We decided on a 6" tall, simple profile base molding. It seems to go with our somewhat classic look to the room. It was a bit tricky to place because the floor was so wavy. When I installed the first piece using a level, with the highest point touching the floor, I had a 2" gap by the edge. It had to be torn out. I ended up warping the molding to keep it somewhat uniform in it's distance from th

e floor. It looks good to the eye. Once again, I wish our predecessors had originally put a flat floor in. No way we can afford to tear it out and re-do it now. 

I decided I really do prefer the green Frog Tape for masking. It leaves a much crisper paint edge than anything else I've tried. There was a lot of hating on their FB site, but it sure worked well for me, on pretty fresh paint, with no issues. It worked equally well edging the crown molding. Those are my cheap computer speakers on the left. I use them with an iPod or the Kindle Fire (as show in the awesome Dodo case) to play music while I work.

That's pretty much it for the project. Just a final clean-up and moving back in. We need some new furniture to get it right. I'll do a final reveal when it's all set.

The budget was about 10 - 20% high, but I really blew the timeline. 5 workdays turned into twenty, plus several evenings during the workweeks. We're really pleased with the results. I'll check back in with more updates as more tweaks get accomplished.

And the next major project is... ?


The Great Family Room Remodel series:  

Part I • Part II • Part III • Part IV • Part V • Part VI • Part VII  • Before and After: Family Room.

The Great Family Room Remodel - Part VI

After tragedy, travel, family illness, and getting back to work, it was tough to get rolling on the project again.

Spoiler Alert!  

If you've stumbled into the mess without first reading the exciting beginning of the saga, head over to the beginning at 

The Great Family Room Remodel - Part I

As I have been recounting The Great Family Room Remodel story on this site, I've known this chapter was coming and planned on glossing over a big gap in the progress due to family tragedy, as I had originally done on my Facebook posts. I like to keep my stuff light, somewhat humorous, and not too personal. Now, months later, I feel it's an integral part of the story and I should share it; it's reality of life. Life has a way of getting in the middle of projects. Plans get derailed.

Jef:  12/21/1971 - 05/09/2012

May 9, 2012, my youngest brother Jim called me at work, from Michigan, to tell me that our other (middle) brother Jef had been taken to the hospital with some sort of heart trouble, and was in intensive care. Jim was far from the hospital, but on his way, and would call me back when he got there. His next call, an hour later, was the absolute worst news; Jef had died. He was 39. Jim, his wife, and Jef's wife were in really rough shape at the hospital. I had to tell our parents, via telephone, that their son had passed. That memory will haunt me forever. I was, and remain, crushed and heartbroken. I'd never lost anyone close to me in my entire life. We left that night, on the red-eye flight, for Michigan.

The next days were a blur. Visitations, the funeral, and family visits were an overwhelming crush of emotions. We got back home, exhausted, roughly a week later. My poor wife was severely sick. I had no steam left, or interest to working on projects. The house remained a wreck.

Jef was a truly good man and I miss him terribly. He left a beautiful family, his wife and three very young children. The amount of friends and people he had touched in his life was simply staggering. At the time, we had no idea what had caused his young heart to stop working. Now we have an idea, a belief. I'm not sharing specifics at this time. However, my personal decision and advice, based on my belief, is to stay away from energy drinks,

especially the popular shot-size energy supplement drinks

. I'd boycott stores that sell it, but there don't seem to be options for stores that don't. I've blocked them from advertising on my site.

Jef's family, May 2012, in Florida, on vacation.

Before we returned, Jef's wife encouraged me to get back to work on the family room. She said she and Jef had been following my Facebook posts, and enjoying the progress. He'd want me to get back at it.

Throughout the summer, a group of Jef's friends, still close since childhood and high school, my brother, parents and I set up a trust fund for the future education of his children. This will be an ongoing project for years.

Hug your spouse and your kids.

Workdays 13 & 14:

After tragedy, travel, family illness, and getting back to work, it was tough to get rolling on the project again. My heart just wasn't in it. But once I got started, it was really great to be using the tools, making sawdust, and blasting the iPod. Mr. Nugent may be a bit of a nut lately, but some of

his old stuff

sure gave me a boost in production. All the planks are up and it looks great.

The last row was a bear to slip in place, getting the tongue and groove together without too much gap at the wall. I also had a devil of a time with dark fingerprints this time for some reason (easily cleaned with Costco baby wipes). I still can't believe how well it worked out; in all the cuts for length, edging, can lights, A/C, and the fan, I only screwed up once and cut a board backward; measure 3 times and cut once.

By over ordering by 10%, just in case, I have a box and a half of spare planks to put in the attic, in hopes that I'll never need to make a repair. If we didn't have them, certainly the roof would be leaking by tomorrow and we'd find this particular plank out of production.

Of course there's still lots of work to do, but the end is in sight. We're ready to stop living like cave people in the dining room.


THE GREAT FAMILY ROOM REMODEL SERIES:  

Part I • Part II • Part III • Part IV • Part V • Part VI • Part VII  • Before and After: Family Room.

The Great Family Room Remodel - Part V

The Weekend Warrior is back. After a getting back to work for a week, we get back in action on the weekend. Real progress continues with more framing, insulating, and the actual installation of the ceiling planks gets underway.

Spoiler Alert!  

If you've stumbled into the mess without first reading the exciting prequels to the saga, head over and start from the beginning at 

The Great Family Room Remodel - Part I

All tucked in.

Workday 11:

Saturday: I managed to finish the framing at the sloped edges of the room to allow for end fastening of the planks. I had to rip some 2x4's on the table saw for the width of the room and create a bunch of short brackets to hold them. A slow process, since no two framing members were alike up there. I managed to get them up and finished insulating and taping the ceiling by the end of the day. Once again, the DeWalt Chalkline Laser Level  was invaluable for getting everything level.

A close up of the clip for the groove on the planks.

Workday 12:

Sunday:

Finally,

the ceiling planks are going up. It's a neat system. It took a bit to do the math, rip, and fasten the first edge piece, by face screwing the edge into the framing. 

Once that was done, the planks started slipping in quickly. It's all tongue and groove with a screw-in clip for each rafter.

 I launched a bunch of those screws around the room throughout the day, before finally realizing I needed a #1 Phillips driver bit instead of the standard #2.  I used my impact driver to drive the screws which really sped things up and was lighter than lugging the full size drill overhead all day.

It's starting to look like a finished project!

The can lights and vents slowed me down a bit, due to all the cutting with a jigsaw. Masking tape on the shoe of the jigsaw kept me from scratching the finish. I had to make cuts on three to four planks for each can light because the openings were wider than the planks. I used a paper template that came with the cans.  By the end of the day, four cases were installed, about 1/3 of the room. The room already looks better and is holding temperature nicely.

I really like the plank system. As I mentioned in Part I, they are Woodhaven 1148B Ceiling Planks by

Armstrong Residential Ceilings 5" wide x 84" long x 3/8" thick. They are an engineered board, like hardboard with a smooth, white painted finish.

We ordered them online through Lowe's and picked them up at their local home center.

It's a good looking system. You take the cut end from a finished row and start the next row with it. This way the plank seams are nicely staggered, creating a diagonal pattern.

Next, I'm derailed by family tragedy, but return with: The Great Family Room Remodel Part VI

THE GREAT FAMILY ROOM REMODEL SERIES:  

Part I • Part II • Part III • Part IV • Part V • Part VI • Part VII  • Before and After: Family Room.

Attack of the Irrigation System

So I thought I'd be a nice hubbie this morning and run out to get the paper for Sweetie. It was actually supposed to hit freezing last night, so I braced myself for the cold, dark dash to the curb.  I opened the door to realize it was raining, lovely. As I raced out from under the awning, in my flannel PJ pants, and ran down the bone-dry walkway, my sleep addled brain to turned me around to look for the single rain cloud parked over the front door. Instead, there was a geyser, spraying from the ground, raining ferociously on the roof.

It took a minute in the dark to find a irrigation line protruding from the ground with a nice little split in it. Craaaaaaaaaaap!  Happy New Year's, old bean. So much for a nice Daddy breakfast. I get to play in the mud at a balmy 36 degrees this morning.

"Ferb, I know what we're going to do today!"
                            -Phineas


See? I'm delighted!
I excavated the mess and found the line was basically scratched below the surface about 2" deep. There were two more holes in the same area, saturating the ground. All told, I pulled up about 15' of the tubing before I hit dry ground. I shut off the water flow at the irrigation timer. Dang it, I thought I heard it raining yesterday too. No wonder our water bill hadn't come down much after I fixed the valves. This rascal has probably been blasting away every morning while we are at work. I only noticed it due to the holiday. In the dark, I closed the wooden door covering our utility hookups and managed to snap the cover clean off the irrigation control box, ahhhhhhh,.... so 2013 is going to start like that, eh?
Yep. Deee-lighted!

I broke the news to Sweetie, got dressed and headed out; the sun was up. I hit the water on again at the controller. Yep, a busted 1/2 black line, just barely breaking the surface of our desert landscaped front yard. A gusher, but not black gold or Texas Tea here. Twenty minutes of this on a watering schedule is a bunch-o-water, down the tubes. There isn't even any plant life anywhere near it to benefit from the dousing. Probably just a nice clean spot on our roof.


Another little bonus I uncovered is a 1/2" PVC Electrical conduit. I have no idea where it's going, but it's not at 18" depth where it should be, more like 6". Nothing I can deal with today. I've never messed with this drip irrigation line before. It branches 1/8" runs out to little drip nozzles near the plants. I'll have to install two of these branches in the section I dug up. Off to Home Depot I go, 8:30 am on New Year's Day! Woooo Hoooo!

Sent a geek to do a man's job
At least Home Depot was open at 9:00; it was like a ghost town. Only obvious service technicians trolled the aisles, plumbers and electricians grabbing supplies for likely emergency calls. In my weather-beaten old Carhartt work jacket and my Sunstates Equipment rentals cap, I blended in nicely with the pro's. I gave one guy the classic manly nod and offered a, "How ya doin?" Yep, one of the pro's. At least I thought so, until I happened to glance down and notice I was still wearing my "Send in the Wookie" t-shirt I had slept in. Dork.

Exactly 1 bunch of stuff.
I was pleasantly surprised that compared to most DIY tasks I managed to grab a pretty big haul of material, including a ton of extra parts and pieces for future problems, for a pretty reasonable $29.54. Of course it's because it's mostly inexpensive plastic, but still it seems like even inexpensive plastic crap seems to quickly spike up to a hundred bucks or so every time I make a run for the store. I needed 15' of the tubing, I bought the smallest quantity available 50'. If I save it, I'll probably never need it. So, I'm saving it!

The tubing cut with a utility knife. The pressure couplings worked pretty good. Pressure held nicely. I used the little punch tool to poke a hole in the tubing, and stabbed the little 1/8" connectors in the side for the branch line. It's too easy. It took me longer to dig the hole and expose the line than it did for me to repair everything. With the water back on, everything held nicely, maybe a little sweat drop of leakage at the connections, but nothing serious.

I took a little time making sure there were no rocks against the tubing as I buried it a bit deeper than I found it. I filled in the trench, tamped it down a bit and took the rake to the area. DONE!!!

 
We were too hungry for a good old Daddy breakfast as planned, so I got cleaned up, loaded the family loaded into the truck and landed in line at IHOP by 10 am. Somehow, we squeaked in during a pause in the holiday rush. I was eating a meat-infused Colorado omelet, hash browns, and hot coffee before 10:45. This has got to be a record for a household emergency repair for me, especially one I started without any prior experience.

Happy New Year to all!