

After finding a plumbing leak and tearing holes in the all, it's time to repair the pipes. Soldering and using handy push-fit connectors.
Read MoreSurprise! Finding a leak inside the wall.

I could hear something inside the wall. Note: This phenomenon, is generally what we like to call in the homeowner business, "bad news". Rarely, do noises in the walls turn out to be the shifting of gold doubloons sliding off a big bundle $20 bills onto a pile of 30 year old Apple Computer stock. No, it usually means you are going to spend money, lots of it. It is, however, a perfect opportunity to practice up on your curse words.
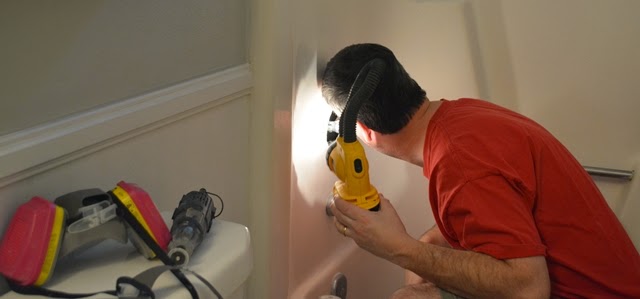
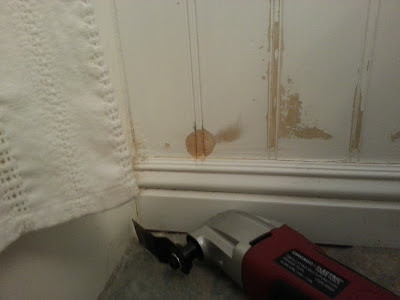
With the shower valve opening too small, I couldn't see into the wall, but I could hear water spraying. With the crud-circle buildup around the valve cover as a guide, I cut the hole larger with a rotary tool. The fumes and dust of cutting fiberglass were pretty strong, so I opened a window, turned on the exhaust fan, and slipped into the manly-pink 3M Professional Multi-Purpose Respirator
 |
| "No Luke, I am your Father" - D. Vader |
 |
| I don't see any hidden treasure either. |
Just like plumbers have done for hundreds of years, I stuck my smartphone up to the hole and took a flash photo for a better look.
 |
| Fact: This age-old smartphone trick is believed to first been used in Boston, circa 1771.
- The More You Know
|
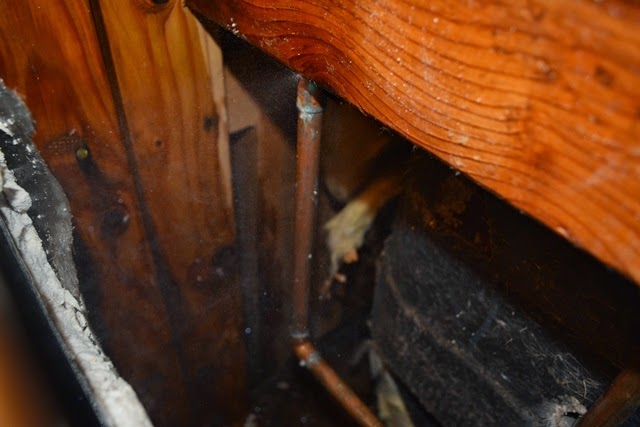
I could now see the leak. How the heck to fix this? There's a fine mist of water spraying, away from me, out the back of a 90 degree elbow, behind the wall of a one-piece shower / tub unit. Sure, this yellowing, beat-up old tub is on the eventual replace list, but there's no time or money for that now. I surely can't carve a hole through it and shut down one of our bathing locations.
 |
| The culprit. |
I checked the other side of the wall, our master bathroom. Now folks, correct me if I'm wrong, but when you press on a wall, it shouldn't bend right? Even if it's over an absolutely hideous 1970's gold marbled counter top?
 |
| Wasn't there a bending wall scene in Poltergeist? |
The side piece of the back splash (side splash (?)) is a separate piece. I figured I could cut the caulk, remove it, cut a hole in the drywall behind it, and if the DIY gods smiled upon me this day, quickly repair the issue.
Of course, that was before I simply plunged my knife through the caulk and spongy, wet drywall with ease. I slid the blade through the wall, like it was oatmeal.
 |
| This is not the work of a Sheetrock saw, just a simple pocketknife blade. |
Fan-freaking-tastic! My Facebook followers have already seen my happy face, bright-eyed with the magical wonder that is a handful of sopping insulation and the joy of beholding of drywall unable to hold its structural integrity. It's a face from the musty, recognizable smell, the smell of my weekend evaporating and my wallet flying open.
Great.
 |
| Can't you just see the joy on my face? |
With the wall open, and the insulation out of the way, I was greeted by a effervescent mist of water, steadily wetting the inside of our walls and soaking the floor of the cavity.
 |
| Cool mist. |
I could feel a J-nail holding the pipe, tight against the 2 x 4 cross-member that was there simply to secure the plumbing. The wood was blocking any hope of repair, so it got hacked out with a Reciprocating Saw .
.

Since we still had a load of laundry on rinse cycle, I didn't want to kill the water to the house quite yet. A gob of duct tape (the crowning achievement of modern civilization) and did a hasty wrap job, keeping the water from spraying in my face. A bucket placed below, began to collect the dripping water.

The bucket filled in 20 minutes. I figure there was at least 5 hours of leaking water so there is a minimum of 15 buckets of water loose in the cavity. Spec-freaking-tacular!
 |
| At least it was a small bucket. |
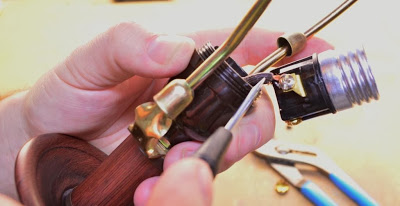
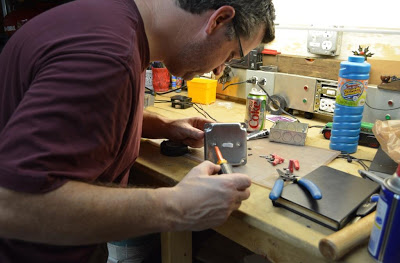
A few years ago, I'd bought a Bernzomatic Trigger Start Torch kit. I use the case to keep all manner of plumbing stuff in one place. I lugged it into the bathroom to see what I had to work with.
 |
| Sure it's a nice torch kit, but can you take your eyes off that delicious 1970's counter top? |
After shutting water off to the whole house, I used a Mini Tubing Cutter from my kit to slice the section out. These are handy little tools. They simply slide over the pipe and twist around it. You tighten the knob every few rotations, which drives the cutting wheel deeper into the pipe, until it finally snaps off, clean and straight.

It's a handy little gadget. This one really needs a replacement cutter wheel, but it made the two cuts.

Next up! Off to the friendly neighborhood hardware store to buy some copper.

This is running long, so I'll break it off here and tackle the repair next time. The bathroom window is open, there's a fan down in the wall and another one on the counter top. This mess needs to get dried out before the wall can be sealed up.
Any chaos in your weekend friends?
UPDATE: Here's the plumbing repair. At first, I make it look hard by failing miserably...
The Great Fix-It yourself Contest Winner!
A couple weeks ago I shared some of my DIY stories and asked about yours:
What have you done to save the family budget and keep stuff from the landfill? What's the one thing you're glad you fixed rather than throwing away? What fix it job are you most proud of?
Crucial Vacuum sponsored the contest for a $100 Amazon.com gift certificate.

Here are some of the great responses:
Jess:
"I'm not a mechanic or technician.....at all. And I'm uncomfortable with electricity so any fan or light fixture replacements are done by my dad or friends, so I can't take credit (except for skillfully selecting excellent amigos), but I have replaced my tub's faucet and I took off the drain to remove a hair-based clog in the tub. I figure I would have had a plumber come out for that, so probably saved me $100. And learning to do that was empowering enough that I put on some Spice Girls music to celebrate."
Eric:
"I bought my first Arizona tract home during the frenzy of 2005, so naturally I was broke the following year when the AC quit working. I spent some quality time in the attic replacing the fan motor and controller board and probably sweat off a few pounds in the process. The real feat in this whole experience was finding a place that would sell me the parts. Thankfully I found a small shop in Mesa that saved me from having to wait for parts to be shipped"
Margaret:
"I replaced the lid switch in the washer of our rental. It worked and the washer is still going strong several years later!"
John:
"I recently replaced the drain pump on our front loading washer. These things aren't really designed with ease of maintenance in mind. Got more scratches on my arms than if I got in a fight with a rabid bobcat." (Check out John's blog: Our Home from Scratch)
Brian:
"I am always trying to save a dime. One day my grinder stopped working and I thought it was the power switch. I never fix a grinder before, and I could have bought another for 10 bucks at Harbor Freight. However, I thought that I would open it up and see if I could fix it myself to save some money. Worse case scenario if it was thrashed I would at least know I tried before I junked it. I opened up the case and one of the brushes a brass plate was off one of the brushes.
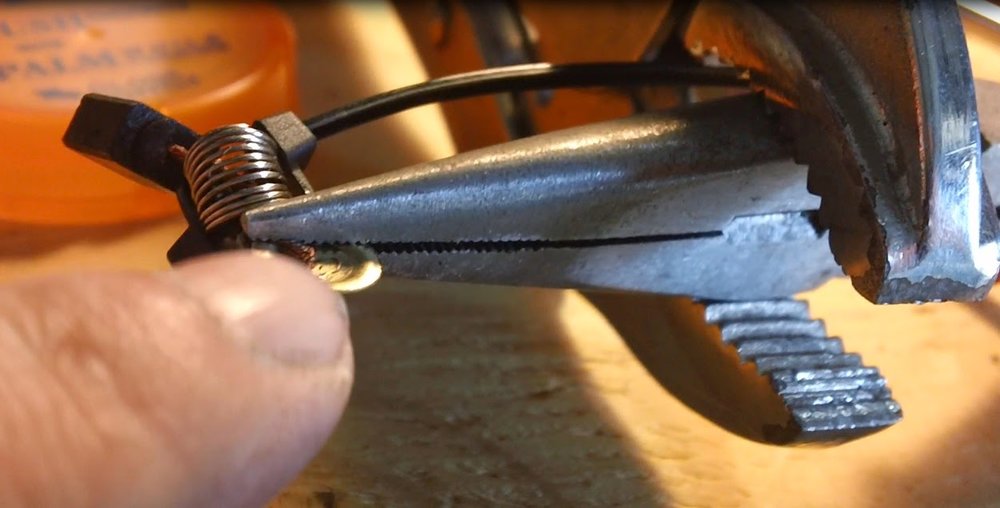
I could have stopped and bought a new set of brushes but these had a lot of life left in them so I figured I would find a way to fix it. All I had to do is solder the brass plate to the wire that is embedded in the brush head. Now in order to do this, I had to find a way to hold everything and compress the spring that goes over the wire, in between the brass plate and the brush head. Enclosed is some pictures of my solution."

Check out Brian on his site too! Summers Woodworking He has an infectious joy for woodworking and tools.
Ben:
"I fixed a broken soap holder in our tiled bathtub wall. We realized there was a problem when there was a leaking ceiling in the utility room that the tub sits over. The previous owners were the type that knew just enough about everything to screw it all up. Turns out there wasn't enough of a stud to screw the soap holder into, so they shoved a few pounds of drywall mud and shoved it in. Well, needless to say it started sagging from my two year old doing chin-ups on it (I exaggerate). I had to rig a 2x4 extension to the stud that was half visible and add a few tiny sheets of plywood to fill the gap of missing drywall, then I lathered it with liquid nails and taped it up for a few days and voila! No need for a plumber and saved countless dollars."
Thank you everyone for the stories. It is an impossible thing to pick the best. My friends a Crucial Vacuum picked the top two. I was frozen with indecision, so I had to flip a coin to make the final call.
Congratulations to John V who wins the $100 Amazon.com gift certificate!
Thank you to Crucial Vacuum for being the prize sponsor for this fun contest. Please check them out when you need some parts, supplies, and information for your DIY vacuum repairs.

www.criticalvaccum.com. Back to regularly scheduled programming soon friends!
The Great Fix-It Yourself Contest - $100 prize!
On this blog, I like share tales of "Fixing Stuff". Now, we want to hear yours.
One comment / story is going to earn a $100 bounty, a glorious Amazon.com gift card from our friends at Crucial Vacuum! (update: Contest over)
Over the years, I've taken advantage of the internet's easy accessibility to repair parts and educational resources to fix stuff that I would have either thrown away and replaced or paid someone the big bucks to repair for me. It's become my first reflex to tear stuff apart and fix it. I've saved tons of money in the process.

Replacing the cord on the dust collector.
Of course there's risk involved. I've attacked a repair, casually ignoring the "no user serviceable parts" label only to find that not only was I unable to fix the item, I couldn't even hope to put it back together. I am embarrassed to admit I did the walk of shame to the trash bin with an armful of plastic, electronics, tubes and dangling wires that had once been a beautiful Keurig Platinum coffee brewer.
We lost a $130 coffee brewer in that debacle, but it was busted and out of warranty anyway. I'm not going to do a brake repair job on my wife's car in the driveway, because I don't know what I'm doing. I'm not going to risk my family to save any amount of money. I leave that one to the pros.
I've had my successes as well. Here's a rundown of some of the highlights...
- Remember the dealership challenge? It saved almost $100 and it took only a few minutes of my time to replace the auxiliary audio jack in my truck. No mechanic!

Plug and play!
- I repaired our front loading washing machine when it tried to self-destruct. Success is 100% due to internet videos and parts schematics. No repair man!

This one took three hands
- I've repaired our aging irrigation system countless times. It keeps finding new place to fail. I plan to replace all the tubing at some point. No repair man!

- Recently, I rewired a lamp rather than chuck it. It's a cheap lamp, probably worth about $20 but we like it and didn't want to add it to a landfill. No landfill / No replacement!

- The pool vacuum spends it's life underwater in a chemically charged environment. Of course stuff breaks and wears out. I rebuilt this $300+ piece of plastic wizardry with parts and instructions from the internet. No repair shop!

- Speaking of the pool, I again reached out to the internet for parts and instructions to repair our aging DE filter in "You will go to the Dagobah System"No Service Technician! I did later hire a company to replace and upgrade the whole system.

I've had plenty of other fix-it successes like an XBox controller, a vacuum cleaner, a clock, countless toys, some light car repairs, and general household plumbing and electrical repairs. Other stuff, I've had to chuck in the trash when it's simply outside its useful life or just not worth the major surgery to attempt a repair, like televisions, a pool motor, a toaster, and etc.
The Contest!
How about you?
What have you done to save the family budget and keep stuff from the landfill? What's the one thing you're most glad you fixed rather than throwing away? What fix-it job are you most proud of? What do you wish people would stop throwing out and start fixing?
Share your story in the comments below, email it to me ( john@azdiyguy.com), or even send it to me through a Facebook message. A few sentences is fine! Send photos if you like. I'll feature the winner in a future post.
The winner gets a $100 Amazon gift card from Crucial Vacuum ! I'd be honored if you'd follow me on Facebook ! I slip plenty more good DIY content and humor in over there. (Don't forget Twitter, Google+, Hometalk, and Pinterest too!) Have fun!
This contest is complete. We have a Winner
Thank you everyone!
From Crucial Vacuum:
"Crucial Vacuum supply vacuum cleaner parts and supplies, so we're always interested in ways we can encourage more people to fix appliances rather than throw them away. It's great to find bloggers like John, who get more people repairing, recycling, and taking care of things, so we thought it might be fun to see what his readers have been fixing!"
I've looked over their website and loved the how-to videos for installing replacement vacuum parts. I really like the fact that they plant a tree for every 1,000 filters they sell. I also like the price match guarantee, free shipping, and free returns.
Crucial Vacuum is currently running a special coupon code for 20% off a $40 order though March 2014 (Coupon code: POLARVORTEX)
Read the ole' fine print below before entry:
- Relationship: AZ DIY Guy's Projects (Host) has no financial relationship with Crucial Vacuum (Sponsor) and has received no compensation for hosting. They originated the idea for this contest, thinking my readers would enjoy it and would appreciate their products and services. I'm hosting this contest as a way to engage and reward my awesome readers as well as meet new ones. Amazon, Facebook, and other third party social media outlets are not affiliated with the contest.
- Duration: The contest runs through March 26, 2014 at 11:59 pm, Phoenix, AZ time.
- Location: The contest is open to the US and Canada only. Participation is void if any a participant's local authority having jurisdiction deems this contest to be illegal in any way. Participants are responsible for verifying their legal eligibility.
- Eligibility: Only individuals over 18 are eligible, no company or organization. Bloggers are welcome. Employees and family members of AZ DIY Guy's Projects and Crucial Vacuum are ineligible. Entries or comments that are deemed profane, hateful, discriminatory, or otherwise distasteful will be removed and are not eligible.
- Entry: Participants enter the contest via a written commentary / story. Entries are accepted via: 1.) comments on this original blog post 2.) Facebook message to the AZ DIY Guy page 3.) Email to john@azdiyguy.com
- Winner: The winner will be chosen editorially and subjectively at the discretion of the host and sponsor. Following or subscribing to the host or sponsor of the contest on social media is not required for entry (although it is greatly appreciated!). Photographs are not required, but would be great to post on the winning announcement.
- Notification: A good-faith attempt to contact the winner will be made via the contact information provided at time of entry. The winner has 48 hours to respond, before forfeiting and an alternate winner is chosen.
- Prize: The sponsor is responsible for providing the prize, a $100 Amazon.com gift certificate to the winner. This certificate may be digital or physical at the discretion of Crucial Vacuum.
- Release: Participants allow their story, comments, and identity (as supplied) to be shared.
- Errors: The host and sponsor are not responsible for any potential, technical errors into the contest. An best effort will be made to resolve any errors fairly. If a legal error is discovered, adjustment to the contest will me made to ensure compliance or the contest can be cancelled.
- Acceptance: By entering the contest, participants accept the terms and agrees to hold the the host, sponsor and any social media used harmless in the event of an error or omission.
- Spam: Spam will be deleted. Seriously. Shame on you.
Want to win that $100 certificate?!! Let's hear your story!
This contest is complete. We have a Winner
Thank you everyone!
Actually reading instructions and other nonsense.

Although I leap unhesitatingly into all things DIY, and am generally fearless to tear stuff apart and (try to) fix it, I've never claimed to be an auto mechanic. It's just not my expertise. I think it comes from growing up in Michigan where everyone else's dad but mine worked in some way for the auto companies. I had so many car-handy friends that they'd just help me with it, no problem. I never really learned much about it.
However, I have changed headlamps before, and I am a handy guy. After all, I kicked butt fixing the auxiliary audio jack in my truck, didn't I? When I popped outside to fix Sweetie's car, I took a cursory glance at the owner's manual to see how to remove a plastic air duct that was in the way, without breaking the plastic clips, before swaggering to the front of the car to fix the hell out of it, 'cause I'm a handy, handy man.
 |
| Yep! Shorts in February!!! |
It took an obvious, quick squeeze of wiring harness to slide it off the back of the lamp. The lamp took an easy twist to pull it out of the socket. Piece-o-cake! I removed both of the front lamps so the beams would match.
 |
| The 2007 Honda Accord Ladies and Gentlemen. |
I grabbed a new bulb and,....uhmmmmm.....CRAP! It didn't fit. Tried it again,... Dang it! Just to be sure I wasn't just feebly struggling to get it in, I actually measured the base with a micro caliper. Yep. The new lamp base was too big. Those idiot, grease monkeys at the auto-parts store had sold me the wrong freaking part. I had even bought a two pack of them.
 |
| Precisely different sized lamp bases, exactly and positively wrong. |
I slammed the hood, drug my tools back into the garage, and grunted to Sweetie I had to go back to the @#$%! store because that idiot had sold me the wrong part. I don't get mad often, but this guy was going to hear about this for sure. After all, it's his job to know this stuff. He's the "expert." I think he is even the manager, more like the head moron.
I took the car, so I could show that mental giant personally. I don't know why I glanced at the open owner's manual still laying in the passenger seat, as I backed furiously out of the driveway...
My eye caught the bold heading, "High Beams Headlight". Whaaaat?!!!. After looking over my shoulder to see if anyone was watching, I casually flipped the page to see the next bold heading, "Low Beam Headlight"
Oh.
There's two sets of lamps. Ohhhhhhh.... heh heh... silly me.
 |
| "I'm with stupid à" |
I couldn't see them from the outside, but after actually reading the manual, I found the "Low Beam Headlight" was behind the fender liner, accessed by popping some plastic screw things out with a screwdriver. They were behind a reflective cover in the headlight area.
Of course my first attempt to snag it blind resulted in a turn signal. Nope, back in he went.

The second excursion resulted in success. The lamp was exactly the same as the ones I had purchased, including the yellow gasket ( = Exactly the same as the ones the friendly, very knowledgeable counter guy had recommended.) It was a quick and easy swap.

I opened the hood again and put the high beams back where I got them. At least they were a little easier to get to, and in a less filthy location than the brake-dust coated fender wells.

The wiring clipped back in place.

Since I was already filthy, I replaced the other lamp on the passenger side too.

All the little plastic clippy-things had shattered when I pulled the fender liners so I did actually have to go back to the auto parts store for new clippy-things. I couldn't look the guy in the eye. I felt horrible for doubting him. He even gave me advice on choosing the right clips. Thank goodness I looked at those instructions before truly making an absolute ass of myself at the parts counter. Like I always say, those guys at O' Riley Auto Parts are just awesome (Non-sponsored, just an apology for those awful words I was thinking in my driveway).
I got back home and got to play with my sweet new DeWalt Right Angle Adapter Attachment to drive the new fasteners in. I'd been waiting to play with this beauty since I won it in DeWalt's Fan of the Week Photo Contest.

No, I didn't read the instructions.
DIY Lamp Repair - A Fixing Stuff Adventure

Lamps are simple creatures. Generally, they're a series of raceways that the electrical cord goes through to reach the socket for the light bulb. There's hollow tubes, threaded nipples, nuts, washers, lock washers, and screws, but that socket is where all the real action is. The rest is just decoration and structure.
To start, it's an easy operation to unscrew the finial that holds the shade in place.
 |
| This floral shade is way to pretty for my workshop. |
With the shade removed, guest of honor was immediately revealed, the socket. This is where the light bulb threads in and receives its life-giving electro-juice. Speaking of light bulb juice, it goes without saying, I hope, that this project should be done, with the lamp unplugged.
Our switch knob was mysteriously broken off. Those of you with children have undoubtedly heard many times before, "I don't know..." (what happened to it).

The next series of events was simply a dis-assembly process. First, I took out the little set screw that keeps the socket from unscrewing from the nipple. I use an insulated screwdriver, which not necessary here, but it's my favorite one, a nice comfortable Klein. Unlike the beautiful new one Jeff at Home Repair Tutor used on his florescent light repair last week, mine looks like it's served in front-line combat. I'm jealous.
 |
| Removing the set screw. |
This socket unscrewed in the middle. Some versions simply need to be popped open to expose the electrical connections.

There was no slack in the wire. I couldn't pull the socket from its housing to get at the screws, so I chucked the whole lamp up on the workbench and fed the cord up from the base, into the vertical, hollow pole.

Many floor lamps are simple, stick-straight units, but this one has an articulated arm. The power cord is fed through very narrow tubes with tight bends. I had to unscrew each section to get as close to the joint as possible, to feed the cord. Channel Lock pliers did the trick nicely.

Once the retaining nut is off, whole sections come apart easily. Little caps pop off to allow access to the joints. I took the liberty of promptly dropping this one and crushing it under my boot, like an oaf.

Once the joints were open, it was a "simple" matter of man-handling the cord up towards the socket, feeding it and pulling slowly, taking care not to damage the cord. Damaging the insulation is referred to, in technical, electrical terms as, "BAD". A bare copper conductor, without the protection of the rubbery cord coating, touching the metal parts of the lamp would cause a direct short, hopefully tripping a breaker, instead of much worse.
 |
| A little of the old push 'n pull technique |
With enough slack to pull the socket itself out, you can see there is a silver screw and a brass one, just like a a wall outlet. The important thing to watch here is identifying which wire goes where. You can't tell what color the they are. You can mark one with tape as you pull it off or, even better, look very closely at the two wires that make up the cable. In this case, the neutral (grounded conductor - normally a white wire) has ridges on the outer jacket, while the hot (ungrounded conductor - normally a black wire) is smooth. Remember this for later.
 |
| Like Ruffles, it has ridges. |
I still needed more slack to install a new socket. It wasn't easy at all. There was no space in those transitions and I had trouble getting the cord to budge. So, I used a trick a salty old electrician shared with me years ago. Normally, electricians use a special lubricant when pulling wire through conduit. In a pinch, he showed me they can use dish soap. I was in a pinch, so...
 |
| Yes, it's "green apple" scent. |
I fought the cord, bit by bit through the fixture, leaving slack at each elbow. The slippery soap helped, and kept me from damaging the wire.

With enough slack pulled and more than enough parts strewn haphazardly across my workbench, it was time to quest out into the open world for the replacement parts. I headed out to my friendly neighborhood hardware store with the old socket in my pocket and dreams that their popcorn machine would be in action. Surely they'd have something in stock I could use (besides a bag of free popcorn).
I faced the electrical lighting section at the hardware store. They had EVERYTHING! There's parts for all kinds of stuff that I never paid attention to. Heck, you can build your own lamp with the stuff they have here.
Note to self: future project - find a shapely, plastic woman's leg and make my own, fragile Christmas Story lamp to display in our front window. The wife will love it!

Of the various sockets, I chose a replacement 3-way rather than a standard on/off only switch. This allows the use of a bulb with three filaments for different lighting levels. This works nicely with a 30/70/100 watt light bulb. It's something you can retrofit onto an existing on/off fixture for a nice upgrade. They were actually the same price.

Returning home, sadly without any popcorn, I cracked the new socket open like an egg. It was a snap-together unit, rather than threaded like the old one.

The base then screws onto the nipple from the lamp and gets held in place again by the set screw. Its easy to peel the two wires apart by hand, since I finally had plenty of slack to work with.

Here's a close up of those ridges on the neutral wire. Take a look at a lamp cords in your house. They'll probably have these and you've never noticed it. I think it's a secret communication method left to us by Ben Franklin. The string hanging down from his kite with a key probably had ridges just like this. That dude was smart.
 |
| Believe it or not, I've never had a manicure my whole life. Honest! |
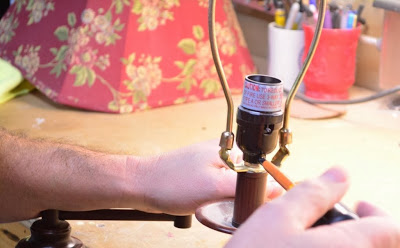
Remember to use the correct wire on the its corresponding termination screw - with the neutral landing on the silver screw. This is important. If you reverse the wires, the lamp will work just fine, but there's a safety hazard. The threaded shell for the lamp becomes the hot, electrified portion and the contact tab deep in the socket becomes the grounded neutral. This places the dangerous, "hot" way too close to accidental contact should anyone ever change a lamp with the switch on (and who hasn't done that?). Considering the lamp itself is metal, that's a recipe for pain, or worse.

I stripped the insulation back a half inch using wire strippers, twisted the strands together, and wrapped it around the screw clockwise. As the screw is tightened, it pulls the strands tighter rather than pushing back a rat's nest of frizzy copper. I wanted a good connection with no loose copper strands to sticking their electrified noses where they didn't belong.

After that, it was just a matter of reassembling everything I had taken apart, in reverse order. It's probably best to lay the pieces in order on your workbench rather than fling them randomly about like I did, resulting in a pissed-off Easter egg hunt. I fed the cable backwards through all the elbows until there was just enough to fit into the socket enclosure. All the various nipples threaded back in with their retaining nuts tightened.

I gently threaded the lamp in. Finally, the moment of truth, my friends.. (click)
 |
| Blinded by the light, revved up like a deuce, another runner in the night!! - Manfred Mann's Earth Band |
Now comes the victory parade. An adoring family gets to see witness this monumental feat of home repair triumph as it is transported, first to downtown New York for a ticker-tape parade, then to its home, by a comfy chair. Full disclosure: It's cold in New York and surprisingly inconvenient from Phoenix. I skipped that step.
There's nothing better than a nice book under the warm glow of a reading lamp...

There's nothing better than a nice book under the warm glow of a reading lamp...
zzzz....
The Great Debate: Hiring a Pro vs DIY (Replacing Swimming Pool Equipment Edition)
My whole concept is Do IT Yourself . I write this blog hoping to empower others to do the same by sharing my experiences, triumphs and challenges. Truly, I believe homeowners can do nearly anything themselves with the right tools, materials, and knowledge. I enjoy doing it myself, have saved tons of money, and have a lot of experience being dissatisfied with the results from people I've hired in the past. I guess I expect absolute perfection for my hard earned money.

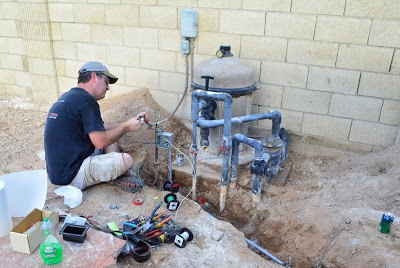
UPDATE: I after re-doing some electrical myself and digging up the pavers in advance of the new install, the work is done. The technician arrived early and lugged in a bunch of new parts and pieces.

However, there are times were the time spent muddling through a project is just not worth possible savings, fun, bragging rights, or the experience gained. Sometimes there are expensive, specialized tools required, that I'd never use again. A mistake I make can cost me, where the mistake a contractor makes, should have to be corrected on their dime. There may be product warranties to consider as well. True craftsmen, can get results even the most gifted DIY'er can hardly hope to obtain.
So, can I follow instructions, tear out and replace all this mess? Yes, I think so. It's mostly a PVC pipe and glue project. Can I get it done in a few hours and be confident? No. It would probably take me all weekend and infinite trips to the hardware store to do it.
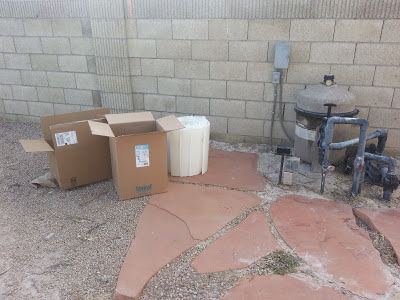
So, today it happens. I had already cleaned out the dirt around the horror-show above and repaired some of the electrical last weekend (check it out here). We have an experienced professional from one of our local pool stores coming with brand spanking new equipment.
Here's the scope:
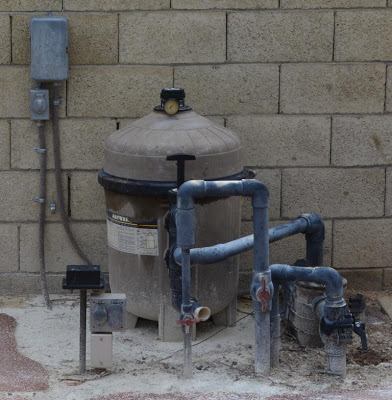
- A new cartridge filter to replace the aging DE filter (the big R2-D2 looking thing) so back-washing and dealing with that messy white powder is a thing of the past. Old leaky here has been a maintenance nightmare. It would need hundreds of dollars in replacement parts if we wanted to save it. A cartridge filter will reduce my maintenance time greatly.
- Replace the pool pump. The existing motor is doing fine, since the it was replaced a year ago (home warranty!!!) but, we expect to save about $700 annually in power consumption by upgrading to a modern, variable speed pump. Plus, the unit is tired and has air and water leaks.
- Adding a salt water cell. This is actually exciting. We are going to nearly eliminate our chemical dependency (and cost!!!!) by converting salt water to chlorine. Everyone I talk to who's made this conversion has loved it.
This is coming to us at a heart-stopping cost of nearly $4,000. No, we cannot afford it. But, we also cannot afford to let this beast nickle and dime us to death, while we spawn water creatures in it's foul depths. We are still in swim season here and cannot take advantage of it. I've spent untold hours and about $1,000 this year alone in chemicals and parts trying to keep this priceless awesomeness...
 |
| No swamp. |
...fom reverting again to Dagobah, in the blink of an eye.
 |
| Swamp. |
The total cost of this renovation includes about $380 in labor (and that's on special this month). Still steep, but I think it's worth it. I don't think I need to surrender my DIY Guy credentials on this one.
Hire or DIY? The great debate. I nearly always choose DIY. I've hired out for roofing and plan to hire out for window replacement (if we can ever afford it after this pool debacle). I only do so much electrical myself because I have been trained, but suggest most people bring in a pro for anything major. How about you; what's on your hire vs. DIY list?
Homework: There's a neat article Marcie Geffner wrote last year for Bankrate.com, titled Remodeling Yeilds Rewards, Vexations where she compares my successful family room remodel experience to cautionary advice from the authors of Home Improvement For Dummies. I do their cautionary, contrasting point of view vs. my gung-ho, I-can-do-anything approach. Doing research, I found their website diyornot.com, which provides lots of info on DIY vs. hire. It's a very good site. I just get a vibe that it's pushing the hire direction a bit hard, especially with an apparent choice of advertisers directed towards for hiring contractors. Maybe I'm a bit sensitive because I love the do it yourself approach. Heck, I have ads for tools and materials on my site. - John
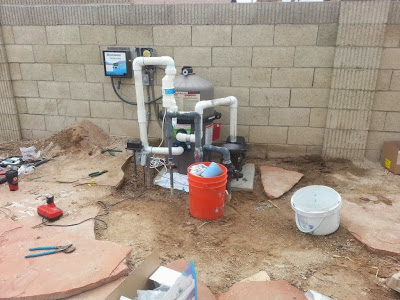
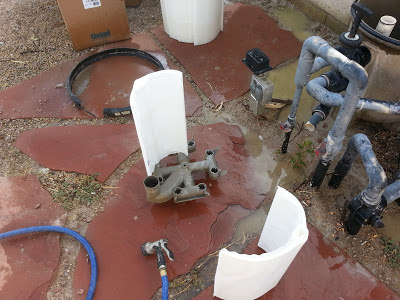
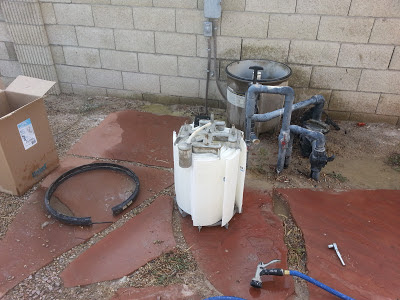
He installed the equipment in the existing footprint, using a bunch of the existing plumbing. You can see the salt cell standing vertically in the center and its new computer on the wall.
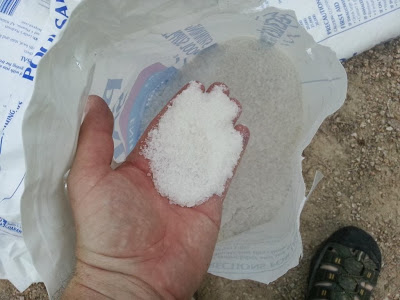
I did the honors and dumped seven huge bags of special swimming pool salt in the pool. They say it was special salt, but I think its the same stuff they put on those big salt pretzels at the mall. Shhhhhh....
When it was wrapped up, we had a completely new mechanical system,.... and some exciting new financing payments. We're really happy we did it. This winter I hope to drain and re-coat the pool, maybe the decking. Who knows, I may even do some cool new landscaping and a screen to hide the equipment. Next summer should be a great swim season!
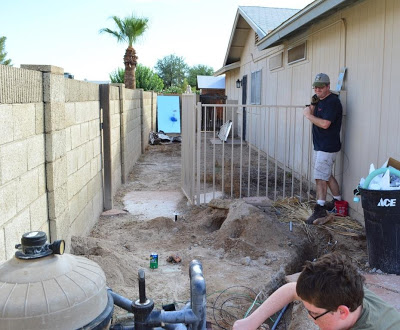
A Relaxing Labor Day Project: Underground Electrical
So the pool's a swamp again, despite battling with all the modern chemical weaponry at my disposal. It's time to throw in the towel. We give up. It's either a dump truck full of fill-dirt or we scratch together enough money to replace all of our pool's mechanical equipment. Since a dump truck won't fit into the back yard (and I'm out voted 3 to 1), we're replacing the pool equipment, next Saturday. It's a spendy proposition. Do you hear the sound of our kitchen remodel disappearing? Those new, energy-efficient windows slipping from our grasp?
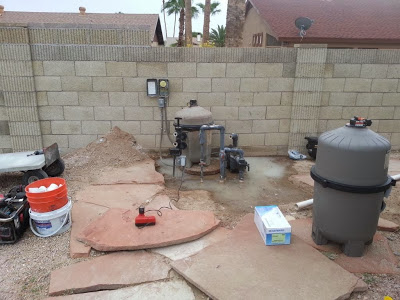
Even though I'd proclaimed it a no-project weekend, I started excavating the slab the equipment is sitting on. I thought I'd be nice and hopefully avoid the cost creep of having a pool tech digging at $80 / hour before dropping down a new slab. I dug it out pretty quickly.
Done!
Of course, it wouldn't be a ripping good DIY Guy project experience if it ended as neatly as that, would it? Nope. Remember Murphy's Law, my friends. I noticed this little gem of awesomeness:

More expletives. There's no 90 degree elbow to unscrew. It's a full 10 foot stick of rigid metal, threaded
conduit, wrapped in corrosion preventing rubber tape. Awesome. Guess what else?!!! There's cement covering it too. Oh, joyous day!! But that's not all; there's a thunderstorm bearing down on me. Sweeeeeeeeeeeet, now this is a holiday, my friends!!! So much for BBQ, it's going to be a carryout pizza night.

I put all the wiring back exactly the way it was before. I recommend you don't mess around with electrical near a pool if you're not really comfortable with it. Seriously, hire an electrician. There's a whole section of code devoted to it.


Even though I'd proclaimed it a no-project weekend, I started excavating the slab the equipment is sitting on. I thought I'd be nice and hopefully avoid the cost creep of having a pool tech digging at $80 / hour before dropping down a new slab. I dug it out pretty quickly.
 |
| One of the many leaks dribbling away. |
Of course, it wouldn't be a ripping good DIY Guy project experience if it ended as neatly as that, would it? Nope. Remember Murphy's Law, my friends. I noticed this little gem of awesomeness:
The electrical feed conduit is rusted completely through. This is the entry point for a 240 volt pump circuit and a 120 volt light and receptacle circuit, sitting next to 10,000 gallons of highly-conductive pool water where we run around barefoot and soaking wet. Professional electricians would call this condition, "not so good". I let a few choice expletives loose under my breath. I'd have to dig out the rigid conduit 90 degree elbow and replace it, maybe a couple fittings too. Skip the nap, but still, I'd be lighting the BBQ in no time.
 |
| "Don't you call me a mindless philosopher, you overweight glob of grease!" |
conduit, wrapped in corrosion preventing rubber tape. Awesome. Guess what else?!!! There's cement covering it too. Oh, joyous day!! But that's not all; there's a thunderstorm bearing down on me. Sweeeeeeeeeeeet, now this is a holiday, my friends!!! So much for BBQ, it's going to be a carryout pizza night.
I managed to beat through the concrete with my sawed-off sledge hammer and scratch down to the conduit to a coupling using a mini-spade, on my hands and knees. My full size shovel is a flat-blade, not at suited for trenching. I was pretty miserable in the heat.

Gracie and her dinosaurs helped further, by recreating the excavation of the Tanis Map Room from Raiders of the Lost Ark. That mini spade is perfect for her diminutive stature.
With the pipe out of the way, I pulled the nasty wire out; it would need to be replaced. The mess of junction boxes also needs to be replaced while I have it all torn apart. They're full of DE filter powder and rusted parts and the switch and plug are junk, all evidence of full water penetration. It's time for a shopping list and a trip to Home Depot.
 |
| The conduit on the left and the gounding box on top are brass, and in perfect condition. |
The thunderstorm blew in while I was in the store. Luckily, it moved through fast and didn't flood my trench. It simply introduced more delightful humidity. I brought home more than $ 120.00 of assorted loot to straighten out this rat's nest. It sure doesn't look like much stuff when I dump the bags.
 |
| Can you tell the new from the old? |
I re-jiggered the boxes a bit to neaten the installation and switched to PVC conduit to save cash, time, and corrosion. When it was time to pull wire through the conduit, I grabbed Jack to help by feed it, avoiding damage to the jacket, while I tugged the Fish Tape . Gracie lubed the wire with liquid dish soap to keep it sliding smoothly.
 |
| 100 degrees and humid after the storm. It's not quite as fun as it sounds. |
I put all the wiring back exactly the way it was before. I recommend you don't mess around with electrical near a pool if you're not really comfortable with it. Seriously, hire an electrician. There's a whole section of code devoted to it.
It's cleaned up, safe and fresh looking. The new junction box actually has a gasket and does not have the optional big drywall screws driven through it (as can be viewed with amazement in the second photo from the top). I installed a switched cover for the pool light rather than the flip-door style cover.
I filled in the trench with clean dirt, ensuring no rocks were anywhere near the PVC conduit. I soaked it down with the hose every few inches of dirt cover and compacted it. I don't want this caving in beneath the big paving stones later.
I'll clean up the area and leave it nice and accessible for the pool tech on Saturday. We are so ready to have this old, sucking money pit of a system replaced so I can spend my weekends doing productive projects (and actually swimming!), rather than repeatedly fighting the endless, loosing battle of the putrid swamp of Dagobah. Yep, I'm really ready for this crap to end.
 |
| Generally, you don't see pools this color outside St Patrick's Day |
I'm off to the pool store to stock up on some more chemical weapons.
Installing a water heater shut-off switch
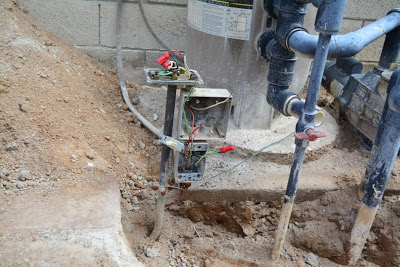
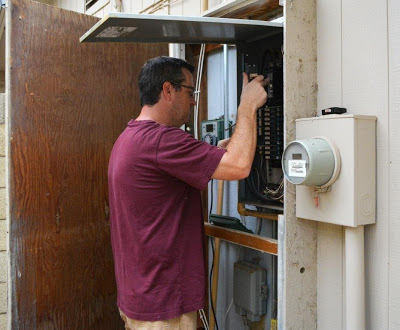
Last time, I mentioned I couldn't quite get to a water heater maintenance program without doing some repairs first. I figure step number one is to bring the electrical up to snuff. I decided to install a disconnect switch by the unit, so I don't have to trudge to the outdoor electrical panel every time I want to shut the unit off.

Before I could get going on this part, I had to replace the breaker. My predecessors had installed two, single pole breakers, rather than one double-pole 30 amp breaker. Not cool my friends.
AZ DIY Guy's Scary Warning - Electrical Edition: Don't mess with electrical, unless you know what you are doing. 120 volts of household current can kill you just as dead as much higher voltages, it just lets you suffer longer, and folks can still recognize you in your casket. Plus, electrical issues can do a heck of a job burning your house right to the ground. When in doubt, get a professional electrician. If you do the This project is a snap for someone who's trained; it shouldn't cost too much. Even if you know what you are doing, I recommend you work it like it's live, even if it's not. Research legal requirements in your area before making changes to your electrical system. Finally, don't take my word for this stuff, I might be some random idiot on the internet.

No. Not cool at all. Those are separate breakers. I picked up a breaker at Home Depot for about 13 bucks. It was an easy swap; just a matter of turning off the main breaker for a minute while I slipped the two originals, popped the new one in, and re landed the wires.
Of course it couldn't go perfectly. I noticed, for the first time that this particular circuit's wiring was aluminum. I hate that I have aluminum wiring. More on that later.

Cool. Very cool indeed.
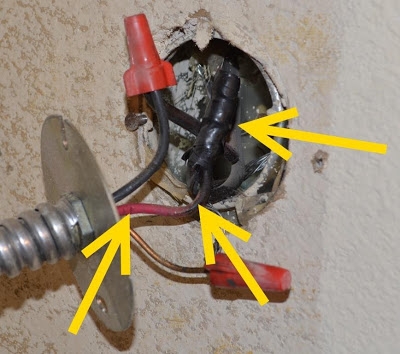
I turned off the new 2 pole circuit breaker and moved inside to open up the junction box to find,... a gob of black electrical tape, discolored wire, and nicked insulation (clockwise below). Not good signs.
Since I don't trust ANYTHING in this place, I like to do a quick check to see if the circuit is still live. Especially if there's some sketchy-looking wiring where I'm about to stick my fingers. Idiots could have easily landed one of the hot wires to the wrong breaker; it could light me up. No thanks. It's time to reach the Bat Belt for my trusty non-contact voltage tester.
.

.

Apparently, It's pretty serious.
Ahhhhh,... sweet silence. The circuit is dead.

This is scary. The wire nut inside the tape glob is completely destroyed. Worse yet, where is the rest of it? There were no fragments or pieces of more than half of it, not in the tape, not in the junction box. To me, this means some mental giant actually knew this was busted and wrapped it in electrical tape, rather than simply installing a new wire nut. This could burn a house down to save the effort of installing a cheap wire nut. Jackassery! I think it's especially unsafe in that it's aluminum to copper wire junction.

That's an identical, complete wire nut on the right.
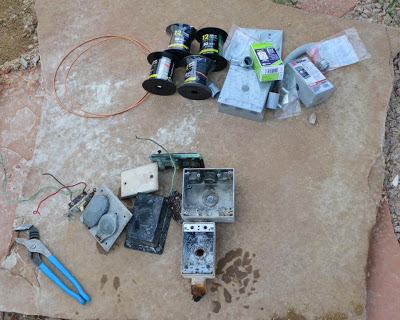
Back over to the workbench, I set up to prefabricate the switch assembly. Here's the stuff:


Diet Coke Lime The lime is important. I can't find the reference exactly, but it's in the National Electrical code somewhere,...promise.
Square Box Extension Ring. This will extend the in-wall box allowing for more room to fit the switch and wiring.
30 Amp, 2 pole switch I chose Leviton's extra heavy-duty spec-grade.
Anti-Oxidant CompoundThis gunk is required when you tie copper to aluminum wiring.
Screws: 8/32's to screw the window box, and one ground screw to ground it. (... to rule them all!)
Wire Nuts ..you know,...to nut wire.
I clipped the ears off the switch, so it would fit nicely behind the plate.
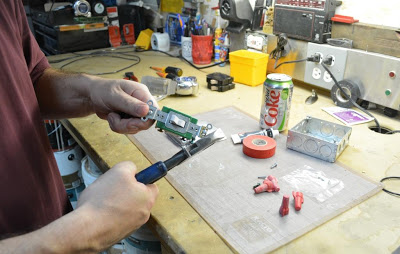
I pulled the existing 6/32 mounting screws out of the switch, since they're not needed here. Next, I stripped some new #10 copper wire and installed it behind all 4 termination screws, the line side (the "home run" to the breaker) on the black screws, load side (to the heater) on the brass.

No, the WD-40 and the big ol' bottle of blowin' bubbles are not necessary.
I like to put a wrap of electrical tape around the device, leaving a folded, courtesy tab for easy removal later.

Pop the cover on with the two short 6/32's (included with the cover) and we're ready to install.
The extension ring installs on the wall, screwed to the back box in the wall.

The stripped, bare copper and aluminum wires got a good bit of the anti-oxidization goop. Man! I wish we didn't have that aluminum wiring. At least it's only on a few circuits in the house.
All wired up and sealed in place. I slipped on a 90 degree flex connector, pulled fresh new wire to the heater, terminated it, and sealed everything up.

Flip the breaker and power it up. We should be in business, just in time for the next laundry cycle. Now I can shut the whole thing off whenever I'm finally able to drain it for maintenance.

Look good?
To check the voltage, I popped off the front cover, peeled out a piece of insulation, and exposed the internal wiring terminations for the the heating element. Careful, careful,.. 120 volts from both of the hot conductors to ground and 240 between them. Done!

240,...243.7, whatever it takes.
Next time kiddies, it's on to plumbing. I have to repair or replace that corroded, seized shut-off valve. I'll have to do some research on that one.

Before servicing the water heater...
A friend of mine told me about struggles with black water coming from all the taps in her house. It appears that it may be a water softener issue, but her heater is half-full of gross sediment. In discussing the water heater as a possibility, it really woke me up to my own lack of maintenance.
I found that water heaters should be drained and flushed as much as twice a year?!!! and the sacrificial anode rod replaced as much as annually?!!! Lovely. We're on year 7 and I've never touched the thing; heck I've never even looked at the water heater, even though I pass it entering and leaving the garage. There was a receipt on top, showing that it was purchased at Home Depot 2001. I bet it's never been drained or had the anode replaced in all this time.
What a great opportunity for a blog post on water heater servicing right? Drain it and check the rod, piece of cake. Let's do it this weekend kiddies!!!
Nope. Because of this stuff I need to deal with first.

Just to spice things up a bit, I just found another little Inheritance from my DIY Predecessors. Instead of the 2 pole, 30 amp breaker, they installed two 1 pole 30 amp breakers. Not cool, IMHO. The two pair in the yellow circle should look like the three in the blue below. It's not safe to turn off or trip half a 240 volt circuit, both should turn off together.
2) Water: To drain the water heater I need to turn off the cold water coming into the tank. It's handy that there is a valve here. Of course this particular valve isn't handy at all. It's completely frozen, crusty with corrosion. AWESOME!! I'm going to look into replacing the parts so I don't have to cut into the pipe and mess with soldering ect. I'll just have see if that's a possibility. (I checked Home Depot; they don't sell the kit, but they referred me to Ace Hardware).
3) Dissimilar metal corrosion: This steel fitting tied to copper on the cold water feed is corroding. Eventually, I suspect we could suffer a breakdown here, probably timed for 5 minutes after we depart for a long vacation. There's nothing like spewing water left unchecked for a week.

I found that water heaters should be drained and flushed as much as twice a year?!!! and the sacrificial anode rod
What a great opportunity for a blog post on water heater servicing right? Drain it and check the rod, piece of cake. Let's do it this weekend kiddies!!!
Nope. Because of this stuff I need to deal with first.
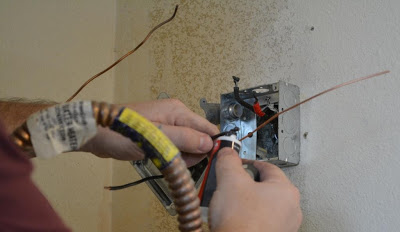
1) Electrical: As I understand it, code requires an electrical disconnect:
A) within sight,... or
B) capable of being locked in the open position (power off) position.Our electrical panel is outside, as is common here in Arizona. Technically, we may be ok, since the breaker can be locked out (if I buy a lockout kit). It's fuzzy, the locking means is supposed to be there even if it's not locked. Either way, I don't like it. Electrical code is minimum. I want better in my own home, so I'm going to install a switch.
Just to spice things up a bit, I just found another little Inheritance from my DIY Predecessors. Instead of the 2 pole, 30 amp breaker, they installed two 1 pole 30 amp breakers. Not cool, IMHO. The two pair in the yellow circle should look like the three in the blue below. It's not safe to turn off or trip half a 240 volt circuit, both should turn off together.
 |
| Alas, this fine, Shakespearean penmanship is not mine to claim. |
 |
| Crust is good on apple pie, not on plumbing. - AZ DIY Guy |
I'm not quite sure what to do here yet. I'll start researching it.
I suppose I'll start with the electrical. Hopefully, I don't discover anything else shocking. Check in next time as I head towards eventually getting on a regular maintenance program.
PS - Do I at least get points for making it through the whole post without calling it a Hot water heater?
I suppose I'll start with the electrical. Hopefully, I don't discover anything else shocking. Check in next time as I head towards eventually getting on a regular maintenance program.
PS - Do I at least get points for making it through the whole post without calling it a Hot water heater?
_____________________________
Update: I crossed step number one off the list and repaired the electrical portion. Yes, I found some scary stuff in the process. Check it out! Installing a Water Heater Shut-Off Switch
Moving through another door
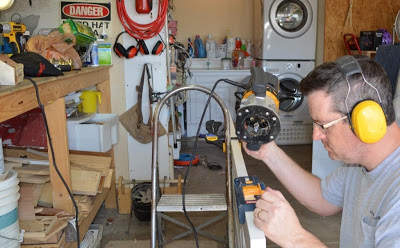
Despite the kids going back to school, some crazy weeks at work, the still oppressive summer heat, I managed to regain forward momentum on the interior door replacement project. It's getting to be routine now: purchase, plane to size, paint, rout hinge mortises, hang the door, drill and chisel for the door hardware and install the handle / latch assembly. Not a pro, but I'm getting better at it. (Here's where I started)
This time it was Jack's bedroom that got completed. His door had sat, half-painted for four months or so, while I tackled other pressing projects (see the index, April through July). I do get off-track.
I pulled his (young) man-cave door, complete with HAZ-MAT warning and an electrician's lockout tag-out tag out off it's hinges.

I've also started monkeying with the new DSLR camera and tripod, so "action shots" of yours truly are possible. Although, seeing my mug isn't much of an improvement, I can finally show some better photos than the ol' camera phone, and share some updates to my methods.


This time it was Jack's bedroom that got completed. His door had sat, half-painted for four months or so, while I tackled other pressing projects (see the index, April through July). I do get off-track.
I pulled his (young) man-cave door, complete with HAZ-MAT warning and an electrician's lockout tag-out tag out off it's hinges.
I've also started monkeying with the new DSLR camera and tripod, so "action shots" of yours truly are possible. Although, seeing my mug isn't much of an improvement, I can finally show some better photos than the ol' camera phone, and share some updates to my methods.
I've started using Bench Dog - Bench Cookie Work Grippers to keep from scratching a fresh door with the old one, when I'm transferring hinge measurements. mmmmm coooooookies!

 |
| Cooooooooookies!!! |
I like to transfer marks directly by using a little pocket combination square rather than a tape measure or ruler. It's fast and accurate, less chance for me to screw up when there's no tolerance for error on door hinges. A slight miscalculation from my melon-head and the door won't fit in the original location.
You'll also notice I like to wear free t-shirts. It's an important step to keep Sweetie from killing me for wrecking, yet another, nice work shirt in the garage. I just thought I'd lob that out there for Jeff over at Home Repair Tutor, who has been known to DIY in a shirt and tie.
 |
| Yes,.... that's the mighty, still not finished, organizer project under there. I'm not proud. |
I zapped the hinge mortises out. The Ryobi template is still doing awesome, several doors in.
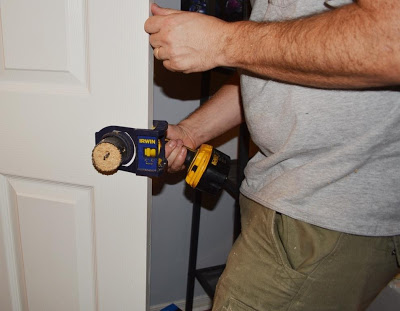
I'm still using the Irwin door lock installation kit that I've had since door #1. I'll do a review at some point, but honestly the jury is still out. It's not blown me away like the two cool Ryobi products I've tried, but it's done the trick,... mostly. Yeah,..mostly good.
I recently shared I tried and reviewed a new tool to cut the mortise for the latch plate. Read my post about the Ryobi Door Latch Installation Kit if you want all the juicy details. It sped up the process and gave me better results than my previous method.
Then a quick bit of door latch installation action (with an insulated screw-driver for some reason).
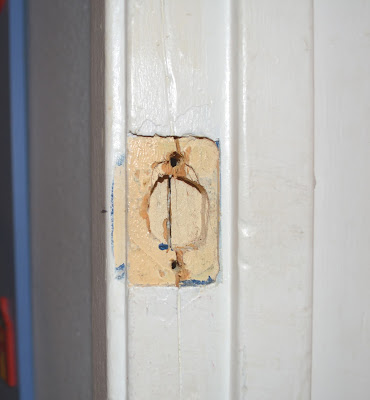
Then, a hiccup. The latch plate mortise in the doorjamb was simply too worn out to hold screws. It's obvious this particular doorway had experienced some violence, sometime in its existence, before our loving family took possession. At some point, the wood had been blown out, obviously kicked in by Genghis Khan's marauding Mongolian hordes. There had been feeble repairs.
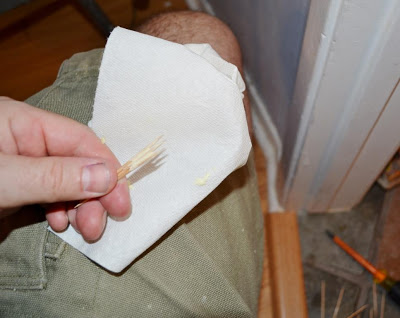
I employed the old 1-2-3 wood glue and toothpicks approach to fill the void. Here's how it's done. Warning, it's isn't pretty, but if you want to know how the soup is made, read on.
Step 1: Slop some glue on toothpicks. Make sure to open the box in such a way that you spill them all over the floor as I have, otherwise the technique won't work. If you're wearing nice clothes to work in (ahem, Jeff), a damp paper towel is nice to have on hand.
Step 2: Jam a three or so gluey 'picks in the hole and savagely snap them off. There's no need for ceremony here. We're cleaning up after barbarians. Note: The spattered glue on my hands is a controlled exercise, just an educational illustration of one possible outcome, if you get overzealous in the glue application. It would never happen to me in real life. I'm sacrificing for you, dear reader.
Step 3: Run the screws in. Pro tip: I like to turn my screws in clockwise, otherwise known in the scientific circles as "righty-tighty". Do it your own direction, I'm just sharing what works for me. Again, I used the insulated #2 Phillips tip screwdriverbecause, well.... I don't know.
I'm going to come back and touch up all the door frames at the end of the project. I'll fix that damage. For now, we've got this end of the hall way 100% done!! Except the ugly light fixture,... those old hideous linen closet doors and hardware,.... the paint,...the baseboards,... and the chips in the drywall corner. Yep, besides that stuff, 100%!!!
"You will go to the Dagobah system"
Obi-Wan Kenobi: [voice comes from out of nowhere] Luke. Luke!
Luke Skywalker: [weakly] Ben?
Kenobi: You will go to the Dagobah system.
Skywalker: The Dagobah system?
Kenobi: There you will learn from Yoda, the Jedi Master who instructed me.
- Star Wars, Episode V, The Empire Strikes Back
You know how some things sound really great, but when you take the plunge, not so much? I'm talking about convertibles, pet boa constrictors, joining the French Foreign Legion, and, of course, swimming pools. Visions of sparkling summer recreation can quickly turn into the reality of a green, swampy pit of wallet-sucking, time-stealing forced labor for survival misery. The planet Dagobah.
BUT, access to a swimming pool, in Phoenix, is pretty much compulsory. It's like having a snowmobile in Northern Michigan. It's mid-June, and I still haven't gotten our pool operational. The weather would have allowed for swimming in April, but it's been a constant battle with the pool to get it habitable. It's an old pool, in need of a serous top to bottom retrofit, but it's cool, wet, and does the job, usually.
It's not quite as bad as the turtle pond above, but we have had it turn nearly this color when our Baracuda Vac sucked up a rock and I didn't catch it for a couple weeks. Yoda would have been quite comfortable, spending his years of exile in our backyard.
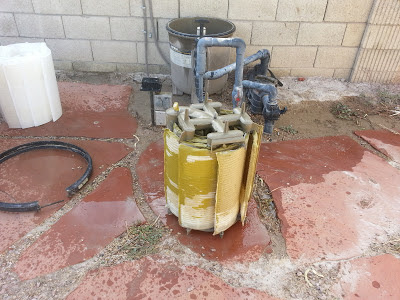
I'd already torn the filter apart and cleaned it twice this year. This time, it was blowing D.E. (diatamatious earth) filter-aid powder back into the pool. In the morning, it was easy to see that yellow slime mold was taking root again. Basically, the filter cycling dirty muck right back into the pool.
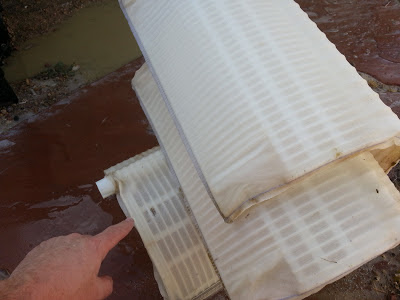
Our Hayward DE3620 Pro-Grid 36-Square-Foot D.E. Pool Filter
takes 8 screens that look like fish skeletons covered with sail canvas. Locally, they cost 30 - 40 bucks (EACH!!!). I try not to replace them unless I absolutely have to, one at a time. Since Sweetie and the kids are bugging me and summer in the desert is in full (heat of hell-fire) blast, I bit the bullet and ordered a full set. Luckily, Amazon had a full replacement grid set , with good reviews, for $103 plus, it's eligible for Prime (free two day delivery). Scooooore!!!


Luke Skywalker: [weakly] Ben?
Kenobi: You will go to the Dagobah system.
Skywalker: The Dagobah system?
Kenobi: There you will learn from Yoda, the Jedi Master who instructed me.
- Star Wars, Episode V, The Empire Strikes Back
You know how some things sound really great, but when you take the plunge, not so much? I'm talking about convertibles, pet boa constrictors, joining the French Foreign Legion, and, of course, swimming pools. Visions of sparkling summer recreation can quickly turn into the reality of a green, swampy pit of wallet-sucking, time-stealing forced labor for survival misery. The planet Dagobah.
BUT, access to a swimming pool, in Phoenix, is pretty much compulsory. It's like having a snowmobile in Northern Michigan. It's mid-June, and I still haven't gotten our pool operational. The weather would have allowed for swimming in April, but it's been a constant battle with the pool to get it habitable. It's an old pool, in need of a serous top to bottom retrofit, but it's cool, wet, and does the job, usually.
 |
| At least someone is swimming. |
I'd already torn the filter apart and cleaned it twice this year. This time, it was blowing D.E. (diatamatious earth) filter-aid powder back into the pool. In the morning, it was easy to see that yellow slime mold was taking root again. Basically, the filter cycling dirty muck right back into the pool.
 |
| Even our house guest, Bella thinks it's horrid |
takes 8 screens that look like fish skeletons covered with sail canvas. Locally, they cost 30 - 40 bucks (EACH!!!). I try not to replace them unless I absolutely have to, one at a time. Since Sweetie and the kids are bugging me and summer in the desert is in full (heat of hell-fire) blast, I bit the bullet and ordered a full set. Luckily, Amazon had a full replacement grid set
Out of the box they look just as good as anything I've found locally. I let the pressure out of the filter and zapped the retaining ring off with my beloved impact driver .
.
You may want to have your children leave the room for this next photo. Brace yourself. I'm unleashing serious horribleness upon you, dear reader... You cannot un-see this...
 |
| Remember the way to kill a zombie? |
AAAGHHHH!!!! That, my friends is slimy yellow mustard algae at it's finest. Believe it or not, I've seen worse.
A single 37" centered bolt holds this contraption together. I managed to get it apart and remove the screens, getting just enough of this putrid green slime on me to make my stomach lurch, but I managed to keep my breakfast down with Herculean effort. Some screens were obviously damaged, with broken "bones", holes, and bits of yard debris inside, far too big to normally get that far in the system.
A month ago, the system had lost it's prime when the vac hose came undone and water was not flowing through at all for a whole day. The basket that normally catches debris, right before the filter, actually melted. When I had opened the housing, steam came out; the water was nearly boiling. The melted basket had allowed flotsam and jetsam to flow past, into the filter. I had thought the screens were ok, but if I had done this operation then, and we'd already be swimming.
After cleaning up the manifold, it was easy to pop the new screens into place. There's a slot on each that keeps them oriented in the right direction. The only thing to watch out for is placing one short narrower screen in the right spot, near the big inlet tube.
Screw the whole thing back together, and it's a single unit. It's so much easier to handle without the dry-heave inducing weight of that godawful slime-impregnated filter powder and fetid water.
Reversing steps, it's easy to put the whole thing back together. I just add the step of whacking merrily on the retaining ring with a rubber mallet as I tighten it, to ensure even seating. I fired up the system, loaded fresh DE powder through the skimmer and got the Barracuda prowling the depths again, greedily devouring it's prey. Clear water began discharging back into the pool. Hooray!!
Next, I turned my attention to the fallen, the wounded screens.
I hosed them down, from a distance, and surveyed the damage. Three of them were completely wrecked. One, with a fingertip sized hole, was probably the biggest offender in causing the issues. Two others were significantly broken inside. I stomped them into submission, crushing them into broken carcasses of shattered bones, to fit in the trash can. It felt good.
I saved the rest. two look really good, the other three are serviceable in a pinch. I'll stick them in the shed for future emergencies. I cleaned the area up, loaded some liquid and tablet chlorine let the system run all day, and night....
 |
| Good night, sweet desert oasis |
... and now, it's tomorrow! Holy sparking sunshine and blue water!!!!
 |
| Bella approves, but the Barracuda lurking below makes her nervous |
I hereby proclaim: We shall swim again this day! Sorry Yoda.
This one's for Jef, who loved it as a kid and played it endlessly:
Fixing it up, again
 At some point in the ongoing adventures of home ownership and remodeling projects, I think everyone finds themselves at the point where they are re-remodeling or fixing stuff they were already proud to have called finished.
Upon study, it's my hypothesis that this natural phenomenon, normally brought on my age or changing tastes, is greatly accelerated by the presence (infestation) of the pint-sized interlopers commonly referred to as "children".
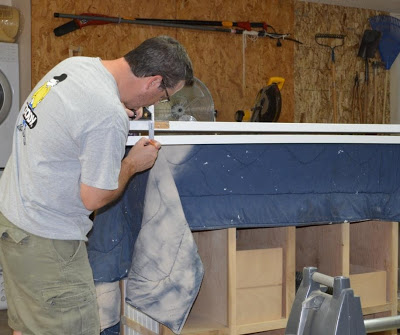
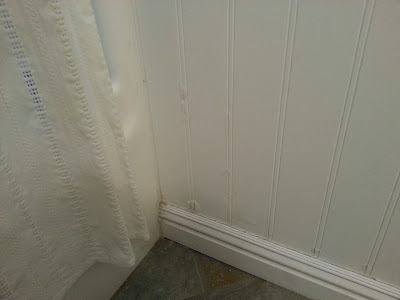
One of my early (pre-azdiyguy.com) projects in this house was the remodel of our guest bathroom. Along with new cabinetry, the train-rack towel rack, vanity top, paint and pluming fixtures, we'd installed wainscoting. I'd made it from a 1/4" x 4' x 8' particle board panel with a beaded finish and trimmed it out with wide base molding and chair rail.
 |
| I think a cannon exploded right about here. |
Now two years later, next to the bathtub where a deluge from countless water-gushing naval engagements had been fought by our little pirates, the panels have become damaged.
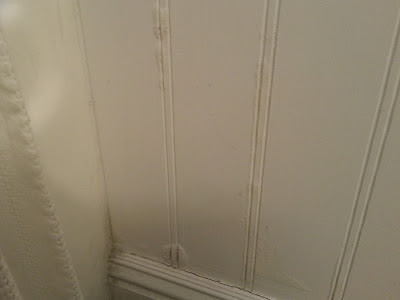
Evidently, I didn't seal them up well enough when I painted them. The decorative grooves had let splashed water into the fiberboard, and it has swelled horribly.
 |
| Ohhhhhh,..... the horror! |
Luckily, in the dryer than dry climate of the Sonoran desert, the panels were bone dry. The swollen spots were not spongy at all; they were left hard nodules of ugliness. It took just a few minutes of sanding with my sweet DeWalt random orbit sander and some 220 grit sandpaper to get all the swelling knocked down and the panel smooth again.
 |
| Sand-tastick |
Unfortunately, the worst area was swollen so thickly that sanding it had completely taken out the groves (beading?). That would certainly look stupid if I simply painted it. I tried to cut new grooves with a razor knife and a straight edge, chisels, and even sandpaper folded over a thin piece of plastic. Nothing worked well enough for me to really dig in with confidence.

Staring slack-jawed at my garage tool cabinet, I finally remembered my oscillating, multi-tool. It's an inexpensive Harbor Freight  version, but its served me admirably well on two projects already. Sure enough, plunge cutting and giving it a slight wiggle scored the new lines in mere seconds. The grooves on the existing panels are already a little rustic, so the hand-held cut matched up just fine.
I finished it up with some fresh caulk and a coat of KILZ primer . I taped the whole panel off with my favorite painting buddy, Frog Tape
 , and painted it a fresh, glossy white. I think I sealed it up pretty good.
Fixed. Repaired. Re-remodeled. It looks nice against the new door I think. Hopefully, our youngest is at an age that we can keep the raging geysers of Poseidon's oceanic tempest under control.
How about you? You get tired of fixing up stuff you've already fixed?
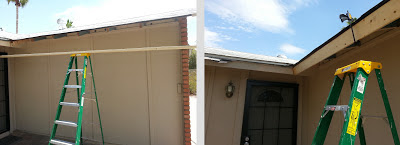
Installing new facia boards,... solo style
After tearing off the front overhang on our house, we need a new facia board. While I'm at it, it's time to fix the sun-beat, peeling, rotten soffit that's along the whole front of the garage. Surely, the HOA will soon ding us on that as well.
I started the day at Home Depot, then Lowes. Both were down to fuuuugly 2x6x16 boards this morning. There were twisted, knotty, and split misfits. 'Depot was nearly picked clean. Hopefully, this is a good sign for our economic recovery; people (besides me) are working on their homes again. I managed to dig through the entire stack and find three serviceable boards at Lowes.
Loading the big 16 footers into a pickup with a 5 foot bed was a challenge. Even shoving them through the sliding rear window left too much hanging out the back, so I opted to go upstairs with it:


 |
Loading the big 16 footers into a pickup with a 5 foot bed was a challenge. Even shoving them through the sliding rear window left too much hanging out the back, so I opted to go upstairs with it:
 |
| Not a surfboard, dudes. |
Lugging those big boys onto the truck, I started thinking the idea of a solo soffit install might just be beyond me. Working with a heavy, 16 foot board atop a ladder and trying to nail it in place now seemed more difficult than it had earlier.
I thought I'd make some sort of custom contraption with 2x4 T-braces, but I realized I had cut up my stock of 2x4's building the miter saw bench. After some stubble scratching thought, I came up with a workable method. I put the ladder in the middle of the run and balance the board on it. I lifted the board, held it, and used a one-handed woodworking clamp to secure it in place. Bingo!
 |
| Clampeyness |
The door-end of the board required a compound miter cut due to the angles of the two soffits combining on two planes. I used a piece of scrap to scribe a pencil line, front and back, and then connected the two lines across the bottom of the board.
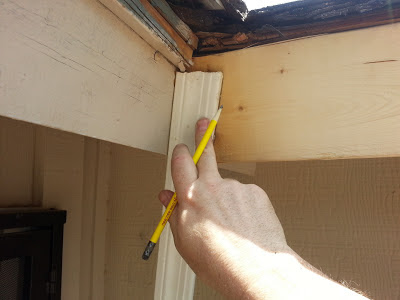 |
| Scribing the outside angle. |
I took the board back down and set up to cut both angles, on B.A.M.S. (big ass miter saw - as coined by Kit over at DIY Diva). This was the first time I'd actually used the saw to cut a compound miter. It paid for itself today, slicing and dicing 2x6's with precision and ease. My homemade, beefy saw bench was priceless when man-handling those massive boards. At one point, it stuck out so far, I had to open the door into the house and stick it inside.
 |
| B.A.M.S having lunch. |
After clamping the board up again, B.A.N.G. came out to play (big ass nail gun - I claim that one). I shot the board into the rafters and then again through the decking, resetting the clamps as I worked across to keep it tight. I actually hit the framing rafters behind,... most of the time.
 |
| Bang - Bang - Bang |
Rounding the corner, to move up along the garage, the old facia looked even worse up close. I don't think the wood was ever primed.
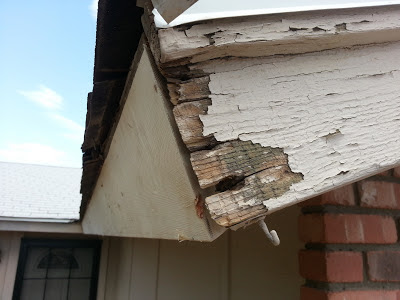 |
| Mr. Hook, it's been lovely, but you'll not hold Christmas lights again. |
I had to work my way up slowly, gently prying the shingles up and pulling out the staples that held the metal drip edge. This was precision work, best suited for a small prybar / nail puller .
.
It also was tedious work. There were a million of those pesky staples to pry out. The sun started getting to me so I broke for lunch, a healthy dose of sunblock, and my sexy hat. Oh yeah, I know the ladies will be drawn to the floppy lid, but too bad, I'm taken. And no, I'm not going to share a source link for this sweet slice of melon shading headgear.
 |
| It's a Stubble Sunday, but you just can't take your eyes off the ol' chapeau can you? Don't be jealous. |
After the 1x2 behind the drip edge popped off easily with a
Wonderbar Pry Bar , I tried to pry off the old facia. It wouldn't come off without damaging the decking and framing, because it was nailed both through the top and the face. I pried the decking up a bit and cut nails with some diagonal cutters for a while. Finding that a pain, that still left some nail-nubs behind, I changed tactics. In came the reciprocating saw with a bimetal blade which sliced the nails off flush as I ran it down the seam, a much better approach.
 |
| Ye old nail slicer. |
A couple hearty whacks with the FUBAR sent it tumbling to the ground with a clatter. I'm really glad I'd moved the cars out of the way. I used it to trace the angles to the new board before taking it in for a visit with B.A.M.S for a quick bit of slice and dice. No compound cuts this time, just nice simple angles.
The clamp trick worked perfectly again. I skadooshed it into place with B.A.N.G and called it good for the day.
A heaping helping of cleanup was in order, again. I'd managed to blast debris in a wide radius around the work site, which is where (inconveniently) we park our vehicles. I hired out some skilled labor to police up all the nails and staples. She drove a hard bargain, but it was cheaper than buying a new tire.
There's still lots of work to do on this project. I still have half the garage face to demo and replace. I need some 1 x 2's, drip edge, primer, and paint.
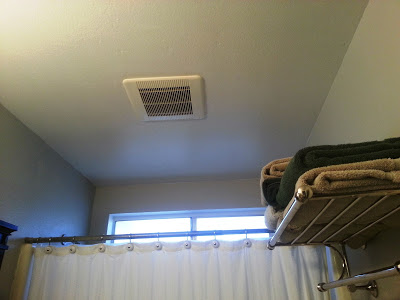
Replacing our bathroom exhaust fan
Both of our bathroom exhaust fans are shot. The one in our guest bath was a beast at one time; it sounded like an F-16 afterburner on takeoff and moved air like a pissed-off hurricane. I'm surprised it didn't pull the door off its hinges. Certainly, it blew too much of our costly air conditioning up into the attic. Now it's fried.
A trip to the home center for a replacement found me staring slack-jawed at a huge display of ceiling-suck-age options, ranging from $30 to $200.
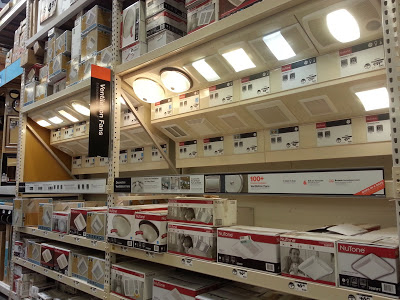
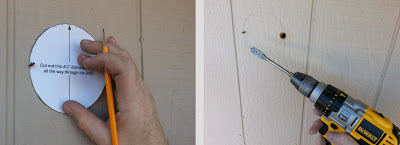
Uhhhhh,... I came prepared complete with the info of: about 12" x 12" square. I was certainly not prepared with CFM measurments, Sone ratings or, most importantly, funds up to $199.99. Since the slack-jawed, staring approach didn't seem to resolve much after a few minutes, I did some split-second Matrix style education,... I looked it up on the smartphone. I find that the deal on CFM ratings is that it's the speed / amount of air the fan moves, in cubic feet per minute. I found a formula and plugged in our measurements:

Now that it's all done, I guess I should have tested the fan to make sure this one wasn't a dud. Luckily, it worked just fine. I actually had to strain to hear it. I almost miss the clattering din of the old one.
 UPDATE!! I'm honored to have this story chosen to be featured an Bob Vila's website as part of the "Bob Vila Nation" of contributors from the blogging community. Please check it out and give me a vote by the hammer image, if you like the story.
A trip to the home center for a replacement found me staring slack-jawed at a huge display of ceiling-suck-age options, ranging from $30 to $200.
Uhhhhh,... I came prepared complete with the info of: about 12" x 12" square. I was certainly not prepared with CFM measurments, Sone ratings or, most importantly, funds up to $199.99. Since the slack-jawed, staring approach didn't seem to resolve much after a few minutes, I did some split-second Matrix style education,... I looked it up on the smartphone. I find that the deal on CFM ratings is that it's the speed / amount of air the fan moves, in cubic feet per minute. I found a formula and plugged in our measurements:
Cubic Feet = Length: 9 ft. x Width: 5 ft. x Height: 8 ft. = 360
360 cu. ft. ÷ 60 minutes per hour = 6
6 x 8 air changes per hour = min 48 CFM fan needed
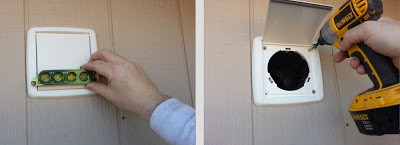
I bought a Hampton Bay (#986 755), 50 CFM, 0.5 Sone (Ultra Quiet) for $ 48.97. It turns out the old one was rated for 180 CFM and screamed its furious banshee wail at 5.0 Sones. Folks with bigger bathrooms will need bigger fans, and deeper wallets.
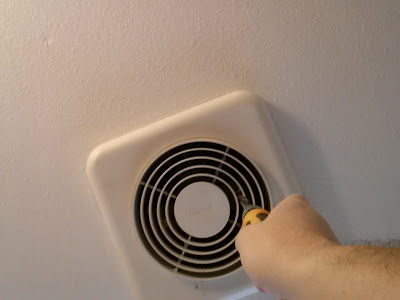
Back at home, I tried to pull the cover and found that this one was held in by rusted screws, not the handy springs I'd seen more recently on our other fan. Up close, this cover is a yellowed, paint spattered mess. I cut the paint and caulk from the edge with a utility knife before I pulled it down.
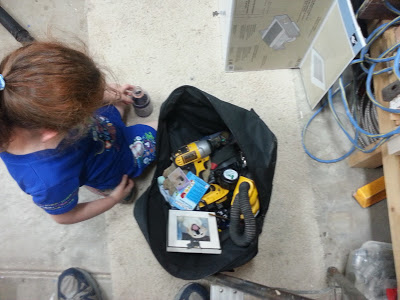
Next, I geared up for the dreaded attic crawl. Our attic is a filthy, itchy mess of ancient, blown-in insulation horror. It's never fun. I loaded a tool bag with all the tools and material I might need. When I returned from changing into long pants, a long sleeve shirt, and a spare t-shirt wrapped around my head and tucked into the back at my neck, I found my tool bag had been substantially supplemented.
Gracie was worried about me going into the attic, without her. She'd helpfully loaded up my tool bag with:
- (1 ) box of Band-Aids (Angry Birds)
- (3) tape measures
- (1) Diet Coke
- (1) Photo of Kirby (our dog who passed in 2010)
- (1) Doggy Valentine's card
- (1) Hand drawn "note" with hearts and "Daddy"
- (4 ) Pretty rocks
- (1) Small bag of 1/2" nuts and bolts
- (7) 3" finishing nails
- (1) Extra dust mask
Of course, I had to lug the extra stuff up there, just in case.
I traversed the attic, which ended in a miserable, belly-crawl across the rafters. It was 86º degrees outside in Phoenix; in the attic, it was damn hot. In the light of my headlamp, the fan appeared, it was unfastened and completely without a duct. From what I know, venting your moist shower air directly into your attic is commonly referred to as extremely stupid. It's not going to freeze in Phoenix, but it could cause mold issues and who knows what else. I didn't see any evidence of problems, but it was a dark, hot mess, and I wasn't going to loiter.
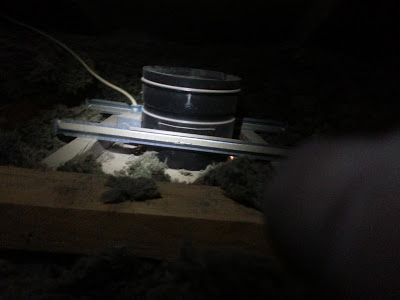 |
| I could see the target in my high-beams. |
I lifted the old fan out of the way. Luckily, there was enough slack in the electrical line to push the unit back to where I could at least crouch to work on it. With the hole open, there was a sudden burst of excited chatter from the bathroom below. I couldn't get close enough to the hole to look down. I held my camera phone over the edge to take a blurry recon shot:
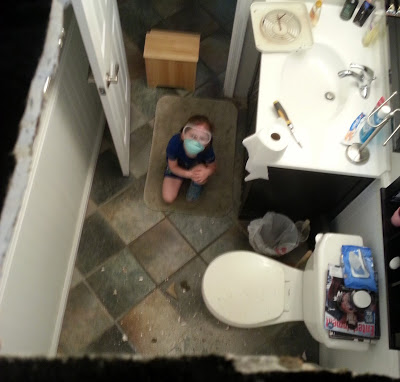 |
| Daddy's helper. Thanks for the Coke sweetie! |
With the power off, I opened the wiring compartment and took the wires out of the wire nuts. I slid the existing, three wire cable into the compartment of the new fan and clamped it down, using the connector (NM 3/8-Inch Clamp Type Connector ) I had installed earlier, in the comfort of the garage. This particular unit used the push-in style quick connectors for the wiring. Normally, I cut them off and make a tight, twisted joint with my Linesman Pliers
 and wire nuts, but in the dark, hot attic, I was pleased to go with the plug-and-play approach.
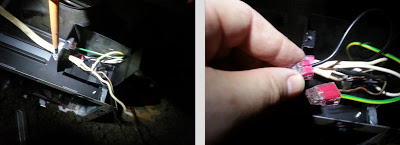 |
| Clamp, plug & play! |
I had bought a wall vent ducting kit as well. The 4" flex duct attached to the fan exhaust port with an included zip-tie. I added a quick wrap of the metallic foil tape that I had left over from the ceiling project. I shoved the new fan back over the hole and screwed the supports to the nearby studs.
 |
| Duct,..duct,... duct,... GOOSE! |
QUICK TIP: Ready to run the duct to the outside, and having pulled the bone-headed move of drilling exterior holes into framing members in the past, I took the time to drive a screw through the wall from the inside, so I could find the location easily from the outside, no measuring!
Finding the screw was easy. I shifted to the right to avoid the groove in our "lovely" T-111 siding and traced the 4" hole using the template supplied with the duct kit. Drilling a larger hole near the side of the line with a Spade Bit allowed for saw blade access.
Grumbling about the lack of a cordless jigsaw in my collection of power tools, I was forced to the disagreeable task of stringing out an extension cord, like a chump. This Black & Decker Jigsaw is actually the first power tool I ever purchased as a homeowner. It was bought for slicing a countertop to fit a new refrigerator in our first house, probably in 1999. I don't use it a ton, but it's held up very well for a lightweight, economical-grade power tool. Here's their current version, the Black & Decker 4.5 Amp Variable Speed Jigsaw
The duct kit came with a exterior vent with a flap door. An included sheet metal, rigid duct tube snaps into the back and is fed through the wall into the attic. I put a my small torpedo level on a straight line to square it up. Four wood screws zapped in quickly with the impact driver
 .
.
Back in the attic, I attached the flex duct to the rigid duct tube, again with a zip tie and some foil faced, adhesive tape to seal it up. Per instructions, I kept the flex duct in a gentle curve, without making any tight corners. The attic rat mission is an operational success. This highly classified image shows the target has been taken care of:
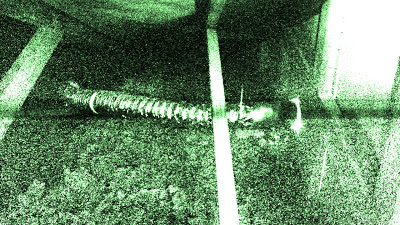 |
| Classified: Just between us right? |
Returning filthy-clothed to the sweet, air conditioned goodness of inside, I popped the beautiful, new fan cover in place, this time with the easy, snap-in retention springs.
 |
| Note a very important detail in this step: no bald spot. |
The exterior vent flap works well. It swings open and closed as needed.
 |
| Thar she blows! |
This was a medium difficulty project. Anytime attic work is required, it's a bit difficult and unpleasant, but you can do it. Keep your feet on solid framing and watch out for nails and open electrical connections.
It's not an exciting project to have done; we had a fan and we have a fan again. Just an unforeseen, necessary repair, not a desired improvement project. At least it's quiet and looks much better than the dated, ugly one. Plus, we now have exterior venting.
Thoughts? Comments? I'd love to hear from you.
____________________________________________________
UPDATE!! I'm honored to have this story chosen to be featured an Bob Vila's website as part of the "Bob Vila Nation" of contributors from the blogging community. Please check it out and give me a vote by the hammer image, if you like the story.The best laid plans...
Why is it that when you need consecutive weekends dedicated to a big project (like replacing all the doors in your house) that the rest of your house goes haywire? We've been buried with scheduled obligations lately, so the time allotted for serious weekend-warriormanship was already limited. The door project was going really well; I could see then end in sight. I was knocking one door out each weekend, no problem-o.
Then BAM! The washing-machine self destructs. Gotta drop everything and fix it. Tear down and rebuild.
...then, BAM! Just like the front yard, the irrigation system bursts in the back. Gotta be fixed.


...then, BAM! The awesome Baracuda Zodiac G3
robot pool cleaner-dude finally wears out it's rubber parts. A total tear down and,....you know the rest. At least I found better pricing on Amazon and saved about $150 vs. our local pool shop. Still, it's not the fun kind of tool I want to be buying parts for.

... then, BAM! The guest bath exhaust fan gives it's death rattle. Inside, it's an unholy fossilized mess of rusted metal. Carbon-dating analysis puts it's installation in the long bygone era of 1979. I think the only thing holding it together is the rust.
Then BAM! The washing-machine self destructs. Gotta drop everything and fix it. Tear down and rebuild.
 |
| Frickin' frackin' rubble bumbin' mumble mud... |
... then, BAM! The Pool Filter gets clogged up, right as the temperature rises. The pool turns into a swampy-green, scale model of the planet Dagobah, without the diminutive Jedi Master . A total tear-down and rebuild is in order, with a diminutive mud-pie master.
...then, BAM! The awesome Baracuda Zodiac G3
... then, BAM! The guest bath exhaust fan gives it's death rattle. Inside, it's an unholy fossilized mess of rusted metal. Carbon-dating analysis puts it's installation in the long bygone era of 1979. I think the only thing holding it together is the rust.
 |
| This weekend's recreational activity. |
I even managed to fit time in to break my shop's dust-collector while changing the bag. Enough with "BAM!" already. It's killing progress, and tearing an unwelcome, good-sized hole in our checkbook.
What's next?
An Emergency Washer Repair Challenge
Our LG front loading washing machine tried to self destruct! Here’s how I fixed it myself and saved a ton of money
Read More
The front door. Someone actually did this to their own home,... on purpose!
Undesired Inheritance from our DIY Predecessors
Remodeling a house and finding the half-assery left by previous, drunken DIY'ers.
Read MoreInstalling the New Pocket Door
 I'm installing the new pocket door for the master bath today. I'd already prepared our new six-panel door, trimmed it to fit, primed the fresh edges, and painted the whole thing with a couple coats of white, semi-gloss last weekend. If you missed the story, find it here; it's a cliffhanger. The last coat of paint went on 6 days ago, so it's nice and dry, out in the workshop.
The dang thing keeps falling off its rail, plus it rubs on the inner walls of the pocket as it sways loosely from the track. I've already replaced the track mounting screws with larger screws, they seem to be holding. Look how ugly that beat up old slab door looks!
I pulled the top two trim pieces (casing?) off to access the mounting hardware, showering the whole area with bits of drywall from the rough edge behind. It isn't the best looking installation of trim I'd seen, with heavy globs of caulk filling the voids. Maybe when we redo the bathroom, I'll re-trim the whole thing with wide trim.
There was a side piece of molding that kept me from swinging the door out from the bottom. First a quick score with the utility knife to break the paint / caulk line:
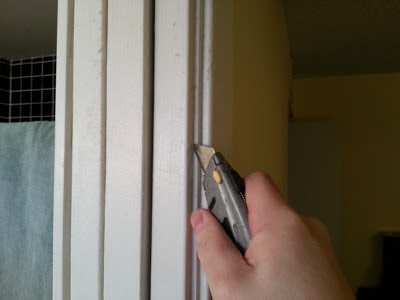
I used a wide-blade putty knife to slightly pry the molding out enough to stick my mini-prybar/ nail puller behind it. Having learned from several past remodeling disasters, this time I took my time, gently wiggling the tools, then the molding itself as it slowly broke free. I want to reuse it when I reinstall the door. It actually came out in one piece! If you look close, you can see the horrendous tile in the shower. Don't worry, it's on the to do list.
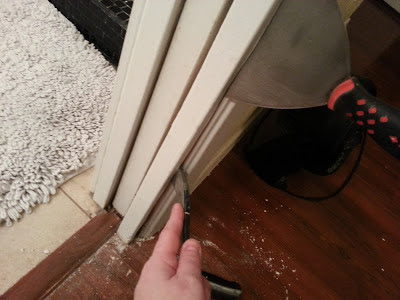
Jack stopped in and pulled all the nails that were left. The narrow head on the mini-prybar/ nail puller made it easy without scuffing up the paint on the remaining trim. He had fun with it and did a great job. There's another glimpse of that horrible black tile in the shower on the left.
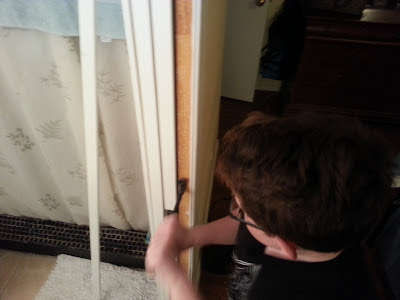 |
| Child Labor Rocks !!! |
I learned why the door was swinging free, dragging on the pocket sides. There were plastic guides originally installed, but they were yellowed and brittle. They had snapped off sometime in the past 30 years. I also saw old water damage from our wonderful house flood a few years ago. (A toilet feed line had ruptured - I'll cover that in future story).
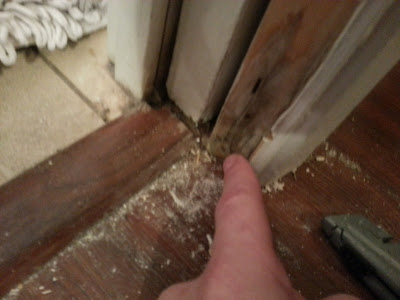
I needed another set of hands for the next step. Jack pushed the bottom of the door from inside the bathroom while I lifted the door up with the top of my foot from outside. The door pivoted from the track, hanging like a garage door. It took my mini pry bar and my favorite, beefy, slotted screwdriver to pry the track and wheels apart. FREEDOM!!! The door popped out. I could see the wheels were well worn, compared to the replacements I have bought.

Looking inside the wall with a flashlight I can see I'm in luck. The track mounting screws inside the wall have not worked themselves loose, like the ones in the doorway had. I could only reach one with my screwdriver; it was tight, thank gods of remodeling. The whole plan to avoid cutting the drywall had hinged on this. Whew!
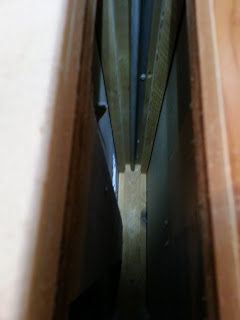 |
| Like most men, I have a one-track mind. |
In order to replace the broken plastic guide on the bathroom side of the door, I had to pry the inside molding up a bit. Unfortunately, I couldn't get it free. The floor tile had been installed after the trim piece and was encasing it. I tried out a tool I'd never used before, a "Variable Speed Oscillating Multifunction Power Tool". It plunge cut, flush with the floor, slicing the wood like butter. 30 seconds = done! Mine is a Harbor Freight cheapie that I picked up a couple months ago on a whim; it was on sale. I'm sure it's not lasting quality, but it's a great concept. I'll definitely buy a nice, quality one whenever this one dies.
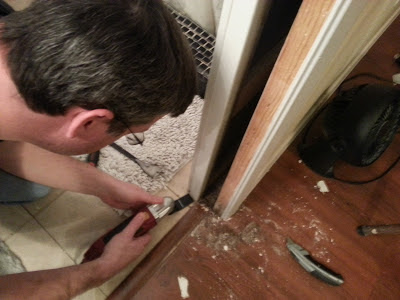
I pulled out the molding a bit, removed the old one that was installed with a finishing nail, and screwed the new one in. I'll adjust it later when the door is in.

I lugged the old door out to the workshop and laid it on top of the new one. Perfect match. With luck or possibly the benevolence of magical, midnight workshop elves visiting, I had managed to use the planer for the first time, to trim the new door down to a duplicate size without removing the old door.
It was interesting to note that the top, bottom, and pocket side edges were bare, unpainted wood. That's apparently a big no-no in humid environments. I didn't see any ill effects though.
Using the old door for placement, I matched the location of the roller hardware and installed the new ones by measuring, pre-drilling, and running the screws in tight with the impact driver. The new hardware seems a lot heartier. The big hex bolt adjusts the height of the rollers, more on that later.
I also copied the location of the latch from the old door. A very close call, I nearly cut the same size slot, but for some reason I read the instructions and learned that the new latch was 1/8" smaller. I shudder to think what foul words I would have befouled the neighborhood with if I had ruined the door by cutting an oversize hole. The old latch was painted and had a broken mechanism. My wife even cut her finger on it two days ago. I couldn't have used it.
I managed to scuff the new paint by dragging the old door's latch across the new one's face. To avoid more damage, I taped off the face of the new door, drilled a starter hole in the back of the slot and made three slow, steady cuts with the jig-saw. The new brushed-nickel latch fit perfectly.

Go time! I tipped the new door top first into the head of the opening and slipped the rollers easily into the track. Of course that is complete bull, a bald-faced lie.
I grunted and sweated that bastard into place crawling on my hands and knees back and forth, in and out of the bathroom trying to get those rollers to get into the track. For as many times as I had popped the old door back on track, I should have been able to do it with my eyes closed. AAAAAAAGHHHHH!!!

Finally, I turned my brain on for a second and adjusted the rollers so that the wheels were completely extended. It just took a few turns with a 1/2" wrench to extend them. Having only turned on my brain, "for a second" I was quick to realize that by cranking the wheels all the way up, it drove the door down, wedging it into the floor. I couldn't budge it. Idiot.
Turn the brain back on,.. climb back up the step stool,... crank the wheels back up,... climb down the step stool,... swing the door out,... climb back up the step stool,... extend the rollers again,...
This time, a quick prying motion with the mini-crowbar on the roller and the same with the screwdriver against the rail. Click-click, POW! Locked and loaded. I adjusted the rollers back up with the wrench making the leading edge square with the wall so there is no gap. The door slid closed smooth and easy. I installed the second guide at the bottom and tightened both. This door will not rub.
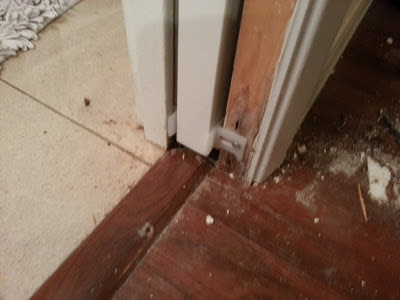
The original trim goes on with a quick "skadoosh!" from the finish nailer. It was easy to place since the original razor cut-line fit back together like a tight puzzle.
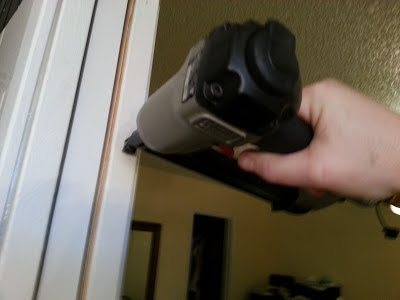
I've got it on the run now! Quickly swapping the nail gun for a caulking gun, I keep on shooting.
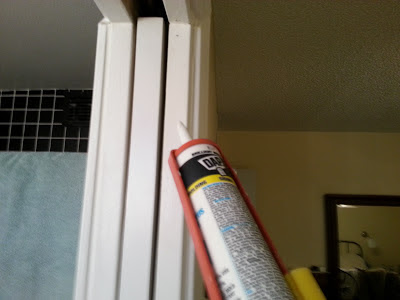
With wet caulk, I have to pause to address the more important task of enjoying a grilled cheese sandwich, a bag of Fritos, and a Diet Dr. Pepper that Sweetie whipped up for me. There's enough time to eat, clean up, and type up the story while it dries.
After a couple hours, I hit the trim and the door scuffs with a quick touchup of white paint. It's nice that I didn't have to remove trim from anywhere against wall color paint. It was all trim on trim / white on white, therefore no masking, just a quick layout of old newspaper on the floor to avoid drips.
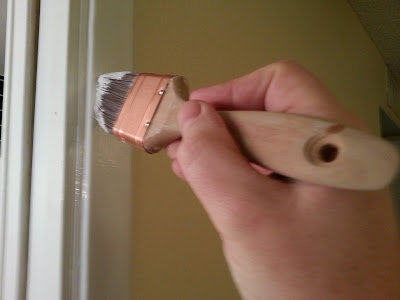
Finished! I think it looks 100% better than before. It really dresses up the room a lot. The ladies will be pleased that the door finally, actually locks and won't fall off the track, trapping them in there.
Overall, it wasn't a super difficult project. It did take time to prep the door, but today's portion only took a couple hours to do.
 |
| What do you think? Better? |
That's the only pocket door in the house. Next, I have six standard doors, the door to the garage, and a louvered closet door to replace.
The DIY Guy vs. Dealership Challenge 2013!
I'm not a car repair guy at all. I don't have much experience, or interest. But, a dealership repair quote socked me in the gut. Surely, I can take a crack at it. A little off-track from my normal subject of DIY around the house, I'm taking this fight to the driveway.
I love my Honda Ridgeline. It's a mid-sized, 4-door, short-bed, pickup, perfect for hauling the family or my piles of project material. Mine is the middle trim-line, the RTS, which includes a 3.5 mm auxiliary audio jack for plugging in iPods, MP3 players, etc and playing them through the excellent audio system. Mine simply stopped working, the radio wouldn't even let me select "AUX" as an option anymore. I figured it was the connection, because it cut in-and-out for a while, when I wiggled the plug before it died. I took it to the dealership to get an oil change and to have them look at it; I realized I had slipped just past the warranty mileage expiration. Lovely. The quote to replace the jack came in at $120.00. It was actually a little higher, but my ears turned off at "One hundred and twenty..."
While waiting for the oil change, I sauntered over to the parts counter, just to see what the part cost. $35.84. Hmmmmmm.... If I can do it for less than $84.16, I'm ahead, even if it takes me a several hours of weekend time. I ordered the part. If I failed, or it didn't fix it. I'm only $35 at risk.
Holding the part in my hand, it looks like a snap in deal with a plug-in wiring harness in the back. Fairly easy, for $84 in labor? Can I get to it behind the dash. Any of those pesky clips you can't figure out and end up breaking hidden in there. Still, I'm pretty sure I can beat it. Thus,...
 Nothing broken! I got one of those early bursts of confidence, you get when nothing goes wrong early in a project. Dangerous.
 I gently pulled the jack forward and fed a little of the slack cable through the opening. There was enough to twist and rotate the assembly so I could get a good eyeball on it. There wasn't even a clip on the little green plug for me to break! I grabbed the plug and the jack assembly and slowly pulled / wiggled it apart. Bingo! No problems so far. The plug popped into the new jack and the jack snapped into the dash. I clipped the plunger / piston onto the glove box, reinstalled the two bumper things, removed them both when I realized I needed to semi-close the box first, reinstalled them again, and, using the most difficult technique of the day, flipped the box closed. That was easy, too easy, waaaaay too easy...
 I stopped the timer. Barely over 2 minutes, TOTAL, from opening the glove box.
 |
| You don't know jack! |
 |
| Looks like a snap. |
Holding the part in my hand, it looks like a snap in deal with a plug-in wiring harness in the back. Fairly easy, for $84 in labor? Can I get to it behind the dash. Any of those pesky clips you can't figure out and end up breaking hidden in there. Still, I'm pretty sure I can beat it. Thus,...
The DIY Guy vs. Dealership Challenge 2013!
 |
| On your mark, get set... |
In the Dealership corner:
- A trained, professional automotive mechanic, wearing dark-blue coveralls (coveralls assumed)
- A full set of specialty automotive tools
- Experience with this procedure, in this vehicle
- A heated work space (it's 35 degrees in my driveway)
- Manufacturer's reference material
- Smug, professional confidence
- free coffee in the waiting room
In the DIY Guy corner:
- My lucky Dunedin, New Zeland ball cap (a gift)
- (2) mugs of Kirkland Signature, Pacific Bold, Dark Roast Coffee, Extra Bold coursing through my system
 |
| Pop out these thing-a-ma-jigs. |
GO TIME!
I opened the glove box and emptied my junk onto the driver seat. There were some sort of bumpers that keep the box from falling all the way open. They were a little flexible and the glove box itself was a bit rubbery as well, so I took a chance and pushed them through from the outside. They popped out pretty easily, one on each side of the box. Then there was a plastic, plunger / piston thing on the right side that simply unhooked from it's connection. The entire box flipped all the way open and hung upside down, leaving an open access behind the passenger side dash. 35 seconds.
Nothing broken! I got one of those early bursts of confidence, you get when nothing goes wrong early in a project. Dangerous.
I stuck my hand up in there, like I was birthing a calf, and felt around for the back side of the jack. There was enough room for my fairly large hand to feel around in there. I could feel the wires and some sort of plug. I couldn't tell if there was any sort of locking mechanism holding the wiring clip in so I didn't pull on it. I didn't want to damage a wiring harness that I can't get to the other end of the cable. (That would probably cost at least $800.00 at the dealership!) I could feel the spring clips I had seen on the replacement part. A quick, tentative squeeze to both clips and I could tell the jack assembly was free, no retaining clip. Sweet!
I gently pulled the jack forward and fed a little of the slack cable through the opening. There was enough to twist and rotate the assembly so I could get a good eyeball on it. There wasn't even a clip on the little green plug for me to break! I grabbed the plug and the jack assembly and slowly pulled / wiggled it apart. Bingo! No problems so far. The plug popped into the new jack and the jack snapped into the dash. I clipped the plunger / piston onto the glove box, reinstalled the two bumper things, removed them both when I realized I needed to semi-close the box first, reinstalled them again, and, using the most difficult technique of the day, flipped the box closed. That was easy, too easy, waaaaay too easy...I stopped the timer. Barely over 2 minutes, TOTAL, from opening the glove box.
Knucklehead. I didn't even test it before reassembling everything. When it inevitably didn't work, I have to do everything all over.
I plugged in an audio cable, turned on the ignition and pressed AUX. The radio actually displayed it. There's a good sign. Pulse, pounding in my temples, I hooked up the Kindle Fire (The iPod battery was DOA)...
On button,...
Music,...
Songs,...
Shuffle....
 |
| Get up, Everybody's gonna move their feet, Get down Everybody's gonna leave their seat You gotta lose your mind in Detroit Rock City |
Veni, vidi, vici
- Julius Ceasar, Tyrant
POST GAME SHOW:
2 Minutes, 9.9 seconds. No tools other than my hands.
Let's call it three minutes. Let's add 10 minutes for the mechanic to go grab the part. Lets add another 5 minutes just for, whatever. Call it 18 minutes. What the heck, call it 20 minutes, . That calculates to an hourly labor rate of $ 252.48 / hour.
Using my totally SWAG* methodology, that calculates to a Mechanic making $25 / hour + 25% employee burden and 10% overhead, leaving $218.11 / 634% in profit!
*Scientific Wild Ass Guess
We Came, We Saw, We Kicked its ass!
- Dr. Peter Venkman, Ghostbuster
You think it was the hat, or the extra bold coffee?