

So I just replaced the broken threshold under our patio doors after a complete failure to find repair parts. It was done. Except...
/ präjˌekt / krēp /
- A slang term for the gradual extension of a deadline, especially if the parameters of a project are moved repeatedly.
- Describing the assured wallet-puckering, time-suck that is AZ DIY Guy performing a "quick fix", "speedy-repair", or other such nonsensical fantasy. This phenominon routinely develops shortly after our delusional knucklehead proclaims, "I'll have this fixed up before lunch!"
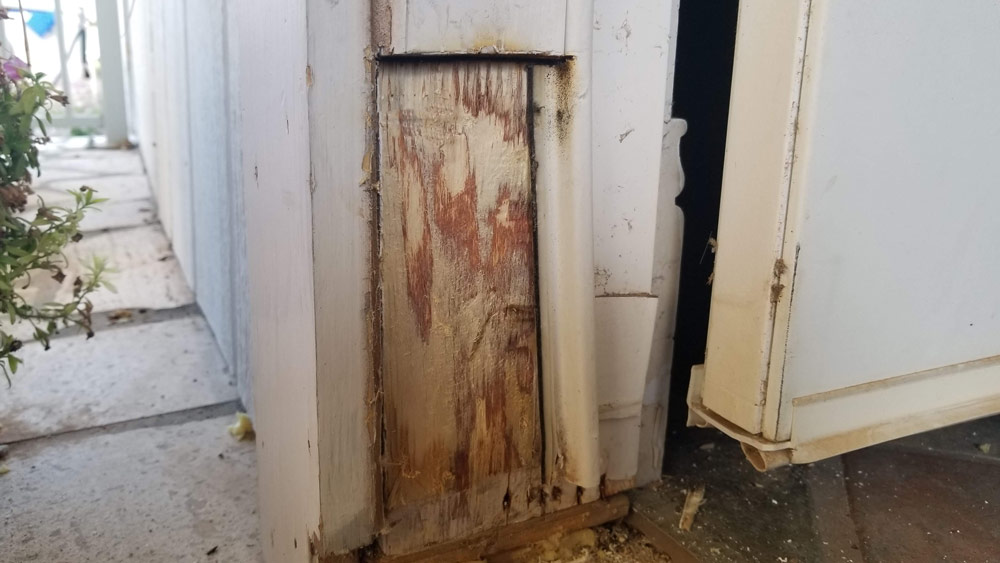
Remember this?
In that last post on replacing the threshold, I described how I had cut out the lower sections of the door jamb due to water damage. I still needed to fix those to truly call the project done.

The Dreaded Project Creep Begins
I've been focused on remodeling the interior of our house for years. We've always meant to do the exterior later. This explains the absolute rubbish of a back patio that we've been suffering for over a decade. It needs A TON of work. There's chipped paint, an old, doggy-door patch, abandoned cable-TV lines, and other hideous delights. So, naturally, as I closed in on wrapping up the threshold repair, I figured,...
"While I'm at it..."

Suit up old man. Back into the breach.
If I was replacing those chunks of door jamb, I might as well tackle the godawful, hack-job trim around the door right?
Damn right. Grab the pry bar and hammer.

I do love me some demolition.
The old, ill-fitting trim got swiftly and mercilessly splintered. It landed curbside, on the bulk-trash pile. Good bye.
I'd picked up a short piece of 1/2" poplar and cut a couple pieces of it to fit each side of the doorway, plugging the holes in the jamb. The corner needed to be trimmed off and the back edge needed a quick chamfer to fit the weatherstripping. I buttered the bottom and back with some silicone caulk to keep the water away.


Silicone caulk might help seal it, but wouldn't glue it in place permanently. I fired some finishing nails to lock it in. This was one of those times a cordless nailer was the absolutely perfect solution. I didn't have to lug a compressor and hose from the garage, just for a pinch of nailing work.
I suppose I could have done it by hand with a hammer, but that's just silly thinking. I'm no chump; it's all about the power tools for me baby.

Tape: DEWALT 25FT Tape Measure Nailer: DEWALT 20V 16 GaugeFinish Nailer Blade: Stanley Quick Change Utility Knife
I filled the nail holes and gap with a plastic, indoor / outdoor wood filler and left it to dry.


The right side of the door had less damage, so it got a smaller patch piece. The same treatment worked for the fix.


With no choice in the matter while the wood putty dried, I retreated into the house for some food. The next, obvious step was to consume a salami and Swiss sandwich on a sesame bagel. In the interest of full disclosure, it had Dijon mustard and lettuce. You're welcome.
Continuing my relentless (lazy) pursuit of an entirely cordless project, I left the palm sander and extension cord in the garage cabinet. My beloved, cordless oscillating multi-tool has a perfect, little detail sanding attachment to do the job.

A belly full of sandwich and a fist-full of multi-tool: DEWALT DCS355D1 Lithium-Ion Oscillating Multi-Tool
Here's an interesting observation...
The house was built in the late 1970's. We think the family room expansion may have been done in the late 1980's or early 90's. Back then, in olden times, it must have been such a luxury to have a telephone out on the back patio, by the pool.
No more; we've got cellphones in every pocket. Wreck it.

An end to the extravagance.
Installing A Craftsman Style Door Casing
I measured for the new casing. I'd be placing the edge, slightly offset from the door jamb to leave some visual interest.
Don't judge me on the ragged, ripped out paint, I did score the caulk with a razor knife before I removed the old stuff. That's old damage.

I used an mini adjustable T-square to draw those offset lines to place the casing against. I cut the board to length in the garage, laid it on the offset line, and nailed it in place. This Craftsman technique is an unbelievably speedy way to trim doors and windows, with no angled miter cuts.
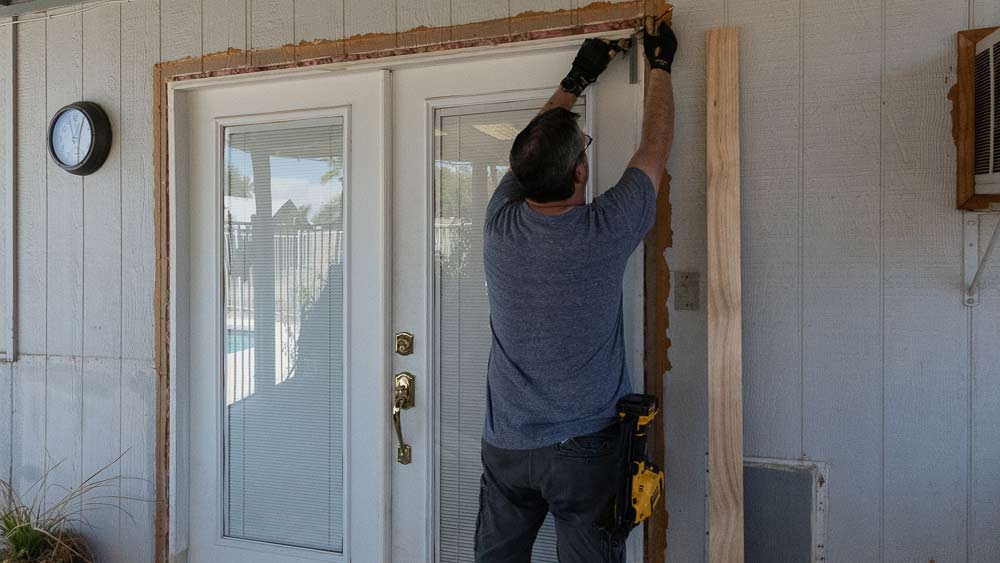

The head casing is a wider, beefier piece that spans across the top of the door, from casing to casing. I trimmed a 1 x 6 long enough to hang over by 1 inch on each side.
I was using cordless tools at the back of the house, but that's no reason not to use a corded, big-ass miter saw in the garage, is it? 😊 I had the wood stacked in there anyway.

I lugged the properly trimmed board through the house, without breaking anything, and nailed it in place.
"Remember, with great power, comes great responsibility."
- Uncle Ben
Ok. I looked at the photos after the fact.
It sure looks like I'm performing some ridiculously unsafe Spider-Man acrobatics on top of my ladder. It's not as bad as it looks. The Little Giant is on it's lowest setting, basically in step-ladder mode. It has a really wide, very stable base. I was careful, honest.
I would not be earning yet another Order of the Purple Hammer Award this weekend.


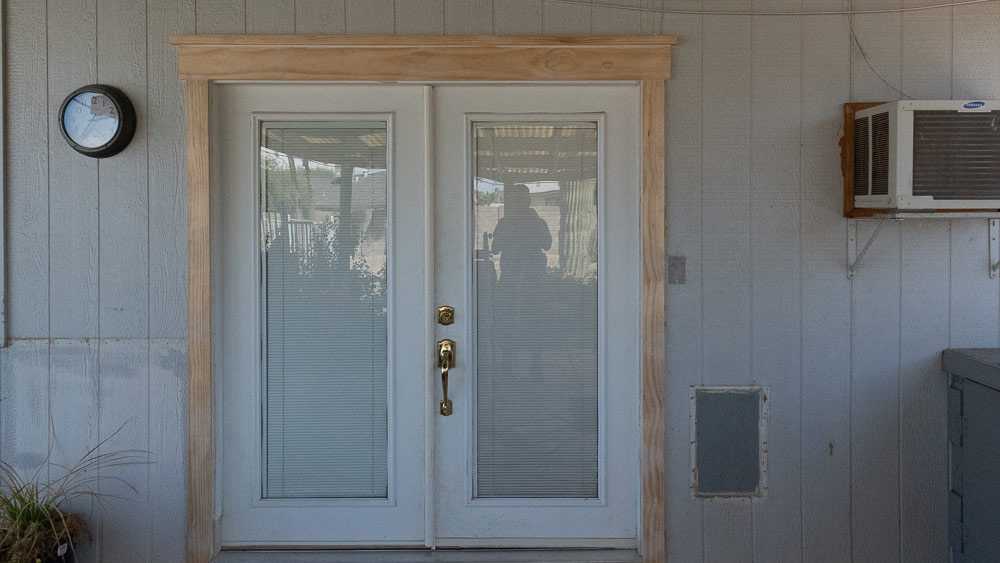
The crème de la crème of a Craftsman style trimmed door is the top, the cap or crown. It's a thicker 2x2 that gives a look weighty presence with a nice shadow line. I let it protrude and additional inch beyond the head casing and nailed it in place.

Since it's under the patio roof, I put it up there as-is. I think I'd have run it through a table saw and put a slight angle to the top if it was going to be exposed to rain. I'd also install some kind of flashing / waterproofing.
The Craftsman style trim was complete with only 4 simple, straight pieces of wood. I caulked the seams and edges with a quality acrylic latex to seal it up.
Untreated wood doesn't last long outdoors. A good coat of quality primer will seal it up until I figure out just how far I will go in this "while I'm at it" diversion. The whole back wall needs to be done.
<wining mode on> But I have other projects I want to do first! <wining mode off>

It already looks a ton better, even with primer coloring outside-the-lines to cover those bare spots in the siding.

What's next? Paint? Stucco, Siding?
That's all probably going to wait. The whole patio really needs a remodel. I'm going back inside; I still have to finish the kitchen and (foreshadowing) do the dining room.

Stay cool friends. The end of summer is in sight, even here in Phoenix.
Related Posts


Kitchen Remodel: Episode 29 The new, super-huge window / pass-through between the kitchen and family room is getting getting its trim. No more rough opening!