

Did you know you can install a window air conditioning unit without using a a window? I can’t, but you can. Well maybe you can. I know I can do it, but it turns out I can’t, not even in a window. Make sense? I’ll share more on this stream of confusing nonsense later, but first…
Our son’s room gets way too hot in the summer. Now that he’s in college, he spends a lot of time in there doing homework, and it gets downright uncomfortable. Plus, he has a fish tank he doesn’t want boiled. He bought a small window unit; I agreed to install it with him. He didn’t want it hanging out his window, blowing right at his face level while he was doing homework. We decided to put it up high and out of the way.
On with the install!
First, We Need More Power!
The unit he bought needed a dedicated, 15 amp circuit. His room is on the completely opposite side of the house as our electrical panel. Luckily, there was a small, sub-panel that runs our swimming pool located right on his room’s side of the house. It even had a spare, unused breaker. We’d use that!

Electrical panel junior.
For some reason, the power for the pool, sub-panel is encased in a metal, conduit raceway, from the main panel on the other side of the house, all the way across the attic, then along this exterior wall. In this case, we could use the conduit to help us route power back away from a low-slope, inaccessible corner of the attic, to the middle where we could work with it.
Jack started us off by removing the pipe straps.

With the power off, we disconnected the wire feeding the sub-panel and pulled it back to a conduit body (affiliate links - thank you!) where the conduit exited the attic. I cut the metal pipe with a reciprocating saw and a bi-metal blade. A hacksaw would do it, but I’m not a fan of pumping away with a muscle-powered tool while standing on a ladder, not when there are power tools to be had.

Rocking my ol’ electrician’s tool pouch.
I cut a section out of the conduit to insert a new, T-shaped conduit body with rain-tight connectors. We’d only be pulling the new circuit wiring back halfway from the panel and branching it out at another angle. The “T” would direct that branch upward, into attic height.

Interception
With the “T” installed and the conduit strapped back in place we used a fish tape to pull the original wires back to the sub-panel. We added our new circuit along the way, starting at the new T. Plenty enough of it was left hanging out to get to our new location.


I drilled through the siding with a hole saw. Less than 6 inches of new conduit and another conduit body got us back up into accessible attic space where we could mount a junction box on the inside.

This is not the prettiest set-up by far. If I had installed the pool sub-panel myself, I certainly would have done it another way, to avoid so much exposed conduit on the side of the house. Luckily, this is a narrow, side-yard, an unused ally-like space where we won’t be entertaining the Hollywood elite anytime soon.

Not pretty, but serviceable.
Make a hole!
We’d decided to mount the AC high up on the wall, above some shelves, with the new electrical receptacle right below it.
We taped a properly sized paper target on the wall to get the placement right. Jack moved his stuff out of the way so we wouldn’t damage anything.

High Tech College Bedroom
Using the paper target as a guide, we drilled all the way through the wall at one of the corners with a long bit. From there we measured and marked the rectangle. Luckily the existing conduit missed our location.
Intermission: A Recognition for the Idiots
The keen eyed reader may view the photos in this story and note another spectacular installation by our feeble-minded DIY’ing predecessors. We discovered that the phone line for the bedroom room had been poked through from the garage and ran haphazardly down the exterior face of the house. One can only assume that these intrepid installers somehow realized, through their drunken haze, that phone lines shouldn’t remain exposed to the elements. Clearly, the best solution was to use a plastic butter knife to liberally schmear it with a goopy mess of caulk and let their two-year-old child apply a bare-handed Play-doh technique as an artistic finish. It’s a bold design choice that I lack the cultural depth to appreciate.


Our home is clad in glorious T1-11 siding, the crème de la crème of fine suburban tract home outerwear in Phoenix, from the 1960’s to the early 1980’s. It’s 4x8 sheets of some kind of press-board with an embossed, fake wood grain and faux plank seams. The real seams between the sheets were covered with thin batten strips. Enough history.
I plowed through the stuff with my oscillating multi tool. I carefully eased one corner open first so I could peak inside and see if there was anything I didn’t want to cut into. I found a bundle of electrical cable to the right, just outside the location of our new opening. Three inches closer and we’d have had a problem. Cut on!!!

Chopping right through that stupid phone line.
With the siding open, I cut through the 2x4 studs that ran right through the middle. It looked like a double stud, but one was badly split and not touching the top of the wall plate. I’m not sure what that was all about, but I’d be reinforcing everything with a new, 2x4 box frame anyway.

Cutting below the edge of the siding to fit new framing.
Like most of my projects, this was one of those jobs where I kept trudging back-and-forth to the garage to grab one unexpected tool after another. A jigsaw was next in the lineup.
Since I’d install horizontal members from one intact stud to the other, I had to notch one end to allow for the bundle of cables I’d spotted earlier to fit through.

Kicking it up a notch
I used a Kreg Jig to drill some pocket holes in one end. Screws would be easy to safely install so close to the electrical cables. I didn’t want to use a nail gun that might split the wood or deflect into the wire.
I added the new electrical fished back down from the attic, before closing up the framing.

Notched, pocketed, and screwed
I shot the rest of the board in place with a framing nailer and built the framed box out of 2x4’s.

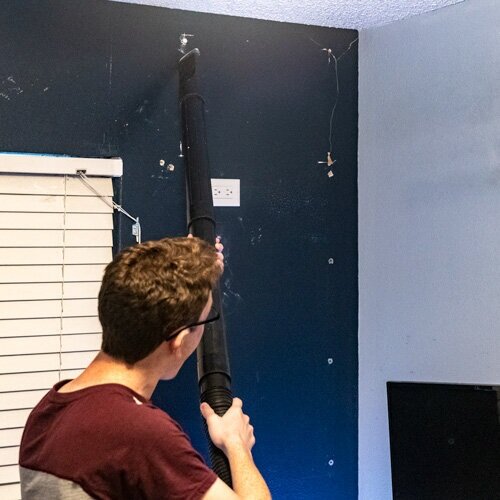
With everything framed, nice an tight I used the Oscillating Multi Tool again and rode the blade along the 2x4’s to cut a precise hole through the drywall. Jack worked the vacuum from the inside while I sawed from outside. We managed to keep from absolutely destroying his room with drywall dust.
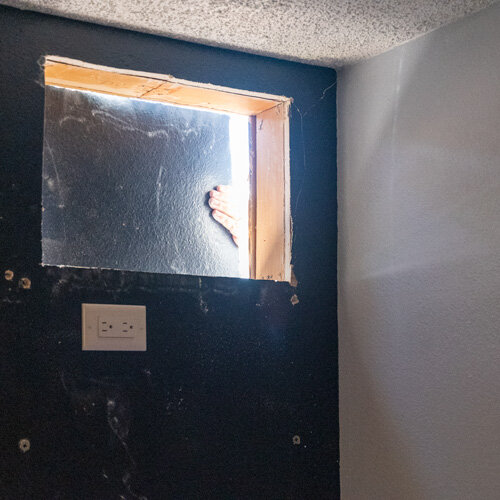
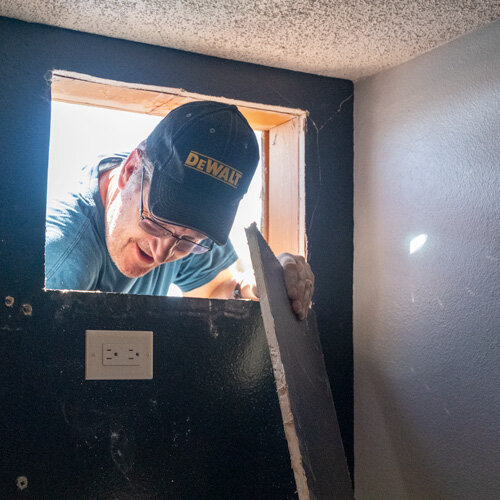
The easy part, Slip in the AC
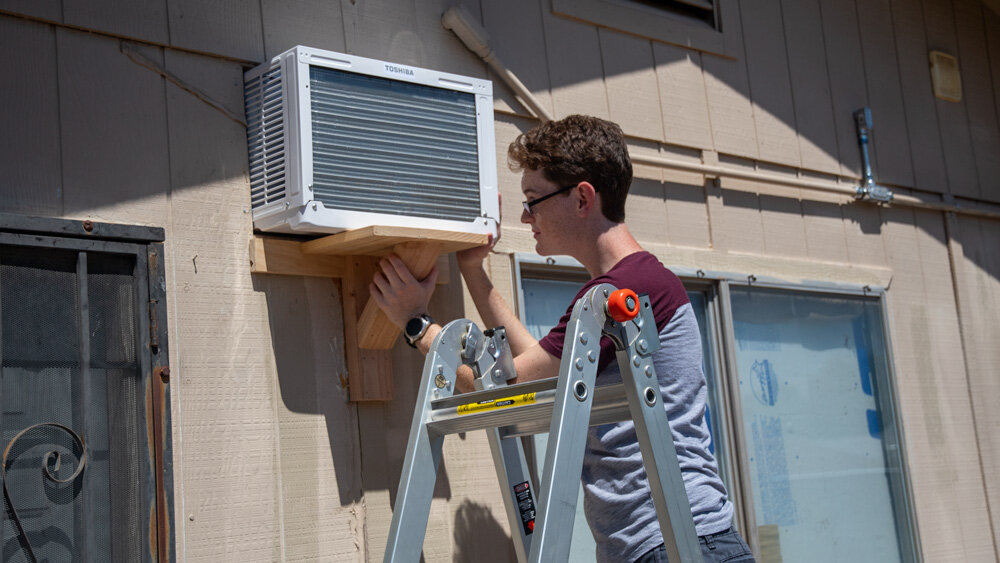
I slapped together a makeshift, wooden support bracket, planning to buy a nice, metal one later. The unit slid into place perfectly and happily sat on the shelf. Jack had to hold it in place, while I ran back to get some longer screws.
Don’t move son. I’m going to go make a sandwich.
It was still a little rough on the inside, but we’ll still trim and paint. We tucked some loose insulation around the AC, plugged it in, and fired it up.

The outside still needed a bunch of TLC too. I’d buy that nicer, metal brace to hold the unit up and get the trim painted. The paint on the house needed some attention too. It had been been about 10 years since it had been painted.
The morning sun relentlessly hammers this side, so it’s faded and, showing the old spray marks.
I figured I’d get into all that the next weekend. For now, Jack’s room was getting some AC!

See?!!! I could do it! I installed a window air conditioner without a window,..
… only I couldn’t (or shouldn’t).

“We noted an A/C unit has been installed along the side of the garage. Please remove the A/C untit per the 2010/2011 A/C Unit Enforcement Policy.”
We’d received a correction notice from the homeowner’s association.
Dammit.
Since this yarn is getting too long, I’m going to break the story here. But since you are obviously riveted and have read thus far, I’m publishing the next chapter right away: Removing a Window AC Unit Without a Window,… and installing a Window.
Oh yeah. It gets real.