

I've never added a window to a house before. The way I see it, it's another one of those required baby steps along the path from being a home renovation duffer to a full-blown DIY rock-star. I'm ready for this one,.. I think.
I'm adding this window, in my daughter's closet, to give a second means of emergency egress from her room. I'd already cleared out the closet and laid out where the rough opening for the window would be.
Because there was an ugly, exterior hose bibb that would be in the way of the window, or at least the trim, I decided I'd attack the project directly, from the outside of the house. It's just 4x8 sheets of siding anyway, easy enough to replace. I figured I could do a lot better with all the framing exposed.
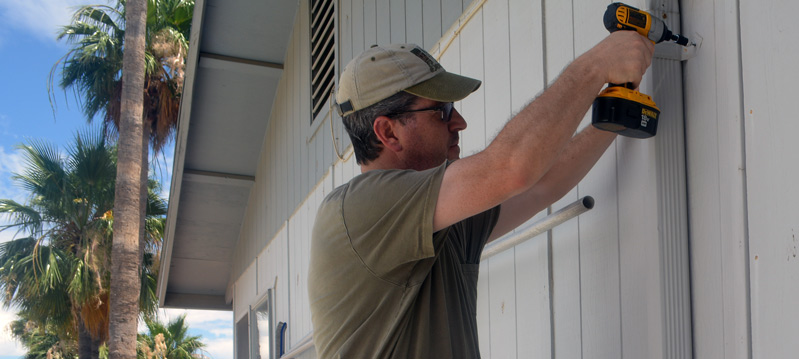
To precisely target the window on the outside of the house, I used a super-long 1/4" drill bit to punch through the wall in each of the corners of my layout. I knew roughly where it was, but wanted to be sure.

stay,.. on target,... stay,.. on target
I was careful as I pushed through the wall; I knew the waterline for the hose bib was somewhere in the vicinity. I figured it was mid-window and there was no electrical on that wall, inside or out; it should't be a problem. Unless I hit a stud, I'd be only poking through drywall, insulation, and thin T1-11 siding material. No problem, right?
Wrong.
Uuughhh...

The exit wound is only half the story.
I punched right through the damn gutter. I had planned on pulling it down temporarily to do the project; why didn't I do it before I stuck a foot-long, razor-sharp, spinning drill-bit through the wall?
Idiot.
So, the next step... is fairly self-explanatory.
You'll keep this between us,... right?
Yep. The gutter went out to curbside for bulk-trash pickup. (The pickers snatched it up in about 20 minutes.)

It was in bad shape anyway. There were several seasons of bird's nests clogging it.
If you are a regular reader, you may have noticed how ugly and worn out this side of the house is compared to the front. It's because, according to the requirements of our Strategic Doctrine of Inside - Out home renovation plan, I'd ignored it. I'd only painted the front when the Homeowner's Association told us it was time. This faded two-tone gray is the color of the house dating to the ancient times before the time we purchased it, probably the 1980's!!!
The abandoned cable TV lines adorning the place are from the lazy schmucks that nailed them to the walls in a random, wavy pattern instead of tucking them into the eves or actually running them through the attic. (Which I did later)
Next came the strips that cover the seams between the siding boards, "battens"(?)

The partial sheet of siding came off, but the new window will eat into full sheet beside it.

With the wall wide open, I changed my mind about cutting the studs in place to frame the window. Instead, I laid into them with the raw power of the mighty Stanley FUBAR and blasted them clean out of the wall in an assault of tool-fueled fury. Sure, there were small nail holes torn in the drywall, but they were a small price to pay for the pure joy of smashing something with a demolition hammer.

After that small spurt of well-mannered destruction, it was down to serious business. Even though the wall wasn't bearing much weight load here, I used a 2x6 as the window header. Not just because I wanted the added strength above the window, but also because I had one laying in the garage.

You know me by now. Any chance I get to break out the B.A.N.G (Big Ass Nail Gun), I take it. Isn't it great how you can hold something in place and BAM!, it's immediately locked in for good. I used two 2x6's and a thin sheet of plywood to build up to the width thickness of the wall studs.

The framing project went really fast, using the cordless circular saw and nail gun. It was a blessing that I was working on the north side of the house. It had the benefit of shade, with temperatures pushing past 105 degrees.

The original insulation was in really good shape, so I re-used it, cutting and tucking it into the newly formed, smaller voids.

Damn. It was a hot one. Wrapping up at the hottest time of day, I dangled my feet in the pool for a bit. I think I was extra, extra hot, because the pool didn't cool me off in the slightest.

That's where it sits for a bit. I need to pull the rest of that siding sheet on the left off and replace it with a sheet and a half, cutting the window opening as I go. I temporarily packed the window hole full of insulation and stapled plastic over it, to protect against the bizarre June rains here lately.

Next time, I'm firing up my brand-new, flame-throwin' torch and replacing that water pipe with a fresh, double-headed line. We'll be adding a brand new hose bibb (outdoor faucet,..spigot,.. thing,.. for hoses). as well as an additional water-tastic surprise. See you then!
Happy Father's Day Fellow Dads!